Arcane University: Voice Line Implementation
This guide covers how to implement voice files, starting from raw audio and ending with lip-synced lines in-game.
Contents
Introduction[edit]
What's Covered[edit]
This guide will teach you how to add voice lines to your mod or modding project. It will cover:
- Creating a voice type and adding it to your NPC.
- Taking audio submitted to you by a voice actor (or recorded yourself) and cutting it into individual files using a label track.
- Lip syncing the lines.
- Compressing them to Skyrim's ".fuz" format.
What's NOT Covered[edit]
This guide will NOT cover how to implement the dialogue itself—that is, Creation Kit entries for Dialogue Branches, Topics, TopicInfos, and so on. It is assumed for this guide that you already have all of this implemented. Guides for dialogue implementation can be found here:
Additionally, this guide will not teach you how to master the audio (Equalization, noise reduction, etc...). It is assumed that this will be done at some point prior to lip syncing & compression, although the exact point in time does not matter so much. Also, note that "Compression" in this case means "File Compression", unrelated to audio mastering.
Before You Start[edit]
What you need before starting this guide:
- The audio file(s) for the voice you will be implementing
- A script of the lines your voice actor read, ideally with filenames for each line
- You may need a spreadsheet editor, such as Microsoft Excel or OpenOffice Calc, for this. Excel is expensive, so if you don't already own it I recommend open-source software like OpenOffice or LibreOffice.
- Audacity, a free audio-editing program. You can download it here: https://www.audacityteam.org/
- FonixData.cdf for lip syncing. This specifically should be in the Data/Sound/Voice/Processing/ folder in your Skyrim directory. This file is reportedly created when the Creation Kit is installed; if not, then see here: https://www.nexusmods.com/skyrimspecialedition/mods/40971
- If you are using Skyrim Special Edition then you will need to download and install Nukem's CK fixes: https://www.nexusmods.com/skyrimspecialedition/mods/20061. (If you are using the SSE CK, you should be using this anyways—trust me.)
- Be sure to download and install "FaceFXWrapper" as well (this is a separate item on the "Files" tab of the above link). Extract the "Tools" folder to your base Skyrim directory, NOT to your Data folder.
Audio File Naming Convention[edit]
Before I get started, I want to briefly talk about voice line filenames. This isn't really a "step" in implementation, more like an explainer.
In short: Voice filenames are implicit. They are defined by the quest & topic they reside in, as well as their FormID (load-order independent). What this means is that when you have a line of dialogue in-game, you don't get to pick what audio file corresponds to it in a file selection window, the way you would for a sound effect, or the way you'd pick a mesh for a static object. Instead, when you create a line of dialogue in the Creation Kit, the filename for that line is immediately defined for you.
This also means that if any aspect of the line changes (e.g. it moves between quests, between topics, or its Form ID changes (such as during a merge)) then the assigned filename will change as well. For this reason, it is often easiest to wait until dialogue implementation is finalized before implementing the voiced lines.
The exact way that the filename is defined isn't important here, only that it's not something you get to control. (If you are interested in how it's defined, look at the "InfoFileName" function inside xEdit's "Export Dialogues" function.)
There are two main ways to find what a voice line's filename is. The first is to navigate to the Response Window and look at the "Voice Filename".

The second is to use the Creation Kit's "Export Dialogue" function. You can reach this by selecting "Filtered Dialogue" from the "Character" menu on the Creation Kit's menu bar. Then, filter for the NPC or Voice Type that you want, and click "Export Dialogue." This will create a text file in your Skyrim directory. You should open this and copy it's contents to a spreadsheet editor, such as Excel, Libre Office Calc, Google Sheets, etc... This will contain the lines, filenames, and other dialogue related information.

Alternatively, if you are a part of a larger project, that project may have it's own method of generating scripts and matching lines to filenames.
In a similar vein, the folder in which your voice lines will be placed is also implicitly defined, based on your plugin and voice type names—more on this in the next section.
Creating the Voice Type & Folders[edit]
Voice Type & Applying to an NPC[edit]
A Voice Type represents a particular voice in game and can be used across multiple NPCs. For this guide we'll consider a single NPC only.
To create a new voice type, navigate to the "Voice Type" section under "Character" on the Object Window. Right-click anywhere and select "New". This will give you a window to create the voice type:

Select the appropriate gender and name your voice type. I personally try to use a standard of:
<Mod Prefix><Gender><Voice Actor><Race>
However you could use a different standard if you'd like. Vanilla Skyrim's format tended to be:
<DLC Prefix if applicable><Gender><Description>
For example "MaleElfHaughty" or "FemaleElderly".
The "Allow Default Dialogue" checkbox governs whether NPCs with this voice type will use generic dialogue; generally this means dialogue that is not conditioned to any specific NPC or group of NPCs. Full detail on what this means can be found on the Creation Kit Wiki: https://ck.uesp.net/wiki/VoiceType
Once you have created your voice type, the next step is to apply it to your NPC. To do that, first find your NPC in the Object Window and go to edit them. On the "Traits" type, look for the "Voice Type" dropdown menu. Find your voice type and select it.

Press "Okay" and save your mod. We're now ready to move on to implementing the voice files. However, before moving on, let's quickly talk about two special cases first.
Special Case: Talking Activators[edit]
"Talking Activators" are special activators that you can... talk to. Think of things like the Augur of Dunlain, the Dark Brotherhood's Black Doors, or Daedric Princes communicating through their statues.
These talking activators use voice types as well. Like for NPCs, there is a dropdown menu to select your voice type.

Special Case: Creature Dialogue[edit]
Typically, creatures are not allowed to enter dialogue. This is a setting on the creature's race, the "Allow PC Dialogue" flag on the "General Data" tab. (See here: https://ck.uesp.net/wiki/Race for more information.)
If you want to allow dialogue for a specific creature of this race (perhaps your quest calls for a single atronach talking to the player), you need to add the "defaultAllowPCDialogueScript" to the NPC. This can be done on the Actor base object, on the placed reference, or through a quest alias.
Note that talking activators and most if not all creatures will not have lip syncing. In this case, you could skip the section of this guide regarding lip syncing and instead compress WAV files directly to FUZ.
Create Folder for Audio Files[edit]
Once your voice type is ready, you need to create the folder where your voice files will go. This is not something you get to choose, it is something that the Skyrim engine decides for you.
Navigate to your Data folder, then into the \Sound\Voice folder.

The first folder you make or use depends on what plugin the lines of dialogue belong to. For instance, if the topicinfos are existing lines in Skywind.esm, you would go into the Skywind.esm folder. If they topicinfos are new lines from your plugin, then create a new folder whose name is your plugin's name exactly. For instance, if my plugin's filename was "KM's Test Plugin.esp", then I would create a new folder named "KM's Test Plugin.esp".

Then, inside the folder for your plugin, create another new folder, where the folder name is exactly the same as the name of the voice type you created earlier. In my example above, my voice type was "fbmwMaleKm816Dunmer", so my folder will be named "fbmwMaleKm816Dunmer".

We're now ready to move on to labeling & cutting the audio files.
Track Labeling and Cutting[edit]
In this section, we will take the audio file and create a "label track" that assigns a filename to each segment of the voice actor's submission. Then, we will use the label track to create the individual audio files.
There are a few advantages to a label track vs. creating the individual files manually:
- Generally, it's just faster.
- The label track can be saved and reloaded so that its labels can easily be adjusted later.
- It allows multiple people to work on the implementation at once. For instance:
- The implementer could create the label track on the original audio while a sound engineer is simultaneously mastering the audio. Then, the implementer could load their label track onto the mastered audio to cut into individual files.
- After one implementer creates the label track, a second could check their work much more easily than if they were checking loose files.
- If an implementer needs to give up their claim for some reason, they can pass on the in-progress label track to let someone else pick up where they left off.
If you are instead handed a set of files that are already cut, then you will need to rename each individual file to match the filename prescribed by the Creation Kit. You can then skip to the next section, however it may still be useful to read the below instructions for tips on reviewing dialogue.
Creating the Label Track[edit]
This subsection covers creating the label track itself. It also assumes you are doing some level of quality control on the voice submission and gives a general procedure for this as well.
- Load up your audio file in Audacity (File → Import → Audio...), and have your script with filenames at the ready.
- Work through the audio from start to finish. You will want to zoom in to see each line clearly. For each line read in the audio recording:
- Find the row of the script that this audio segment corresponds to.
- Listen to the segment, and look for the following:
- Does the VA read the line correctly? (The NPC will be lip synced to the line exactly as it's written, so make sure they got it right!)
- Is everything pronounced right?
- Is the acting good?
- Is the sound quality good?
- If the answer to the above 4 are "yes" (or if you are not doing any quality control on the lines), then assign a label (Step 3). Otherwise, then mark down what the problem was (Step 4).
- Assign a label:
- Highlight the segment in Audacity.
- Include a small buffer of silence before and after the line. One, this helps ensure you've captured any audio that's not visible on the waveform. Two, this provides a bit of room tone immediately before the line that can be helpful when mastering the audio.
- Skywind conventionally leaves 0.5 seconds before an after each line, which later gets trimmed down after the cut files are mastered.
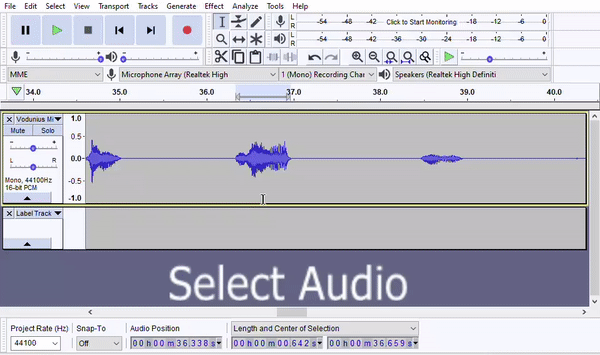
- The easiest way to apply this buffer is by using Audacity's "Length and Center" option for audio position and adding total amount of silence you want to the length. See below for an example of adding a 1-second buffer.
- Always make sure your label isn't overlapping with audio from another line.
- DO NOT add silence if there's not as much as you want. One of the main benefits of a label track is that it lets multiple people work from the same master file. If you edit the audio, then your label track will be out of sync with the source file, which could create conflicts later on.
- Add a label by pressing Ctrl+B. The first time you do this, Audacity will create a label track for you. The following times, labels will be added to the existing track.
- Use the filename of the segment for the label. If you get the filename from a spreadsheet by copy and pasting the whole cell, make sure to delete the space that the Audacity adds at the end.
- Note: It's possible to link some of the above steps into an Audacity macro, so that a single hotkey will add the silence buffer, add the label, and paste the label text. This will really speed up time.
- Optional: After you've applied the label, mark on your script in some way that the line has been labeled. For Skywind, we would highlight the line cyan.
Note: Sometimes a line will be duplicated in the script, but with different filenames, as in the figure below. If this happens, you can simply assign the multiple filenames to the same segment of audio, as shown.
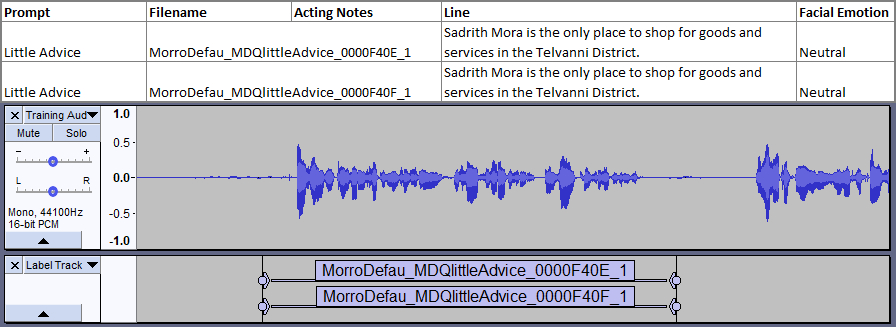
Just make sure that there aren't supposed to be any differences in the line's delivery (e.g. that there is supposed to be a normal and angry version of the same line). You could also turn the line into a SharedInfo to avoid this, but that is a topic for another guide. 😉
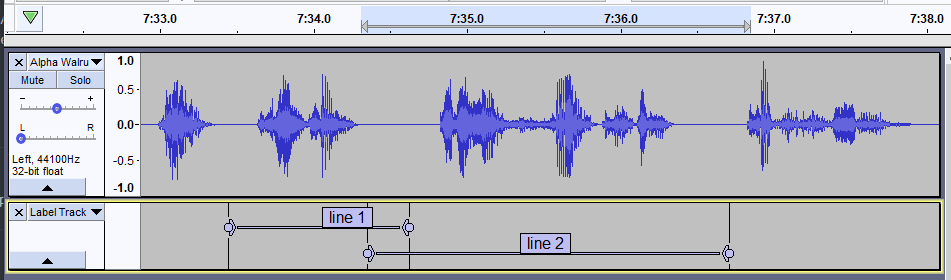
Note: It is perfectly okay for labels to share silence, as shown in the figure below.
- If there was some mistake with how the voice actor recorded the line, then you will want to request a retake from the voice actor. In that case, leave a note on the script of what the error was for when you give feedback to the voice actor later.
- For context, Skywind uses the following method:
- Go to the script, and highlight the row according to what the error was. We use green for poor acting, blue for a pronunciation problem or if the VA did not read the line exactly, yellow for a sound quality problem, and red for if the line is missing from the submission.
- For blue-coded errors, color the specific word or phrase that the VA got wrong in RED.
- Add a note to the script about what the error was. Try to be brief but descriptive and helpful.
- Once you've gone through the entire submission, save a copy of your label track. Go to File → Export → Export Labels... Give the label track an intuitive filename, for instance "Label Track - <original audio filename here>.txt".


Correcting Dialogue[edit]
When we create the lip syncing for voice lines, the lip sync will be to the line exactly as it is written. That means any small changes the VA made to the line (such as changing "cannot" to "can't") will throw off the lip syncing. If the VA did not read the line exactly as it is written, then you have two options: either ask the VA for a retake, or change the line in the Creation Kit to match what the voice actor read.
At this stage, if there are any changes to want to make in the Creation Kit, you should do so now.
- If the line in question is unique to this voice actor, then you can edit the line freely to match what the voice actor gave you.
- If instead the line is shared between multiple voice actors (often the case for generic lines and combat lines), you should duplicate the line. Then, use GetIsVoiceType conditions to make the original TopicInfo exclude your newly created voice type, and the new TopicInfo be only for your new voice type.
- Note that creating a new TopicInfo means the line will now have a new filename, so you will have to update your label track to reflect this.
- Also remember if your plugin will be merged into a larger project, that will change the TopicInfo's form ID again, and you will have to update the filenames again.
Exporting[edit]
Once your label track is finalized, we can export the audio.
First, we need to make sure we're exporting to the correct filetype. Skyrim voice lines specifically require the audio files to be 16-bit WAV files, Mono, and at 44100Hz. Audacity will tell you the sample rate, bit rate, and stereo vs. mono on the circled area below.

Ideally, either your voice actor would have submitted their lines in this format, or the sound engineer would have given you the audio in this format after mastering. In case neither of those apply, you can get the right format like so:
- To convert Stereo to Mono, use Ctrl+A to select your entire track, and then go to Tracks → Mix → Mix Stereo Down to Mono.
- To convert to 44100 Hz, use Ctrl+A to select your entire track, and then go to Tracks → Resample and select 44100 Hz. Then, set the project rate (bottom left corner of the main window) to 44100 Hz as well.
- We can directly choose to export as 16-bit, so we don't need to resample anything here to handle that.


Once we have the right format, we can export. To do this, go in Audacity to File → Export → Multiple...

You will get a window that looks like the image below.

Then,
- Choose the folder for your voice type
- Set the format to "WAV (Microsoft) signed 16-bit PCM"
- Set "Split files based on" to "Labels"
- Set "Name files" to "Using Label Track Name"
Hit "Export", and Audacity will cut your large file into the individual segments, all with the appropriate filename and in the appropriate folder.
We can now move to lip syncing.
Lip Syncing & Compression[edit]
This section covers lip syncing and compressing the WAV + lip sync data into the "fuz" format used by Skyrim (audio and lip sync data together as one file).
The Creation Kit Wiki already has a good guide on batch syncing & compression of voice files (found here: https://ck.uesp.net/wiki/How_to_generate_voice_files_by_batch), so this guide will focus on methods not covered there.
Lip Syncing[edit]
Before we start, a little bookkeeping. Lip syncing uses "Phoneme Mapping," set on an NPC's Race (https://ck.uesp.net/wiki/Race#Phoneme_Mapping), to sync the spoken line to the written line and apply to different facial movements to the NPC. It is unlikely you will ever have to edit the phoneme mapping, but should the need ever arise... now you know.
We'll cover two ways of generating lip sync data:
- Individual files through the response window.
- Batch generation.
Individual Files[edit]
Although this method is easier to learn, it is far more tedious to apply. I don't really recommend it unless you only have a handful of lines to sync. Nonetheless, it is presented here for completeness.
Once you have your voice file exported as a 16-bit, 44100Hz, mono WAV file with the proper name and in the proper folder, find the corresponding response in the Creation Kit. That is, navigate to the quest, then the tab for the proper dialogue type, then the branch, then the topic, then to the topicinfo, and finally to the response.
In the response window, you should see a list of voice types who can say the line. Select your voice type and then check the box for "From WAV". If your WAV file is the right format and in the right place, the "Generate Lip File" will become clickable.

Click "Generate Lip File", and then in your voice type's folder you should find the new lip sync file:

Batch Files[edit]
Batch lip-syncing is far more practical for mods with even moderate amounts of dialogue. There are two ways to do this.
The Creation Kit Wiki guide (again, found here: https://ck.uesp.net/wiki/How_to_generate_voice_files_by_batch) is probably the more efficient method, as it lets you specify the plugin that you are generating the lip sync for.
Alternatively, in the Creation Kit you can select "Facial Animations..." under the "Gameplay" menu on the menu bar. This will try to generate lip sync data for all voice types and dialogue in-game, regardless of whether it is from your plugin or not. So, it will likely take longer to run than the CK Wiki method.
In both methods, lip sync data will only be generated if there is a WAV file present. No lip sync data will be generated for lines with no audio or with compressed audio.
Compression[edit]
Once we have the LIP files, we want to compress the LIP and WAV together into FUZ files. We do not technically need this step, and could deliver our mod with uncompressed WAV and LIP files. But I do recommend compressing them.
If you're following the CK wiki's guide, that method includes creating the FUZ files as part of the batch process. If you're not following that guide, you will need something to convert between WAV, XMW, and FUZ. A few options for this are:
- Unfuzer (https://www.nexusmods.com/skyrim/mods/9797)
- LazyAudio (https://www.nexusmods.com/skyrim/mods/71749)
- Yakitori (https://www.nexusmods.com/skyrim/mods/73100)
I personally prefer Yakitori; other Skywind devs have used Unfuzer. The choice is yours, really, but I will use Yakitori to complete this guide.
- Open Yakitori, and set the input format to WAV.
- Click and drag your WAV files into the Yakitori window (you can even click and drag the whole folder, to make it easier.) I only have one test file for this guide, but a real mod would obviously have more.
- Set it so that the output folder is the same as the input folder.
- Set it so that LIP files are required. The window will show you for each WAV file if an associated LIP file exists.
- Exception: If these lines are for a creature with no lip syncing or for a talking activator, you can set this to "Ignore Lip" to compress the files without lip sync data.
- Set your compression bitrate. I recommend the highest option (192kbps). XWM is a lossy format, and high levels of compression will begin to sound muddy.
- Click convert. When finished, the console will display a message for the number of files converted and any errors encountered (such as bad formats or missing LIP files.)

And now, we're done! We can see the new FUZ file in our voice type's folder:

Practice Files[edit]
This tutorial has practice audio for you to try out filecutting & implementation. The contents are an audio submission (courtesy of Complete The Circuit), a script w/ filenames for cutting the audio, and a plugin (with associated archive) that contains the sample dialogue and has a NPC to test with.
Note: The plugin uses the prefix "AUVID" (Arcane University Voice Implementation Demo) on all of its forms. Look for the NPC AUVIDTestGuy in the cell AUVIDTestCell, and for dialogue in the AUVIDDialogueQuest.