Difference between revisions of "User:Gerp"
| (12 intermediate revisions by the same user not shown) | |||
| Line 1: | Line 1: | ||
| − | Hi, I'm Gerp. Here's a guide to converting a Blender mesh to a Skyrim Special Edition NIF: | + | Hi, I'm Gerp. I'm a beginner 3D student in the [[Arcane University]] programme. |
| + | |||
| + | Here's a guide to converting a Blender mesh to a Skyrim Special Edition NIF: | ||
== Blender to Skyrim SE NIF == | == Blender to Skyrim SE NIF == | ||
| − | Do not try to export directly to a NIF from Blender. Instead, we will export to an FBX file, convert it to a NIF, and then adjust it. If you get stuck, find me in the Arcane University's Discord server and ask for help. :) | + | Do not try to export directly to a NIF from Blender. Instead, we will export to an FBX file, convert it to a NIF, and then adjust it. |
| + | |||
| + | If you get stuck, find me in the Arcane University's Discord server and ask for help. :) | ||
=== Requirements === | === Requirements === | ||
| − | This is for Windows only. | + | This is for Windows only. |
| − | + | Download any of these that you do not already have, and unzip the .zip and .7z files (use [https://www.7-zip.org/a/7z1900-x64.exe 7-Zip] for .7z): | |
| − | + | ||
| − | + | * [https://www.blender.org/download/ Blender 2.83+] | |
| − | * [https://www.dotpdn.com/ | + | ** Also install it |
| − | * [https://wiki.beyondskyrim.org/wiki/File:CK-CMD- | + | * If you have textures: [https://www.dotpdn.com/downloads/pdn.html Paint.Net 4.2+] |
| + | ** Install it, too | ||
| + | * [https://wiki.beyondskyrim.org/wiki/File:CK-CMD-Stable.zip CK-CMD stable build] | ||
* [https://github.com/niftools/nifskope/releases/download/v2.0.dev7/NifSkope_2_0_2018-02-22-x64.7z NifSkope 2.0 Dev 7] | * [https://github.com/niftools/nifskope/releases/download/v2.0.dev7/NifSkope_2_0_2018-02-22-x64.7z NifSkope 2.0 Dev 7] | ||
| − | * [https:// | + | * [https://www.afkmods.com/index.php?/files/file/2398-nifutilssuite/ NifUtilsSuite 1.2.2] (requires signup to download) |
| + | ** No need to install it yet | ||
* [https://cdn.discordapp.com/attachments/312169456153526272/458674423843520512/nif.xml nif.xml] | * [https://cdn.discordapp.com/attachments/312169456153526272/458674423843520512/nif.xml nif.xml] | ||
* For unmovable Skyrim objects: [https://cdn.discordapp.com/attachments/312169456153526272/458679816682602542/Skyrim_Static.nif Skyrim_Static.nif] | * For unmovable Skyrim objects: [https://cdn.discordapp.com/attachments/312169456153526272/458679816682602542/Skyrim_Static.nif Skyrim_Static.nif] | ||
| Line 22: | Line 29: | ||
* [https://www.nexusmods.com/skyrimspecialedition/mods/4089 SSE NIF Optimizer 3.0] | * [https://www.nexusmods.com/skyrimspecialedition/mods/4089 SSE NIF Optimizer 3.0] | ||
| − | + | If you want to verify that your conversion worked (recommended), you also need to install these: | |
| + | * Skyrim Special Edition | ||
| + | * [https://store.steampowered.com/app/1946180/Skyrim_Special_Edition_Creation_Kit/ Skyrim CreationKit] | ||
| + | === Steps === | ||
| + | These are based on [https://www.youtube.com/watch?v=3f_9evNUiGU this video]. If you want, you can use that instead, check here when you run into issues, and then skip to Verification below at the end. | ||
# Make or open your object in Blender, optionally with a colour texture and/or normal map | # Make or open your object in Blender, optionally with a colour texture and/or normal map | ||
# If you have a colour texture: | # If you have a colour texture: | ||
| Line 33: | Line 44: | ||
## Resize it so the height and weight are multiples of 2 (example: 4096x4096 is OK, but 6144x6144 is not) | ## Resize it so the height and weight are multiples of 2 (example: 4096x4096 is OK, but 6144x6144 is not) | ||
## Export it to a DDS file with '''BC7/DX11+''' compression in a folder called "textures" next to the .blend file | ## Export it to a DDS file with '''BC7/DX11+''' compression in a folder called "textures" next to the .blend file | ||
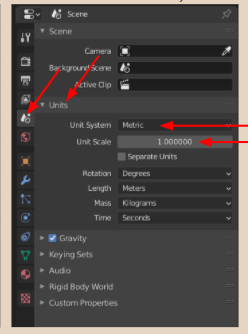
| − | # Ensure that the Blender unit scale is 1.0 and the object is the desired size in your preferred unit system | + | # Ensure that the Blender unit scale is 1.0 and the object is the desired size in your preferred unit system<br/>[[Image:Blender_scene_units.png]] |
# Duplicate the object in Blender with Shift+D and then right click to prevent moving it | # Duplicate the object in Blender with Shift+D and then right click to prevent moving it | ||
# Scale the new object in Blender 100x | # Scale the new object in Blender 100x | ||
# Apply all transforms on the large object in Blender by pressing Ctrl+A with the object selected and clicking All Transforms | # Apply all transforms on the large object in Blender by pressing Ctrl+A with the object selected and clicking All Transforms | ||
# With the large object selected in Blender, click File > Export > FBX (.fbx) | # With the large object selected in Blender, click File > Export > FBX (.fbx) | ||
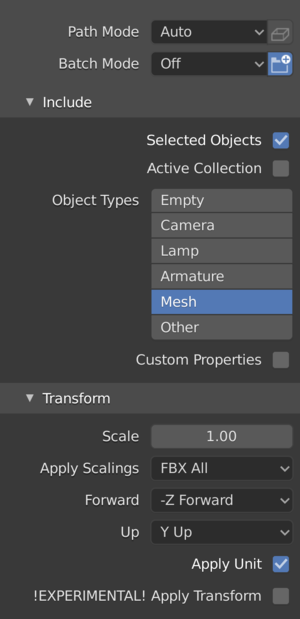
| − | # In the pane that appears, on the right side, set these options: | + | # In the pane that appears, on the right side, set these options:<br/>[[Image:Blender_export_fbx_skyrim_settings.png|300px]] |
# At the bottom of the pane, click the Export FBX button | # At the bottom of the pane, click the Export FBX button | ||
# Open the Windows command line by pressing Windows+R and entering: cmd | # Open the Windows command line by pressing Windows+R and entering: cmd | ||
# In the command line window, go to the folder with ck-cmd.exe by entering: cd <folder path> | # In the command line window, go to the folder with ck-cmd.exe by entering: cd <folder path> | ||
#* Example: cd C:\Users\gerp\Downloads\CK-CMD | #* Example: cd C:\Users\gerp\Downloads\CK-CMD | ||
| − | # On the command line, enter: ck-cmd <FBX file path> -e <FBX folder path> | + | # On the command line, enter: ck-cmd importfbx <FBX file path> -e <FBX folder path> |
| − | #* Example: ck-cmd "C:\Users\gerp\3D Models\myobject.fbx" -e "C:\Users\gerp\3D Models" | + | #* Example: ck-cmd importfbx "C:\Users\gerp\3D Models\myobject.fbx" -e "C:\Users\gerp\3D Models" |
#* This converts the FBX to NIF | #* This converts the FBX to NIF | ||
# If you have a colour texture and/or normal map: | # If you have a colour texture and/or normal map: | ||
## Open the NIF in NifSkope | ## Open the NIF in NifSkope | ||
| − | ## In the top-left panel, open all hierarchy trees, and click the | + | ## Click the model on the right |
| + | ## In the top-left panel, open all hierarchy trees, and click the BSShaderTextureSet entry<br/>[[Image:Nifskope_textures.png|300px]] | ||
## In the bottom panel, open the hierarchy tree | ## In the bottom panel, open the hierarchy tree | ||
##* If you have a colour texture: | ##* If you have a colour texture: | ||
| − | ##*# Double click the value column in the first row of the tree, and ensure that it is textures | + | ##*# Double click the value column in the first row of the tree, and ensure that it is textures\<colour texture name>.dds |
##*# Save the file, and click Yes or OK if any dialog box appears | ##*# Save the file, and click Yes or OK if any dialog box appears | ||
##* If you have a normal map: | ##* If you have a normal map: | ||
| − | ##*# Double click the value column in the second row of the tree, and ensure that it is textures | + | ##*# Double click the value column in the second row of the tree, and ensure that it is textures\<normal map name>.dds |
##*# Save the file, and click Yes or OK if any dialog box appears | ##*# Save the file, and click Yes or OK if any dialog box appears | ||
#* Note: you should now be able to see your textures on the mesh | #* Note: you should now be able to see your textures on the mesh | ||
| Line 67: | Line 79: | ||
# Click the Chunk Merge tab | # Click the Chunk Merge tab | ||
# In the Files > Target-File and Collision-File fields, open your NIF | # In the Files > Target-File and Collision-File fields, open your NIF | ||
| − | # In the Files > Template field, select Skyrim_Static.nif for immovable | + | # In the Files > Template field, select Skyrim_Static.nif for an immovable object or Skyrim_Clutter.nif for a movable one |
# In Collision Source, select Mesh data | # In Collision Source, select Mesh data | ||
# In Collision Material, select from the dropdown a type of visual and sound effects for your object colliding with things in game | # In Collision Material, select from the dropdown a type of visual and sound effects for your object colliding with things in game | ||
| − | # Click the Add Collision button | + | # Click the Add Collision button at the bottom right part of the window |
#* '''Note''': if it crashes, try making and using a simple bounding box for the Collision Source by adding a cube mesh in Blender, transforming it in Object Mode to barely contain your 100x-scale mesh, applying the transforms with Ctrl+A > All Transforms, and exporting it to FBX and converting it to NIF as above | #* '''Note''': if it crashes, try making and using a simple bounding box for the Collision Source by adding a cube mesh in Blender, transforming it in Object Mode to barely contain your 100x-scale mesh, applying the transforms with Ctrl+A > All Transforms, and exporting it to FBX and converting it to NIF as above | ||
# Copy the NIF to the same folder as SSE NIF Optimizer.exe | # Copy the NIF to the same folder as SSE NIF Optimizer.exe | ||
| Line 81: | Line 93: | ||
# Copy the NIF from the Optimizer folder to your Skyrim Data\Meshes folder (example: mine is G:\SteamLibrary\steamapps\common\Skyrim Special Edition\Data\Meshes) | # Copy the NIF from the Optimizer folder to your Skyrim Data\Meshes folder (example: mine is G:\SteamLibrary\steamapps\common\Skyrim Special Edition\Data\Meshes) | ||
# If your mesh has textures, copy those DDS files to your Skyrim Data\textures folder | # If your mesh has textures, copy those DDS files to your Skyrim Data\textures folder | ||
| + | |||
| + | === Verification === | ||
| + | If you want to see if it worked: | ||
# Open CreationKit | # Open CreationKit | ||
# Click File > Data | # Click File > Data | ||
| Line 86: | Line 101: | ||
# If you already have a mod you want to add to, double-right-click it | # If you already have a mod you want to add to, double-right-click it | ||
# Click the OK button | # Click the OK button | ||
| + | #* You can probably ignore any warnings | ||
# In the left-side list of the Object Window, select a category or subcategory that you think best describes your object | # In the left-side list of the Object Window, select a category or subcategory that you think best describes your object | ||
# In the right side list of the Object Window, find something roughly similar to your object. Right-click it and click Duplicate | # In the right side list of the Object Window, find something roughly similar to your object. Right-click it and click Duplicate | ||
| Line 98: | Line 114: | ||
#* A 3D view of the cell should appear. You can zoom with the scroll wheel, rotate around the selected object with Shift, pan with Spacebar, and focus on an object by double-clicking its name in the Cell View or pressing Shift+F for the selected object | #* A 3D view of the cell should appear. You can zoom with the scroll wheel, rotate around the selected object with Shift, pan with Spacebar, and focus on an object by double-clicking its name in the Cell View or pressing Shift+F for the selected object | ||
# Drag your new object from the Object Window to the 3D UnownedCell view | # Drag your new object from the Object Window to the 3D UnownedCell view | ||
| − | #* You should see your new object. You can move it horizontally by clicking and dragging it, and vertically by holding Z while clicking and dragging | + | #* You should see your new object. You can move it horizontally by clicking and dragging it, and vertically by holding Z while clicking and dragging. You can also rotate an object by right-clicking it and dragging, optionally holding Z, X, or C for a particular axis |
# Save your mod by clicking the Save icon button in the top left part of CreationKit | # Save your mod by clicking the Save icon button in the top left part of CreationKit | ||
# If prompted, enter a name for your mod's file name | # If prompted, enter a name for your mod's file name | ||
Latest revision as of 17:49, 9 June 2022
Hi, I'm Gerp. I'm a beginner 3D student in the Arcane University programme.
Here's a guide to converting a Blender mesh to a Skyrim Special Edition NIF:
Blender to Skyrim SE NIF[edit]
Do not try to export directly to a NIF from Blender. Instead, we will export to an FBX file, convert it to a NIF, and then adjust it.
If you get stuck, find me in the Arcane University's Discord server and ask for help. :)
Requirements[edit]
This is for Windows only.
Download any of these that you do not already have, and unzip the .zip and .7z files (use 7-Zip for .7z):
- Blender 2.83+
- Also install it
- If you have textures: Paint.Net 4.2+
- Install it, too
- CK-CMD stable build
- NifSkope 2.0 Dev 7
- NifUtilsSuite 1.2.2 (requires signup to download)
- No need to install it yet
- nif.xml
- For unmovable Skyrim objects: Skyrim_Static.nif
- For movable Skyrim objects: Skyrim_Clutter.nif
- SSE NIF Optimizer 3.0
If you want to verify that your conversion worked (recommended), you also need to install these:
- Skyrim Special Edition
- Skyrim CreationKit
Steps[edit]
These are based on this video. If you want, you can use that instead, check here when you run into issues, and then skip to Verification below at the end.
- Make or open your object in Blender, optionally with a colour texture and/or normal map
- If you have a colour texture:
- Open it in Paint.Net
- Resize it so the height and weight are multiples of 2 (example: 4096x4096 is OK, but 6144x6144 is not)
- Export it to a DDS file with BC1 compression in a folder called "textures" next to the .blend file
- If you have a normal map:
- Open it in Paint.Net
- Resize it so the height and weight are multiples of 2 (example: 4096x4096 is OK, but 6144x6144 is not)
- Export it to a DDS file with BC7/DX11+ compression in a folder called "textures" next to the .blend file
- Ensure that the Blender unit scale is 1.0 and the object is the desired size in your preferred unit system
- Duplicate the object in Blender with Shift+D and then right click to prevent moving it
- Scale the new object in Blender 100x
- Apply all transforms on the large object in Blender by pressing Ctrl+A with the object selected and clicking All Transforms
- With the large object selected in Blender, click File > Export > FBX (.fbx)
- In the pane that appears, on the right side, set these options:
- At the bottom of the pane, click the Export FBX button
- Open the Windows command line by pressing Windows+R and entering: cmd
- In the command line window, go to the folder with ck-cmd.exe by entering: cd <folder path>
- Example: cd C:\Users\gerp\Downloads\CK-CMD
- On the command line, enter: ck-cmd importfbx <FBX file path> -e <FBX folder path>
- Example: ck-cmd importfbx "C:\Users\gerp\3D Models\myobject.fbx" -e "C:\Users\gerp\3D Models"
- This converts the FBX to NIF
- If you have a colour texture and/or normal map:
- Open the NIF in NifSkope
- Click the model on the right
- In the top-left panel, open all hierarchy trees, and click the BSShaderTextureSet entry

- In the bottom panel, open the hierarchy tree
- If you have a colour texture:
- Double click the value column in the first row of the tree, and ensure that it is textures\<colour texture name>.dds
- Save the file, and click Yes or OK if any dialog box appears
- If you have a normal map:
- Double click the value column in the second row of the tree, and ensure that it is textures\<normal map name>.dds
- Save the file, and click Yes or OK if any dialog box appears
- If you have a colour texture:
- Note: you should now be able to see your textures on the mesh
- Open NIFUtilsSuite
- If you have not used the .exe file before, it will ask you for settings. In the first screen, add the files below. For the later screens, just use the defaults
- NIF.XML: nif.xml from Requirements above
- Textures: your Skyrim Data\textures folder (example: mine is G:\SteamLibrary\steamapps\common\Skyrim Special Edition\Data\textures)
- Templates: the folder with either of the Skyrim_X.nif files from Requirements above
- Default Input: wherever you generally want to put your NIFs
- Default Output: same as Default Input
- NifSkope: NifSkope.exe
- Click the Chunk Merge tab
- In the Files > Target-File and Collision-File fields, open your NIF
- In the Files > Template field, select Skyrim_Static.nif for an immovable object or Skyrim_Clutter.nif for a movable one
- In Collision Source, select Mesh data
- In Collision Material, select from the dropdown a type of visual and sound effects for your object colliding with things in game
- Click the Add Collision button at the bottom right part of the window
- Note: if it crashes, try making and using a simple bounding box for the Collision Source by adding a cube mesh in Blender, transforming it in Object Mode to barely contain your 100x-scale mesh, applying the transforms with Ctrl+A > All Transforms, and exporting it to FBX and converting it to NIF as above
- Copy the NIF to the same folder as SSE NIF Optimizer.exe
- Open SSE NIF Optimizer, and click the Optimize button
- In NifSkope, open the NIF in the Optimizer folder
- Note: the textures do not appear here. This is OK :)
- Note: if you click the red Show Collision icon button, you should see your collision wireframe in red
- Right click the mesh, and click Mesh > Update Bounds. If a dialog box appears, click Yes
- Save the file. If a dialog box appears, click Yes or OK
- Copy the NIF from the Optimizer folder to your Skyrim Data\Meshes folder (example: mine is G:\SteamLibrary\steamapps\common\Skyrim Special Edition\Data\Meshes)
- If your mesh has textures, copy those DDS files to your Skyrim Data\textures folder


Verification[edit]
If you want to see if it worked:
- Open CreationKit
- Click File > Data
- Double-click Skyrim
- If you already have a mod you want to add to, double-right-click it
- Click the OK button
- You can probably ignore any warnings
- In the left-side list of the Object Window, select a category or subcategory that you think best describes your object
- In the right side list of the Object Window, find something roughly similar to your object. Right-click it and click Duplicate
- Double-click the duplicated object
- At the top of the new window, rename the object to a single word describing your new object
- Beside the Model field, click Edit
- Beside the Model File Name field, click Edit
- Select the NIF in your Skyrim Data\Meshes folder
- You should see a properly sized and textured version of your mesh
- Click the OK button of both windows, and when a dialog box appears, click No then Yes in the next dialog box
- In the Cell View, double click UnownedCell
- A 3D view of the cell should appear. You can zoom with the scroll wheel, rotate around the selected object with Shift, pan with Spacebar, and focus on an object by double-clicking its name in the Cell View or pressing Shift+F for the selected object
- Drag your new object from the Object Window to the 3D UnownedCell view
- You should see your new object. You can move it horizontally by clicking and dragging it, and vertically by holding Z while clicking and dragging. You can also rotate an object by right-clicking it and dragging, optionally holding Z, X, or C for a particular axis
- Save your mod by clicking the Save icon button in the top left part of CreationKit
- If prompted, enter a name for your mod's file name
- Open Skyrim, and click PLAY
- In the Skyrim main menu, click MODS, and wait for them to load
- Press T and ensure that your mod is selected, then press Esc twice, and click OK if it asks you to restart the game
- You might also need to disable any mods that prevent you from spawning a new character where you want (example: Random Alternate Start)
- In the main menu, press the ~ key, which opens the console
- In the console, enter: coc unownedcell
- This starts the game inside the cell you edited in CreationKit
- You should now see your model from Blender :)