Difference between revisions of "Arcane University:NIF Data Format"
(→Texture Slots) |
(→Texture Slots) |
||
| Line 42: | Line 42: | ||
| SLOT 4 || bump map || greyscale height or parallax || none || g.dds || DXT1(=BC1) || Used for depth levels in fake layers. | | SLOT 4 || bump map || greyscale height or parallax || none || g.dds || DXT1(=BC1) || Used for depth levels in fake layers. | ||
|- | |- | ||
| − | | SLOT 5 || env. map | + | | SLOT 5 || env. map, cube map || environment (mirror), cube map || none|| e.dds || DXT1(=BC1) || Ambient metallic colour reflection of light. |
|- | |- | ||
| − | | SLOT 6 || material map || environment or reflection | + | | SLOT 6 || material map || environment or reflection map || none || m.dds or em.dds || DXT1(=BC1) || a roughness map, Black is zero reflection (organic fiber), White full (metal, ice). |
|- | |- | ||
| SLOT 7 || - map || inner layer diffuse || inner layer depth || i.dds || DXT5(=BC3) || As SLOT 1, colour and transparency | | SLOT 7 || - map || inner layer diffuse || inner layer depth || i.dds || DXT5(=BC3) || As SLOT 1, colour and transparency | ||
| Line 50: | Line 50: | ||
| SLOT 8 || sst.m. || subsurface tint outer colour || none || s.dds || DXT1(=BC1) || Adds inner colour tint (like green shimmer in a white blue glacier) | | SLOT 8 || sst.m. || subsurface tint outer colour || none || s.dds || DXT1(=BC1) || Adds inner colour tint (like green shimmer in a white blue glacier) | ||
|- | |- | ||
| − | | SLOT 9 || - || - || - || - || - | + | | SLOT 9 || - || - || - || - || - || - |
|} | |} | ||
{{note|NifSkope uses [[wikipedia:zero-based numbering|zero-based numbering]], so the first slot is Slot 0, the normal map slot is Slot 1, etc.}} | {{note|NifSkope uses [[wikipedia:zero-based numbering|zero-based numbering]], so the first slot is Slot 0, the normal map slot is Slot 1, etc.}} | ||
Revision as of 12:46, 15 July 2021
NIF stands for "NetImmerse Format," which is a file type that was created for the NetImmerse engine in 1997. This later morphed into the Gamebryo Engine (used for Morrowind, Oblivion, and Fallout 3), which in turn was the basis for the Creation Engine, used by games such as Skyrim, Fallout 4, and Fallout 76. Much more than simple 3D mesh files, Nifs can also contain complex shader and texturing information, as well as character rigs, animations, collison meshes, physics properties, and other information that is passed to the game engine. This article details the structure and workings of Nif files as they are used for Skyrim.
Contents
General NIF structure


Nifs are organized into blocks or nodes arranged in a hierarchy or "tree." Each block has various properties that define how it functions in the game.
The root node always has a block ID of 0. It is most commonly a BSFadeNode (static bodies), a NiNode (skinned rigged meshes like armors), or a BSLeafAnim/tree node (plants). The root node will usually have attached metadata blocks that activate other nif properties like animation, Havok physics, and inventory display. 3D Meshes are represented by TriShapes. The surface material is defined by a shader property block, either a Lighting Shader or an Effect Shader. Animations are defined in Controller blocks, or in child nodes of the shader property.
TriShapes
A NiTriShape can have the following child properties among others:
- NiTriShapeData: the actual mesh data (vertices, normals, tangents, UV map).
- Shader Property (BSLightingShaderProperty or BSEffectShaderProperty): holds lighting and texture information.
- NiAlphaProperty: tells the game how to handle transparency in the mesh, if any.
- BSDismemberSkinInstance: only present in skinned meshes like armor. It contains the vertex weighting to handle limbs being dismembered from the base mesh, and deform during animation.
BSTriShapes, used in Skyrim Special Edition, combine the NiTriShape and NiTriShape into a single block. They are not widely supported by nif import and export tools, and cannot be manipulated as easily within NifSkope. They can be converted back and forth by nif converter tools like Cathedral Assets Optimizer or SSE Nif Optimizer. However, most LE nifs work fine in Special Edition, and do not need to be converted.
BSLODTriShapes are the same as NiTriShapes, except that they fade out some distance away. This is used in LE to make small details on architecture nifs fade out before it is replaced with an LOD model. This block is not used in SE.
Texture Slots
Textures are the only way for you to paint your mesh and make it look the way you want which means that, apart from the mesh itself, the textures will be the single most important work. As the mesh is built using triangular faces, to know what to draw on each face, you create what are known as UV Maps in Blender or 3D Studio Max. The UV Map is where you take the geometry of your mesh and map them on to a flat plane. This way the game can project a texture back on to the mesh based on the information in this UV Map. It is therefore important to understand that when vertices are moved, they will stretch and shrink the face and can cause the texture to look strange. This is more an issue with how 3D engines work and not anything you can control. Just keep in mind and work around it if needed.
Almost all textures used by Skyrim are DDS (Direct Draw Surface) files.
The shader will apply light and effects based on 2 things:
- The BSShaderTextureSet textures.
- Flags set for the BSLightingShaderProperty. Each flag only works with a specific set of textures.

| Number | Name | RGB Channel | Alpha Channel | naming convention | suggested compression formate | Suggested creation method |
|---|---|---|---|---|---|---|
| SLOT 1 | diffuse map | diffuse map (base colour and fake ambient occlusion) | (optional) transparency map | d.dds | DXT1(=BC1) (no Alpha) or DXT5(=BC3) for RGBA, mip maps | Base Colour & additional contrast, darkness, desaturation |
| SLOT 2 | normal map | normal map (white or pink depending on compression) | greyscale specularity map (black=zero) | n.dds | DXT5(=BC3). Preferred by Bethesda for tangent space normals instead of DXT3(=BC2), mip maps | normal map similar to PBR, for specularity in your alpha channel invert a roughness map or insert a PBR specularity. Black is zero reflection, White full. |
| SLOT 3 | glow map | emissive or subsurface color | none | sk.dds | DXT1(=BC1) | White is full emission, black zero. |
| SLOT 4 | bump map | greyscale height or parallax | none | g.dds | DXT1(=BC1) | Used for depth levels in fake layers. |
| SLOT 5 | env. map, cube map | environment (mirror), cube map | none | e.dds | DXT1(=BC1) | Ambient metallic colour reflection of light. |
| SLOT 6 | material map | environment or reflection map | none | m.dds or em.dds | DXT1(=BC1) | a roughness map, Black is zero reflection (organic fiber), White full (metal, ice). |
| SLOT 7 | - map | inner layer diffuse | inner layer depth | i.dds | DXT5(=BC3) | As SLOT 1, colour and transparency |
| SLOT 8 | sst.m. | subsurface tint outer colour | none | s.dds | DXT1(=BC1) | Adds inner colour tint (like green shimmer in a white blue glacier) |
| SLOT 9 | - | - | - | - | - | - |
| NOTE: NifSkope uses zero-based numbering, so the first slot is Slot 0, the normal map slot is Slot 1, etc. |
Diffuse Map (Slot 1)
This texture is the base texture of the mesh and contains the main coloring your texture will use as well as the transparency information in the alpha channel. All other textures will only be detail additions and effects.
- Compression:
- Use DXT1 if transparency is not needed, or if only full transparency is needed.
- Use DXT5 or BC7 if the texture needs smooth partial transparency.
- Required properties:
- For Alpha Transparency: Automatically enabled for outer layer if using MultiLayer Parallax shader, otherwise requires that a NiAlphaProperty be added to the NiTriShape (right-click the NiTriShape > Node > Attach Property > NiAlphaProperty)
- NiTriShapeData > Has Vertex Colors
- NiTriShapeData > Vertex Colors
- Appearance Controller(s):
- For Alpha Transparency: NiAlphaProperty > Flags (Click the flag to view settings)
- BSLightingShaderProperty > Alpha, 0 is fully transparent (invisible), 1 is fully visible (opaque)
- Transparency Map (Alpha Channel): Black is fully transparent (invisible) (dependent on NiAlphaProperty flag settings), White is fully visible (opaque) (dependent on NiAlphaProperty flag settings)
- Transparency increases as shade approaches black (dependent on NiAlphaProperty flag settings)
- Suffix: none
Normal Map (Slot 2)
The normal map adds the illusion of depth and detail to a mesh, while keeping the poly count low. Normal maps are baked from a high poly onto a low poly model, either with xNormal or a texture program. Learn more universal information on normal maps at Mesh Maps Explained and Normal Map on Polycount Wiki.
The Alpha Channel of the Normal Map
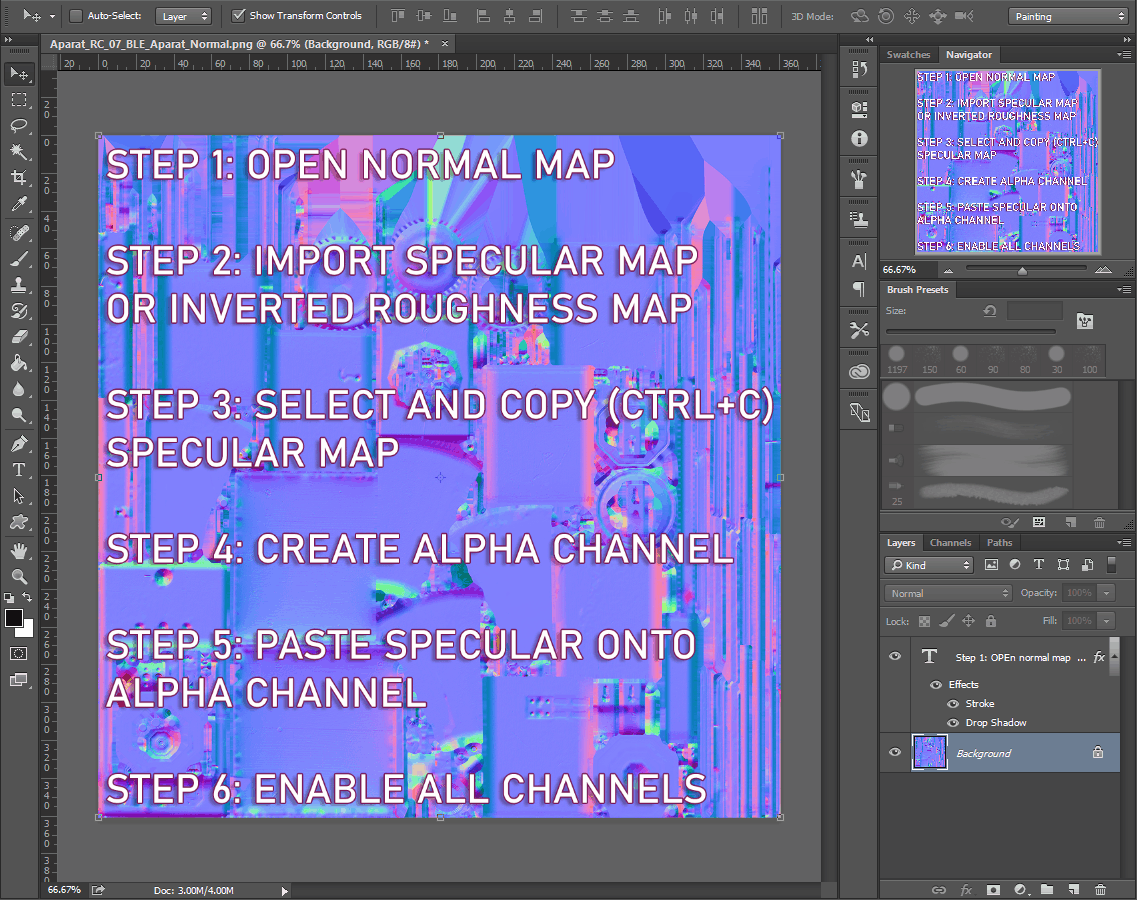
While the alpha channel in a .png image usually controls transparency, it is not the case for DDS normal maps. The alpha channel instead decides how bright or "glossy" (specularity) that part of the mesh will be in-game. The alpha channel is a greyscale map, where black is minimum intensity with no specular highlight, white is maximum intensity, and grey is a varying degree of intensity. You can use a Specular map or an inverted Roughness map as the greyscale map in the alpha channel to enable this effect. Watch how to use specular as alpha.
- Compression: Use DXT5 or BC7 because of the importance of the alpha layer in this file. Bethesda uses DXT5 in all tangent space normal maps.
- Required properties:
- NiTriShapeData > BS Num UV Sets = 4097
- NiTriShapeData > Has Normals = yes
- BSLightingShaderProperty > Shader Flags 1: SLSF1_Specular
- Appearance Controller(s)
- BSLightingShaderProperty > Specular Strength, 1 is normal intensity, Less than 1 is lower intensity, Greater than 1 is higher intensity
- BSLightingShaderProperty > Specular Color, The color of the specular highlight
- BSLightingShaderProperty > Glossiness, Glossiness is the width of the specular highlight, 10 is a wide specular highlight, 50 is a thinner specular highlight, 100 is an even thinner specular highlight; Value ranges from 0 to 999
- Suffix: _n:
Suffix: _n: Tangent Space Normal Map Also called Normal Map. Required to use the alpha layer specular map. Tangent space normal maps are easily recognized by their mostly blue appearance. Tangent space normals almost always look bluish because normals in tangent space are always considered “up” (coordinates 0, 0, 1 ), even if in world space this is not true. The normals mapped on this triangle are thus encoded, and that’s the key point, relatively to ( 0, 0, 1 ). Because most normals are majorly “up”, and since the vector ( 0, 0, 1 ) is colorized as blue-purple-ish, the result is a blue-purple-ish normal map. The benefits of tangent space maps are the removal of the restrictions imposed by World Space and Object Space normal maps. Tangent Space normal maps can rotate and deform, therefore they are ideal for characters or objects that need to have vertex deformation, like water or tree limbs.
Suffix: _msn: Model Space Normal Map
Does not have a specular alpha, SLSF1_Specular must be false. Slot 8 can contain a specular map if model space normals are used. Object Space normal maps can be moved, but the vertices of the mesh cannot be deformed or the shading is wrong. Object space normals are best for things that can move, but not deform, like swords, shields, doors, etc. Also note that the Creation Kit expects the normal map to be present for the mesh and will give an error message if not present.
Emissive (glow) Map (Slot 3)
This slot can either be used for an Emissive Map or for a Subsurface Color Map which is used in the MultiLayer Parallax section below. The Emissive Map texture will add lighting to the mesh based on a few settings being set. The game will glow any color that you use / add but ignore black making this a very easy texture to apply. However, because you need to use Emissive Color for the glow base it may wash out the texture color. You may need to try different settings for this color but it will most often work fine if you use similar colors or set Emissive Color to a greyscale color. Soft Lighting, also called wrapped diffuse adds a glow through the object to simulate light being diffused and passing through the object. Good for simulating semi-transparency on objects such as leaves. Rim lighting is only visible when light is on the opposite side of the mesh and simulates light bending around the object and lighting it at the edges.
- Compression: DXT1
- Required properties:
- BSLightingShaderProperty > Shader Type: Glow Shader
- BSLightingShaderProperty > Shader Flags 1: SLSF1_Own_Emit
- SLSF1_Environment_Mapping disabled
- BSLightingShaderProperty > Shader Flags 2: SLSF2_Glow_Map
- For Soft Lighting: SLSF2_Soft_Lighting
- For RIM Lighting: SLSF2_Rim_Lighting (Rim lighting overwrites soft lighting)
- Appearance Controller(s):
- BSLightingShaderProperty > Emissive Multiple (Glow intensity increases as emissive multiple increases)
- BSLightingShaderProperty > Emissive Color
- Soft Lighting Specific Lighting Effect 1:
Light begins in the center and higher values wrap the light further around the sides. Between 0-1 the effect also diminishes in strength such that 0.0 is completely off.
- Rim Lighting Specific Lighting Effect 2:
Light begins on the edge and moves towards the center as the value increases. The lower the number, the more edges the light catches on. The higher the number, the sharper the effect appears.
- Suffix: _g
Height / Parallax Map (Slot 4)
This slot is used for a true Height/Parallax Map, different from the MultiLayer Parallax shader. It does not function in vanilla SSE, so it requires the SSE Parallax Shader Fix SKSE Plugin, or ENB. This is a greyscale image in RGB format. Height is determined by the darkness or lightness of each pixel as follows:
- Mid grey (RGB 127,127,127) is zero depth and height, Black is maximum depth, White is maximum height.
- Compression: DXT1
- Required Properties:
- BSLightingShaderProperty > Shader Flags 1: SLSF1_Parallax
- Shader Type: Heightmap
- Suffix: _p
Environment / Cube Map (Slot 5)
Environment/Cube Maps more or less add another layer of textures and can help get a more detailed look to your mesh. Cube mapping is preferred over other methods of environment mapping because of its relative simplicity. Also, cube mapping produces results that are similar to those obtained by high quality, slow rendering, but takes much less processing power – the moderate reduction in quality is compensated for by large gains in efficiency. Also, cube mapping provides a much larger capacity to support real-time rendering of reflections relative to other mapping methods because the combination of inefficiency and viewpoint dependency severely limit the ability of these mapping techniques to be applied when there is a consistently changing viewpoint. These maps are a bit different than other one layered textures: A cube use 6 faces, counting 2 faces for each axis, xyz. Each face can be calculated with positive and negative x, y and z. They are sorted from +x, -x, +y, -y, +z and lastly -z. Each of these would be their own layer in an image editor, for instance, Gimp or Photoshop.
- Compression: DXT1
- Required Properties:
- BSLightingShaderProperty > Shader Type: Environment Map
- BSLightingShaderProperty > Shader Flags 1: SLSF1_Environment_Mapping
- BSLightingShaderProperty > Shader Flags 2: SLSF2_Glow_Map disabled
- Appearance Controllers:
- BSLightingShaderProperty > Environmental Map Scale, 1 is normal intensity, Less than 1 is lower intensity, Greater than 1 is higher intensity.
- Suffix: _e
Greyscale / metallic cube mask (Slot 6)
Environment/Cube Mask is a Greyscale Image. Simply a lighting control texture sometimes referred to as a specular map with the purpose to soften or diminish the level of light affecting the mesh reflection. Brightness of individual pixels determines the effect: white will reflect all light and black will reflect no light.
- Compression: DXT1
- Required Properties:
- An environment/cube map is required.
- BSLightingShaderProperty > Shader Type: Environment
- BSLightingShaderProperty > Shader Flags 1: SLSF1_Environment_Mapping
- Appearance Controllers:
- BSLightingShaderProperty > Environmental Map Scale, 1 is normal intensity, less than 1 is lower intensity, greater than 1 is higher intensity,
- Black is minimum intensity, environment/cube map has no effect in these areas, White is maximum intensity, Intensity increases as shade approaches white
- Suffix: _m or _em
Subsurface Tint Map (Slot 7)
This slot is also used for Inner Layer Diffuse and Inner Layer Depth maps in MultiLayer Parallax which will be detailed below. Subsurface tint maps are used for subsurface scattering. This is a rendering effect that simulates the diffusion of light inside a translucent medium. The effect can be seen as an extension on the principles of translucency and is appropriate for realistically simulating a wide range of materials including wax, marble, liquids (like milk), plant leaves, fruit, snow, and most importantly, human skin.
- Compression: DXT1
- Required Properties:
- BSLightingShaderProperty > Shader Type: Skin Tint
- BSLightingShaderProperty > Shader Flags 1: SLSF1_FaceGen_RGB_Tint
- Appearance Controllers:
- Brightness of the texture controls translucency while the game defines the underlying color (Set in the race menu.) Typically a very dark greyscale texture. Black is opaque, White is entirely transparent.
- Suffix: _s
Backlight Map (Slot 8)
Back lighting fills in the surface opposite a light. This is useful for faking translucency, like showing the bones in a dragon’s wings yet letting light bleed through the skin. The texture can be colored but like glow maps a high emissive value will wash that color out.
- Compression: DXT1
- Required properties:
- BSLightingShaderProperty > Shader Flags 2: SLSF2_Back_Lighting
- Appearance Controller(s):
- BSLightingShaderProperty > Emissive Multiple
- Glow intensity increases as emissive multiple increases
- BSLightingShaderProperty > Emissive Color
- Suffix: _b or _bl
Slot 9 (Unused)
Slot09 – Currently Unused.
Shader Types

Here you can see the available shader types of a BSLightingShaderProperty. They also need specific shader flags to be set and specific texture maps. Some are essential, others optional. These are all the available Shader Flags for Skyrim:

Commonly used in Skyrim are Default shader type (“0”) and Environment Map shader type (“1”). Green shows you those who are essential for exporting a default type mesh successfully, the minimum to be set. Pink are those commonly used additional options for Lighting, environment mapping, or weighting (rigging), glow effects. There are more advanced features like multilayer parallax, but the intention of this short tutorial is, to give people a quick and solid introduction into the rendering settings for meshes used in Skyrim, which are unlike the more recent PBR Systems. You set your mesh shader property type in BSLightingShaderProperties. Note that each NiTriShape can only have one shader type and a small range of optional shader flags and use specific controllers (properties seen below).

- The standard for the Glossiness value is 100. It ranged between 0 and 999.
- Specular Strength ranges from 0 to 10 but 2 would already be very strong, 1 being the default.
- Refraction Strength ranges from 0 to 1. 1 being absolute transparency.
- Alpha also does transparency but in a different way.
- Emissive Colour and Specular Colour are the RGB values that are shining or reflecting when looking straight at the mesh.
- UV Scale is the scaling size of the UV map. You can right-click on your mesh in the render window and chose textures / UV map and manually edit it, rotate, and scale it.
The most commonly used BSLightingShaderProperties are Default shader type (“0”) and Environment Map shader type (“1”). You set your mesh shader property type in BSLightingShaderProperties. Note that each NiTriShape can only have one shader type and a small range of optional shader flags and use specific controllers(see below). But, if needed, you can simply use multiple NiTriShapes combined on top of each other. As an example, it might make sense to split your mesh into subsections by material (metal, leather) and export each as a different NiTriShape (first sublevel) into the same mesh. Consider a leather armor for instance. I would suggest having an organic leather/cloth part (which usually absorbs light to a high degree and would use the default shader type) and the metal elements (which would reflect light stronger and profit from cube maps used in the environment map shader type).
Default Shader
- Name: Default Shader Type (0)
- used for: Assets with color, height, and specularity.
- common examples: rocks, clothes, furniture, stones, plants, sometimes metals if specularity is done in a way that can pretend metallic reflections.
- necessary slots: Slot1) base color/diffuse map AND Slot2) normal map with specularity in alpha channel (optional)
- necessary flags: those who are marked green above under shader flags, for export; and additionally what you need (vertex paint, specularity for example, if you learned how to apply these)


A House as an example and the shader flags and lighting properties.


The texture set of a default shader set, consisting of a diffuse and normal map.
Environmental Shader
- Name: Environment Map Shader Type (1)
- used for: Assets with colour, height, and specularity and additional shininess or gloss.
- common examples: Metals, Chitin, Ore, Armours, Glass, Mirrors, Ice (more stable and consistent with ENBs than parallax)
- necessary slots: Slot 1) base color/diffuse map AND Slot 2) normal map with specularity in alpha channel (optional) AND environmental/cube map (slot 5) (DTX1, see DDS Texture files for details) AND optional: an environment mask (_m or _em), that sets which areas are reflective (Slot 6)
- necessary flags: SLSF1_Environment_Mapping, SLSF2_Glow_Map disabled
- controllers: Environmental Map Scale; 1 is normal intensity, less is lower intensity, greater is higher intensity.

Dwemer armour only with slot 1 and slot 2 (diffuse and normal); Dwemer armour with additional m map in slot 6; Dwemer armour with additional cube map on top of that in slot 5.

Ice: Example of BSLightingshaderproperties controller settings. The ice profits from a detailed normal map with a spec map and the resulting specularity and gloss can be set only by these. An ice cubemap is used in slot 5, but no material map in slot 6.

A typical metal texture set for Skyrim: the rendering will make the diffuse appear much brighter. A lot of detail is being baked into the diffuse. Finally, the sword appears silver-metallic in the game engine.
For how to work on the material map for the roughness and metallic shine, see https://www.youtube.com/watch?v=DWs9rDpA5tQ
Transparency
Transparency is enabled for each NiTriShape by adding a NiAlphaProperty node.
Blending
If partial transparency is desired, "Enable Blending" must be checked.
- For Alpha Blending:
- Source Blend Mode: Src Alpha
- Destination Blend Mode: Inv Src Alpha
- For Additive Blending:
- Source Blend Mode: One
- Destination Blend Mode: One
- For Multiplicative Blending:
- Source Blend Mode: Zero
- Destination Blend Mode: Src Color
- For 2x Multiplicative Blending:
- Source Blend Mode: Dst Color
- Destination Blend Mode: Src Color
Alpha Testing
For Alpha Testing, check "Enable Testing." The Alpha Test Function sets how transparency channel grey values (0 to 255 or black to white) will be compared to the Alpha Test Threshold value to determine the threshold at which pixels with partial transparency should be rendered as completely transparent.
This setting can also be modified at the CK object reference level, allowing a single nif to have variable levels of transparency. This is used most often in Skyrim to create objects with varying levels of decay, like rugs in Nordic Tombs.
- Less or Equal: Lighter will be more transparent
- Greater or Equal: Darker will be more transparent
- Alpha Test Threshold: Value from 0 to 255 (black to white)
Color Blending
Color Blending Equation
- (Source * SourceBlendMode) + (Destination * DestinationBlendMode)
"Source" is the color of the model materials in that pixel before blending. "Destination" is the color of what is behind the model in that same pixel before blending. These two values are modified by the value of the blend mode in that same pixel, then they are added together.
Blend Modes (a.k.a. Blend Factor)
- One: multiply by one (no modification)
- Zero: multiply by zero
- Src Color: multiply by “Source”
- Inv Src Color: multiply by inverse “Source”
- Dst Color: multiply by “Destination”
- Inv Dst Color: multiply by inverse “Destination”
- Src Alpha: multiply by value of the model’s alpha channel (diffuse and vertex colors) present at that pixel
- Inv Src Alpha: multiply by inverse value of the model’s alpha channel (diffuse and vertex colors) present at that pixel
- Dst Alpha: multiply by value of the background model’s alpha channel (diffuse and vertex colors) present at that pixel
- Inv Dst Alpha: multiply by inverse value of the background model’s alpha channel (diffuse and vertex colors) present at that pixel
Effect Properties
Effect Properties are set by Bethesda, and the ability to create them without the appropriate tools are limited. However, if you understand the basic structure of nif format meshes and have NifSkope installed, it is easy to copy and paste branches to tweak and reuse the effects that you encounter in the vanilla files. There is quite a variety of usable effects, from animated textures to animated meshes over particle effects and vertex lighting. Many things can be realized with these basic effect types, given the number of controllers to modify them. Note that like with BSShaderProperties, BSEffectProperties are one level below NiTriShape Data and there can only be one of its kind in a NiTriShape, so you might want to use several NiTriShapes in your nif mesh (NiNode skinned rigs or BSFadeNode for statics) if you need several effects. The general workflow would be, similar to how you can exchange shader properties, to:
- search through meshes for an effect property that supports your vision
- copy the branch of the effect property
- remove the branch in the new mesh that is to be replaced
- paste the branch that you copied there in the NiTriShape
- tweak the controller settings (numerical values) and set up textures
- check if you can / have to sanitize the mesh with NifSkope spells
- check placement and CK implementation, Test it in-game
First Example: Glowing Lantern
Hello, Travelers, today we’re going to teach you how to make lanterns glow in Skyrim. We originally encountered problems with the way lanterns glow in Skyrim, but one of our members contributed a tutorial on how to make lanterns glow in Skyrim properly.
So, to begin you open the lanterns you want to make glow in NifSkope. Then, you select the paper’s NiTriShape Branch. In that branch, remove BSLightingShaderProperty as well as any other nodes in the branch (Especially anything with alpha layer data in it). Open one of the Dunmer lanterns which we know has a glow effect in another instance of NifSkope. Click on the paper and right-click on BSEffectShaderProperty, highlight Branch, and select Copy Branch. Go back to the lantern you want to change. Select and Right Click on the NiTriShape Branch you removed BSLightingShaderProperty from, and go to block=>paste Block. At this point you have successfully made lanterns glow in Skyrim, however it has the Dunmer texture, so click on the BSEffectShaderProperty we just copied and in the block details window scroll down to “SourceTexture” Double click on this line and put in the path for the texture you want. We now have to set the glow map not to override our color. In the flags change “SLF1Greyscale_to_palette_color” to “SLF1Greyscale_to_paletteAlpha” (This is why it’s important to delete any alpha layer data in step one as we are tricking the mesh in this step.) If you don’t like how bright your lanterns glow in Skyrim, you can adjust that in the settings down near the bottom of BSEffectShaderProperty. The result should look something like this, albeit on whatever mesh you choose.
Other Examples
- Rain Clouds (you can also emulate Thunder Storms, Animated Doors etc)

- Volcanic Smoke (you can also emulate floating textures like water, lava ...)


- Exploding Ice Chunks

Metadata
BSXFlags
The BSXFlags node goes inside of the root node of the nif. In most cases it will be the first one in the root's children. It contains a series of flags that activate different properties of the object in Skyrim. These properties can be accessed and selected by clicking the small flag icon, the total number is the sum of the selected flag values. The list of possible flags is as follows:
| Bit/Number | Name | Description |
|---|---|---|
| Bit 0 (1) | Animated | Necessary for any animation on this asset to play |
| Bit 1 (2) | Havok | Enable collision |
| Bit 2 (4) | Ragdoll | Used by skeleton nifs |
| Bit 3 (8) | Complex | Has more than one bhkCollisionObject (mutually exclusive with Bit 7: Articulated) |
| Bit 4 (16) | Addon | Necessary for any addon node (e.g. candle flame) to appear in game |
| Bit 5 (32) | Editor marker | Necessary for an editor marker on this asset to appear in the CK |
| Bit 6 (64) | Dynamic | Asset uses Havok physics (affected by gravity, can move around) |
| Bit 7 (128) | Articulated | Has a single bhkCollisionObject, or a single kinematic chain (mutually exclusive with Bit 3: Complex) |
| Bit 8 (256) | Needs transform updates | Never used in vanilla Skyrim or DLCs |
| Bit 9 (512) | External emit | Used by assets emitting light |
| NOTE: Bit 7 (Articulated) is influenced by a NiSwitchNode, if one is present. Even if multiple branches of the switch node have collision, if a single collision object or kinematic chain is to be displayed at a time, this bit will be set. |
This is a cheat sheet of some common BSXFlags values used in vanilla objects:
| Number | Use | Description |
|---|---|---|
| 130 | Statics | The player won't be able to interact with the object aside from colliding with it, e.g. Tables, fireplaces, rocks |
| 131 | Animated Statics | The same as statics, just with animations, e.g. Chests, doors |
| 194 | Clutter | Havok is activated on these objects, meaning that they have physics applied, e.g. Clutter, weapons, armor ground items |
Inventory Marker
The inventory marker (BSInvMarker) block determines the rotation and zoom of an item when viewed in the inventory. Rotation X, Y and Z specify the clockwise rotation in radians*1000 around that axis, when viewed from the positive side of that axis. The standard view (no rotations) in the inventory is viewing from the positive Y axis. Increasing the zoom value makes the item appear larger in the inventory, decreasing it makes it smaller.
Collision
- Main article: Arcane University:Mesh Collisions
Collision meshes are used to make objects solid in the Creation Engine. A nif can have a single collision mesh, or many. They can be static or moving. The collision settings are also what make the object affected by physics. They determine what parts of an object are interactable. They are typically simpler than the visible meshes, being made up of fewer vertices, since they are invisible and do not need small detail.
See Also
- Nif Implementation: Tutorials on making nifs work in Skyrim.
- DDS Data Format: Information on the DDS format, used for textures.
- BSLightingShaderProperty Basics explains further about BSLightingShaderProperty node and it's uses. Includes image examples.