Difference between revisions of "Arcane University:Adding more bones for animation support with 3DS Max"
| Line 1: | Line 1: | ||
| − | {{Trail| | + | {{Trail|Implementation}} |
This tutorial details the process of adding new bones to skeletons in nif format & adding them to their respective .hkx files for animation support. It was written by Otaar. | This tutorial details the process of adding new bones to skeletons in nif format & adding them to their respective .hkx files for animation support. It was written by Otaar. | ||
| Line 158: | Line 158: | ||
« ragdoll » preset from Havok Tools. | « ragdoll » preset from Havok Tools. | ||
What’s missing currently is the ragdoll informations, so if you follow [http://www.youtube.com/watch?v=8WGtqC49tIs&t this guide], you could probably do it all together, unless there’s more that’s missing than ragdoll collisions. I haven’t had the time to do it yet, and you’d still be missing a new behavior file with [https://www.nexusmods.com/skyrim/articles/50508/ all the text files that go along with it]. That stuff goes above my head currently, and I don’t even know how they’d interact with nemesis or Fnis. | What’s missing currently is the ragdoll informations, so if you follow [http://www.youtube.com/watch?v=8WGtqC49tIs&t this guide], you could probably do it all together, unless there’s more that’s missing than ragdoll collisions. I haven’t had the time to do it yet, and you’d still be missing a new behavior file with [https://www.nexusmods.com/skyrim/articles/50508/ all the text files that go along with it]. That stuff goes above my head currently, and I don’t even know how they’d interact with nemesis or Fnis. | ||
| + | |||
| + | [[Category:Arcane University]][[Category:Asset_Tutorial]][[Category:Arcane University-Animation]] | ||
Latest revision as of 21:27, 8 September 2023
This tutorial details the process of adding new bones to skeletons in nif format & adding them to their respective .hkx files for animation support. It was written by Otaar.
Requirements :
- 3DS Max 2015
- 3Ds Max 2010 X64 (Can be found on the internet archive for free)
- Havok Tools 2014 X64 (Can be found online or if you ask other modders)
- Havok Tools 2010 X64 (If you don’t find it, go there)
- The Nif plugin for 3DS Max 2015 (Here)
- The Nif plugin for 3DS Max 2010 (Here)
- The Autopilot Script (Here)
- The Convert UI Tool (Here)
- Nif Optimizer
- Anything to get the files you want in the game’s .BSA, if you need to...
In it’s first part, this tutorial will explain how to add more bones to a skeleton.nif, for any creature, for the game Skyrim SE. It also works for the AE version, obviously, and it might also work for LE, if that’s your thing.
The second part will cover the more important issue, which is to add the new bones to a skeleton.hkx file, in order to be able to animate them (and so that they don’t melt ingame either…).
This whole process relies on 3DS Max, which is somewhat less accessible than blender. You can still refer to this article if you want to use blender. I haven’t managed to make it work so I’m relying on good old and oh so annoying 3DS Max.
This does not cover adding bones that would be parent to the pelvis bone or COM bone. Explanation at the end.
Contents
Adding new bones to a skeleton.nif[edit]
What you’ll need :
- 3DS Max 2015.
- Havok Tools 2014.
- Niftools Max plugin for 2015.
- Autopilot script (install in [3ds directory]/scripts/startup).
- Any skeleton.nif file.
- A mesh that warrants the new bones you want to add (optional, just easier that way)
Do know that this part can be tedious, depending on how many bones you wish to add to your skeleton.
For the basics, you can watch this tutorial up until 20:30. It’s meant for HDT-SMP physics addons but the process is almost the same, aside from a few details which I will explain right below.
- You can, and I recommend, use the SE format for this part, that’ll avoid you some unnecessary concerns with the export settings.
- For an easier use, I recommend you place the meshes you want to import in the « import » folder of 3DS Max. It’s just that this version has an old search UI that’s less convenient to find anything in outside folders.
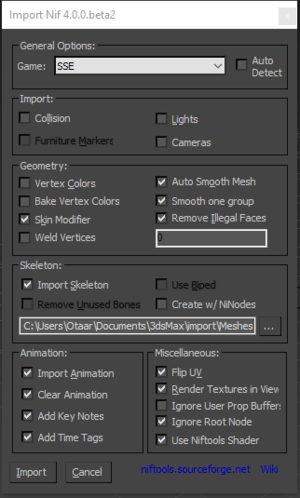
- When importing the skeleton, just make sure to tick the « import skeleton » option in the importer tool, even if the path is wrong. You shouldn’t need to correct the path either.
- You do not need to tick any of the top option in the importer (see image for reference).
- If the skeleton you import has « extra parts » (spriggan skeleton for example), you can remove them.
- If the autopilot script doesn’t work when trying to create ragdoll capsules, and a window opens with the script written in it, you need to go to « Tools » at the top of the new window, then« Evaluate line/selection » (close the window that shows up), then « evaluate all ». This will add a new autopilot window. You can then keep that new autopilot window and close the other ones. I don’t know why this happens.
- The data of the ragdoll capsule will define how your bone will move. If your bone is meant to be animated, only the constraint data will have an influence on it.
- When selecting the « constraint space » (11:40 in the video), you can simply click twice on the « rag doll » instead of pulling down the menu. Trust me, it’s way less frustrating when you have to do it so many times…
- When right clicking to select the « rotate » option, you can select the small square that’s beside it to get a new window. You can then enter values for the rotation instead of eyballing it. It’s not always useful, but it can help.
- The constraint values will determine how far your bone can move. Some good base values are
- Cone angle « 45 »
- Plane min « -70 »
- Plane max « 50 »
- Twist min « -5 »
- Twist max « 5 »
- If you don’t understand what a setting means, you can actually ask chatgpt about it. It’s common enough for it to know the correct answer.
- The export in the Havok Tools tab will tell you if you’ve forgotten to set any shape as a « convex shape ». For that, just for to the « create ragdoll » filter, select « automatically » then reselect « use physics system » and pick the default one. A message will appear telling you how many shapes are
ready and if any isn’t set a « convex shape ».
- For the export, do not select « skeleton only ». Just make sure to set the output as a « bsfadenode » in the last options, it’s all that really matters. You can export in SE or LE format, depending on if the skeleton is for physics only or for animations.
If your skeleton is for physics only[edit]
You can use the output nif as is, but 3DS Max will have removed it’s ragdoll collisions. That won’t break the game, it won’t crash (as far as i’ve tested), but it’s better for you to get the same original skeleton.nif, open both in nifskope and transfer the bones (copy branch/paste branch) from the new one to the old one.
Now do note that this step is only needed if you’ll use this new skeleton as an actual skeleton, and not for SMP physics as shown in the later half of the video.
As a side note, you have 3 options when it comes to physics :
- HDT-SMP, which requires more steps to work, as shown in the video.
- CBPC, which works on regular nodes added in nifskope, so the previous steps aren’t needed.
- Lagbone Controller, which is basically vanilla physics. You can use it to see if your bone is set up properly ingame.
Adding the new bones to the skeleton.hkx file[edit]
What you need :
- 3DS Max 2010 installed
- Havok Tools 2010 installed (it will replace the 2014 version automatically).
- Niftool Max plugin 2010.
- Convert UI
- Nif Optimizer
- The skeleton.hkx file that matches your skeleton.nif in LE format.
- Notepad++ or anything more convenient to edit xml files.
- Nif Optimizer.
Get your skeleton with it’s new bones and convert it to the LE format if it’s not done already (Nif optimizer does the job).
Then get your skeleton.hkx and place it in the « infolder » of Convert UI (create that folder if you don’t have it, as well as « Outfolder »).
Open Convert UI and click « hkx to xml ». Wait until it’s done then open your new skeleton.hkx file in the « Outfolder » with notepad++, or any text editor really…
If nothing was converted, something is wrong with your file or Convert UI is messing up, which can happen. You can get HkCmd in that case, less convenient but should at least give you the reason why it doesn’t work when converting…
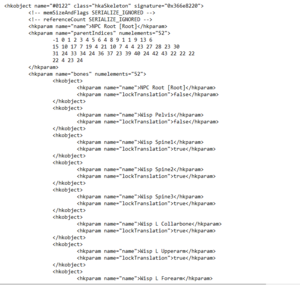
In the opened file, you can scroll a little bit until you see a list of bones (see image below).
Get any text editor and start writing down the bones in the exact order you see in the file, as in :
NPC Root [Root] Wisp Pelvis Wisp Spine1 Wisp Spine2 Wisp Spine3 Wisp L Collarbone Wisp L Upperarm Wisp L Forearm
Make sure you have no typo.
You can then add your new bones to the list, in a logical order (Bone01, Bone02…). You can use the order they’re displayed as in nifskope for that.
Once you’re done, fire up 3DS Max 2010 and import your skeleton.nif in LE format. Again, you only need to make sure you’ve ticked the « import skeleton » option.
Then, go to the Havok Tools « Export » tab, go to « File » then « preset configuration », « behavior » and pick « ragdoll.hko ».
Remove the « create tangents » and « preview tool » filters. Go to the « create skeleton » filter. In the « build rig » part, select « from file » and go pick the text file you just wrote with the list of the bones in the correct order. Make sure you tick « use file order ».
Once done, go to the « write to plateform » filter and select the output format in « win32 » and .hkx (tick around the options if you can’t select it).
Run the configuration, then grab the newly generated file and convert it to xml format with Convert UI.
Open that new file in notepad++ as well as the original skeleton.hkx file.
You now need to add several things from the new files to the original one :
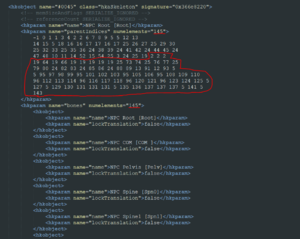
- The number underligned in the image above must be updated, it’s a count of all the bones included in the file. The new count is in the newly generated file, just copy/paste it or something…
- Add the position number of each bone (the big wall of numbers circled in red). Find where the original file stops in the new file and copy/paste anything after that.
- The bones names must be added, in the same format as seen above
<hkobject>
<hkparam name="name">Bone name</hkparam>
<hkparam name="lockTranslation">false</hkparam>
</hkobject>
You can copy/paste that part too, from the new one to the old one.
The « lock translation » parameter determines if the bone can move on an axis instead of just rotating. You can set it to true or false, it’s up to you.
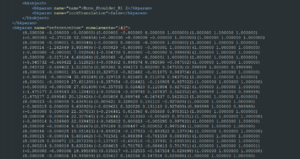
Scroll down to the end of the bones list and you’ll see a wall of values. Those are the coordinates of each bone within the skeleton.
- Once again, update the number underlined in red.
- You must also add the new coordinates of each bone from the new skeleton file to the old one. You can just copy/paste them. Just count to make sure you don’t add one too many or miss one…
Finally, you need to find this part. You can search for « mapped » and you’ll find it as the third result.
- Update the number once again.
- Like earlier, add the position number of each new bone.
Once you’re done, you can convert your modified « original file » back to hkx format with Convert UI. If it doesn’t work, that means you forgot something, look out for « / » that end lines or misplaced « spaces » etc.
And that’s it, you now have your new skeleton.hkx file, ready for use to support animations for your new bones. Don’t forget to convert it to SE format and to switch your skeleton.nif in nifskope as I explained in page 2 (If your skeleton is for physics only). Make sure you place those files in the correct folders and you’re good to go.
To go a bit further…[edit]
In theory, you can also generate a brand new skeleton.hkx file with more steps and using the « ragdoll » preset from Havok Tools. What’s missing currently is the ragdoll informations, so if you follow this guide, you could probably do it all together, unless there’s more that’s missing than ragdoll collisions. I haven’t had the time to do it yet, and you’d still be missing a new behavior file with all the text files that go along with it. That stuff goes above my head currently, and I don’t even know how they’d interact with nemesis or Fnis.


