Arcane University:Intro to Asset Implementation
Asset implementation is bringing a modelled and textured 3D model into the game. This guide assumes you have already exported mesh maps and that your low poly model is complete. This guide is for absolute beginners, and will only cover the essentials.
Different types of assets (such as armor or furniture) may add another step or require a different program. There are even different ways to implement the same type of asset, and it's mostly up to personal preference.
Contents
Terminology
If you are implementing your first ever asset into the game, you MUST read this article step by step, in the order it's written. But before we can get into the how, we must first understand the what.
What is a Nif?
In the simplest terms, NIF is the file format a 3D model must be to appear in Skyrim. You can compare it to an .obj or .fbx, except it stores much more information. You can learn more about NIFs in their dedicated article.
What is a DDS?
Similarly, DDS is the 2D image file format required for textures to appear in Skyrim. It's usually converted from .png or .tga files. Learn more about it in its dedicated article.
What is a CK record?
CK, or Creation Kit, is the program that allows us to alter Skyrim, such as adding new places, assets and quests. A Creation Kit record is stored information that the game refers to in order to know exactly what it needs to do.
For asset implementation, CK records make up a library of assets available to use in game, that level designers or implementers pick from when building levels or assigning rewards to a quest (and more).
Clutter Workflow
The general clutter workflow is: Convert textures to DDS, convert mesh to NIF, set correct properties in NifSkope and lastly, create a Creation Kit record.
Skyrim Substance Filter
 The programs you need depend on whether or not you've used the Custom Skyrim Shader for Substance Painter, as it combines the maps for you.
If you've used the filter, you only need to install Cathedral Assets Optimizer (CAO) then skip straight to 'Converting to DDS'.
No Filter
![]() If you've not used a filter, you'll need a program to manually combine maps, such as GIMP or Photoshop. The program must have an Alpha Channel (transparency support).
If you've not used a filter, you'll need a program to manually combine maps, such as GIMP or Photoshop. The program must have an Alpha Channel (transparency support).
You'll also need a tool to convert the combined maps into DDS. See a list of programs on our DDS wiki page.
 The easiest option is to use GIMP as it allows you to combine and export without downloading additional tools - but it also produces the lowest image quality, and does not export DXT10 (more on DXT10 later.)
 However, if you have Photoshop, the free and downloadable NVIDIA Texture Tools plugin produces great results. (old versions do not support DXT10)
Manually Combining Maps
A guide on how to manually combine maps is written on the AU's DDS wiki page. In the end you'll end up with a minimum of two maps: the Diffuse and Normal.
Converting to DDS
- In both GIMP and Photoshop (w/ plugin), you start by clicking "Save As (Copy)..." and selecting dds in the list.
- In CAO, navigate to the Texture tab.
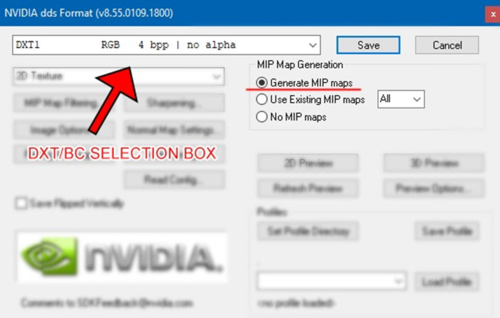
Regardless what program you use, in the EXPORT SETTINGS you may come across several options and boxes. You only have to worry about two:
- You must choose between several DXT (also called BC) alternatives in a drop down box. It can look confusing, but never fear!
For most situations you’ll need to consider only two: DXT1 and DXT5 (Skyrim LE), or DXT1 and DXT10 (for SSE). Find out which to use on the DDS wiki page. - Always generate mipmaps.
And there you go. Congratulations, the first step is complete!
Convert to Nif
There's several programs you can use to convert your mesh to NIF. For clutter items there's mainly two: CK-CMD and Niftools Blender Plugin.
CK-CMD is a standalone command prompt tool that turns any FBX into NIF. Once CK-CMD is set up, it's arguably the easiest to use of the two.
Blender Plugin is integrated with Blender, which is nice, however there's the chance it might break when Blender rolls out major updates.
Attach Collision
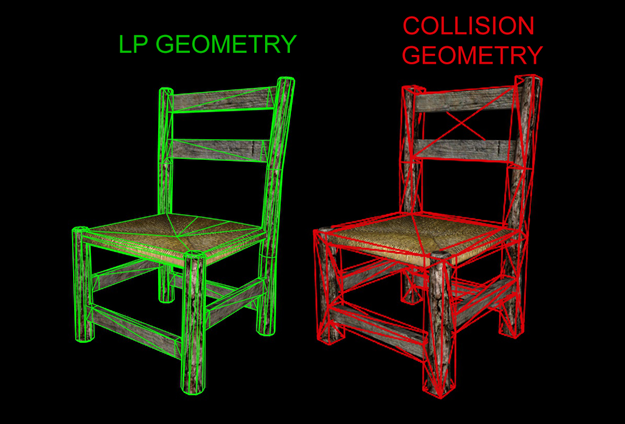
All clutter must have a collision, as a collision is what makes an object solid. The collision should usually be lower poly than the asset itself.
Before you attach a collision, you must decide on Asset Type. Scroll down to Asset Types and find out if it's clutter (a misc object or moveable static) or static. There are different ways to attach a collision, and you can do it with CK-CMD, Niftools, or in Nifskope itself. The type of collision your asset needs will differ, so read about collisions in the article and about different types of clutter.
Folder Structure
You have the DDS and NIF. Let's talk about folder structure.
On larger projects it's crucial to be organised, to make sure no assets go missing (making all your hard work wasted). Partner Projects structures may differ, but here's the basics.
Skyrim Data Folder
All assets MUST be placed in your Skyrim Data folder. Exactly where your data folder is located depends on how Skyrim was installed, but this is a typical file path: C:\Games\Steam\steamapps\common\Skyrim Special Edition\Data
Meshes and Textures Folders
Step 1: create two folders called meshes and textures directly in your Data folder.
Step 2: Within each of these, create a folder called “<name of mod>”. I'll call mine SCP.
Within the SCP folder you create another folder. The name of this folder depends on the asset you're creating, f.ex. armor, clutter, furniture, etc. If you're not sure, look at a similar vanilla asset and copy that. Folder Path Example: "textures\SCP\clutter\"
Step 3:: Within your category folder, you create the final folder; the folder for your asset.
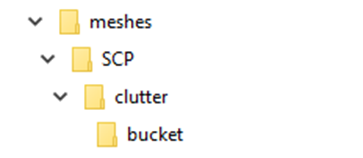 Final Folder Path Example: "meshes\SCP\clutter\bucket\" In this folder you place your .Nif file.
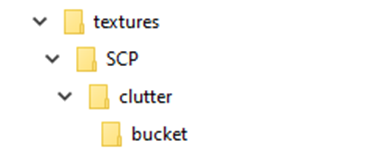 Final Folder Path Example: "textures\SCP\clutter\bucket\" In this folder you place your .DDS textures.
And there you go, it's ready for NifSkope.
NifSkope
NifSkope is used to view and edit NIF files. Nifskope is absolutely essential for asset implementation. It has a plethora of uses, but we'll focus on the absolute basics.
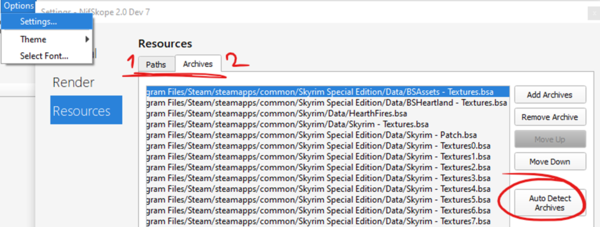
Make sure you've set up Nifskope to search Skyrim's data folder for textures and meshes.
This can be done in Options > Settings > Resources. Set up both Paths and Archives.
Attaching Textures (BSShaderTextureSet)
At the moment, your NIF is textureless. This is something we'll fix in Nifskope.
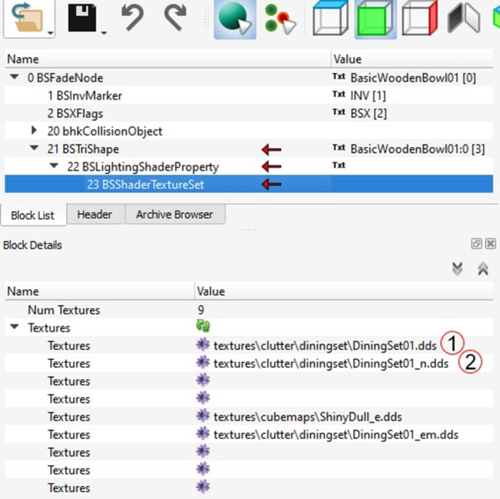
Navigate to the block called BSShaderTextureSet - view it by expanding BSFadeNode, BSTriShape then BSLightingShaderProperty.
This will open up the Texture list, where you will enter the file paths for your textures.
- No. 1 is where we will put our Diffuse map.
- No. 2 is where we will put our Normal map.
It's important that the texture file paths aren't absolute, as that creates issues when transferred to other computers. They must be relative.
YES: textures\SCP\clutter\bucket\bucket_d.dds
NO: C:\Games\Steam\steamapps\common\Skyrim Special Edition\Data\textures\SCP\clutter\bucket\bucket_d.dds
Tweaking Properties
You'll spend a fair bit of time in the BSLightingShaderProperty node. This is the main place where you assign and adjust specific properties of your asset. Play with Glossiness, Specular Color and Specular Strength and see how it affects your asset.
- Tip: Study in-game items (dds and Nifskope) to learn how to make things look good in game. You cannot export SSE Nifs as obj or into Blender. Convert it to LE.
For more information regarding NifSkope, Nifs, DDS's and textures, read NIF Data Format. This guide only touches the surface, there's much more to learn.
Creation Kit
It's time for the last part of the tutorial... creating a record in Creation Kit!
If you've not even heard about Creation Kit before now, you must first install it. To ensure you install the right version, follow the tutorial on creationkit.com. You can find various tutorials on the right hand side. If you're using Skyrim Special Edition, also install the SSE CK Fixes. Trust me.
Asset Types
Creation Kit has three different types of clutter: misc object, moveable static, and static.
The defining properties of a  Misc Object
- Objects the player can manipulate in game
- Player can pick these up and add them to their inventory
The defining properties of a  Moveable Static
- Player can manipulate/grab in game
- Player cannot add these to their inventory
The defining properties of a  Static
- Player cannot manipulate, grab, move, interact with, or otherwise influence it.
- Also includes architecture pieces and landscape pieces without animation.
You need to deduce which type fits your asset, and apply collisions and create Creation Kit records accordingly. Once you know what type your asset is, the rest is fairly easy.
When you open Creation Kit, click File > Data, enable Skyrim.esm, then click OK. It may take a couple of years to load up, make a coffee or something while you wait.
Follow Bethesda's Guide on Copying an Item. While the guide copies an amulet and not clutter, workflow applies to all assets. In essence, find an asset that's more or less identical to what you've created, copy the record, and edit the specifics.
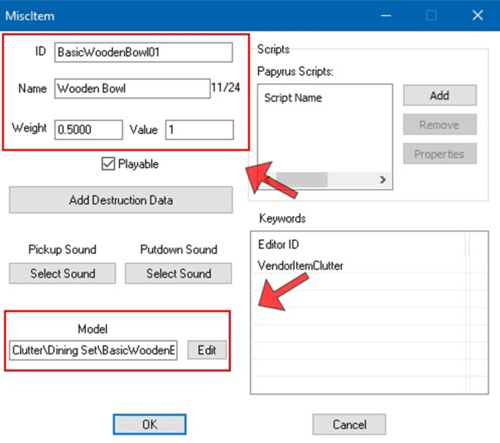
Most item windows display this information (more or less). Don't worry about Scripts, Keywords or Destruction Data, that's more advanced.
In the Model box, navigate to your NIF file in the Data folder.
And that should be it! Before you close Creation Kit, take note of the Form ID - you can see it in the Object Window.
Testing Your Asset
To test your new asset in game, open console command (the tilde key (~)) and type player.placeatme <Form ID>. If you're not sure about the Form ID of your item, you can write help <item name>, such as help wooden bowl to retrieve it.
Armor Workflow
For armor implementation workflow, watch this video by Astolf.
