Difference between revisions of "Arcane University:Animated Textures in Nif Files"
| (One intermediate revision by the same user not shown) | |||
| Line 1: | Line 1: | ||
| − | {{Trail| | + | {{Trail|Implementation}} |
This tutorial about animated textures was written by fishy in 2017. For an even more in-depth article to follow up on this one, see [https://www.nexusmods.com/skyrim/mods/47104/ FPI Animated Textures Tutorial]. | This tutorial about animated textures was written by fishy in 2017. For an even more in-depth article to follow up on this one, see [https://www.nexusmods.com/skyrim/mods/47104/ FPI Animated Textures Tutorial]. | ||
| Line 60: | Line 60: | ||
The final step I usually take is use the NifSkope spell 'Reorder Blocks' which puts everything into a nice order. After that the .nif is ready to put in-game and should include your animating texture. You can incorporate multiple animated textures, as well as include NiAlphaProperties for more complicated animations. Below is a link to the example .nif, excluding the original texture files you can use to research the techniques. As always, all questions are welcome and I'll be going back through to clean up the tutorial over time. | The final step I usually take is use the NifSkope spell 'Reorder Blocks' which puts everything into a nice order. After that the .nif is ready to put in-game and should include your animating texture. You can incorporate multiple animated textures, as well as include NiAlphaProperties for more complicated animations. Below is a link to the example .nif, excluding the original texture files you can use to research the techniques. As always, all questions are welcome and I'll be going back through to clean up the tutorial over time. | ||
| + | |||
| + | [[Category:Asset_Tutorial]] | ||
Latest revision as of 16:27, 8 September 2023
This tutorial about animated textures was written by fishy in 2017. For an even more in-depth article to follow up on this one, see FPI Animated Textures Tutorial.
Contents
Introduction[edit]
To add animations to your textures, you're going to need to become familiar with 3 new nodes in NifSkope which you won't have had to deal with before:
- BSLightingShaderPropertyFloatController
- NiFloatInterpolator
- NiFloatData
Getting to know these new nodes don't require too much effort, as they're pretty basic on their own but contain a lot of possibilities. To get started with the example, we are going to use a quick .nif I threw together for the tutorial exported straight from the 3D modelling program, no changes or tweaks at all.
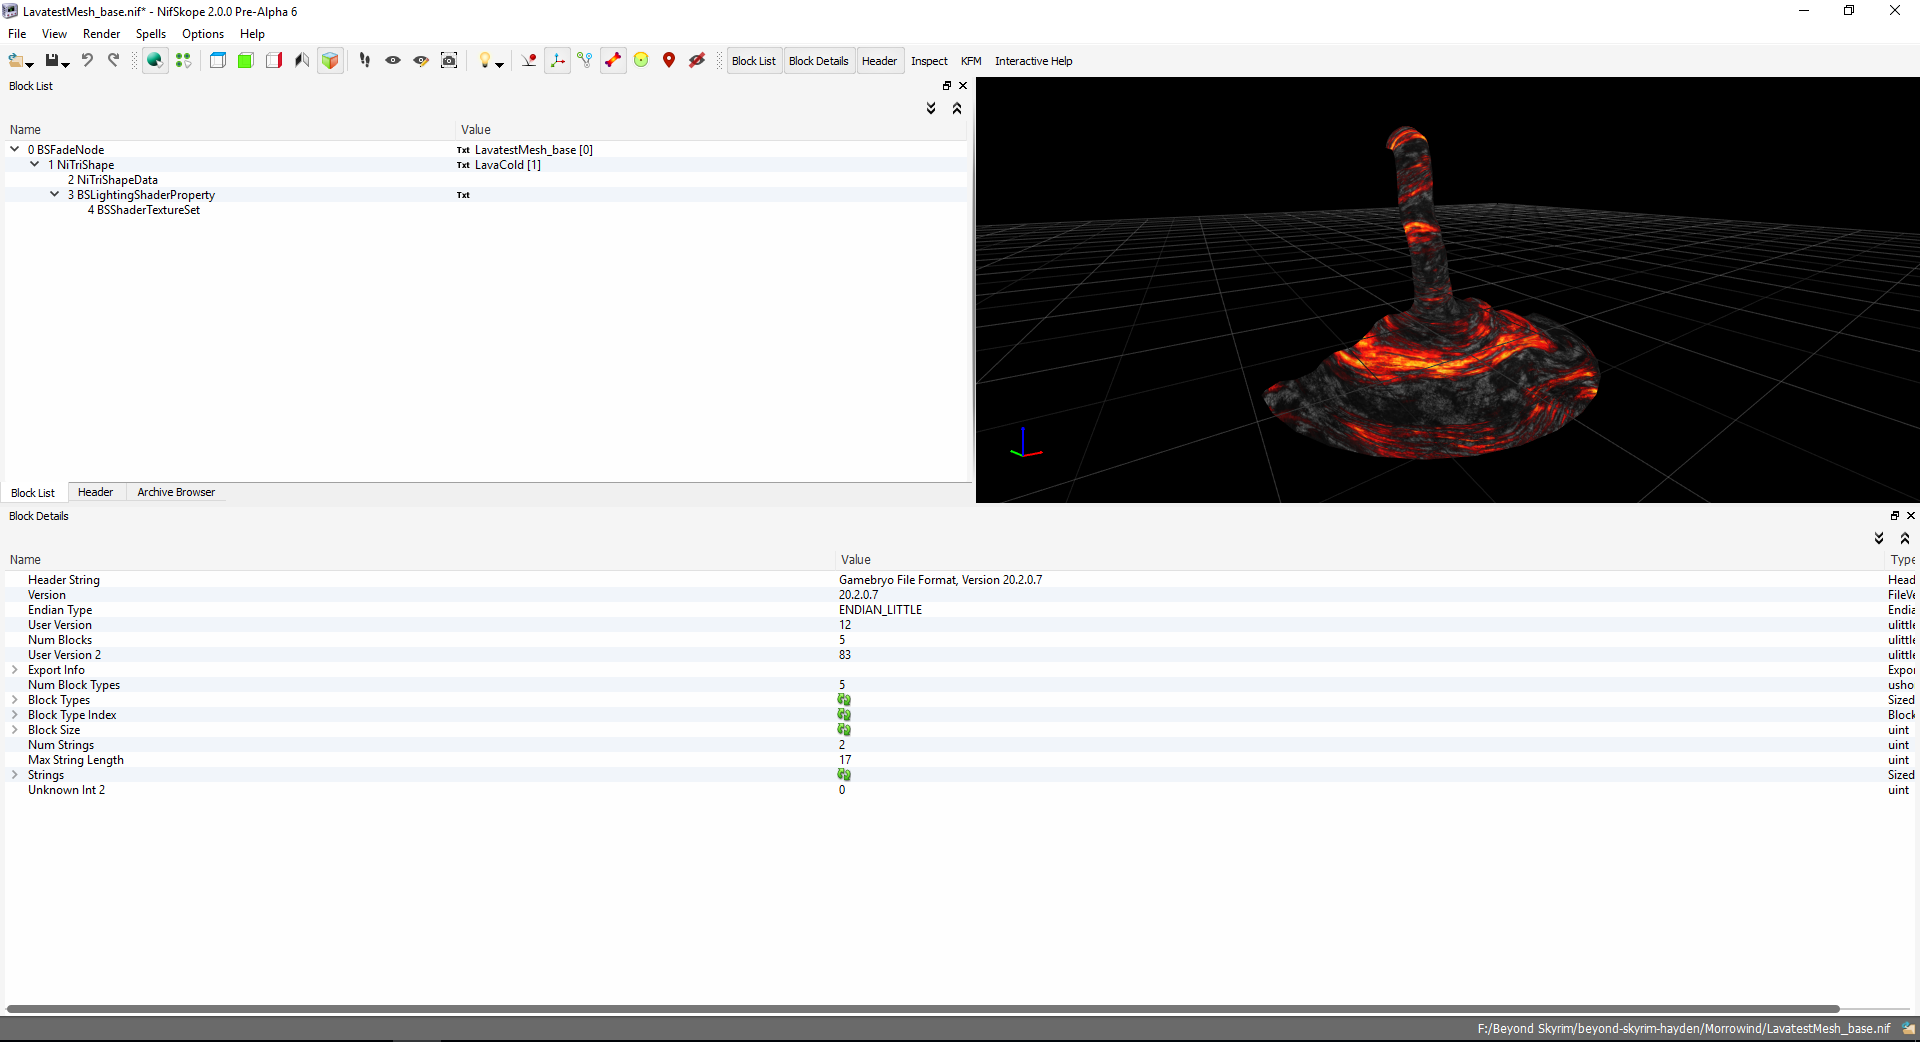
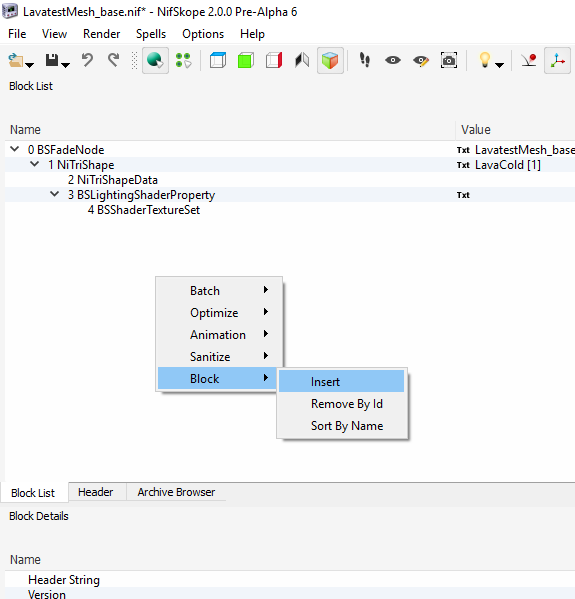
Here's our fresh .nif with the basic nodes and textures applied as you would with any other static mesh. The first changes I am going to make is to add in the new nodes we will be using to animate the texture. This can be done by right clicking in the Block List (top left) and clicking Block -> Insert.
You'll find the BSLightingShaderPropertyFloatController node under the Bethesda menu, and you can find the other two nodes under the NiF... menus. You can add these in in any order, and they should just appear in your Block List either above or below your BSFadeNode root.
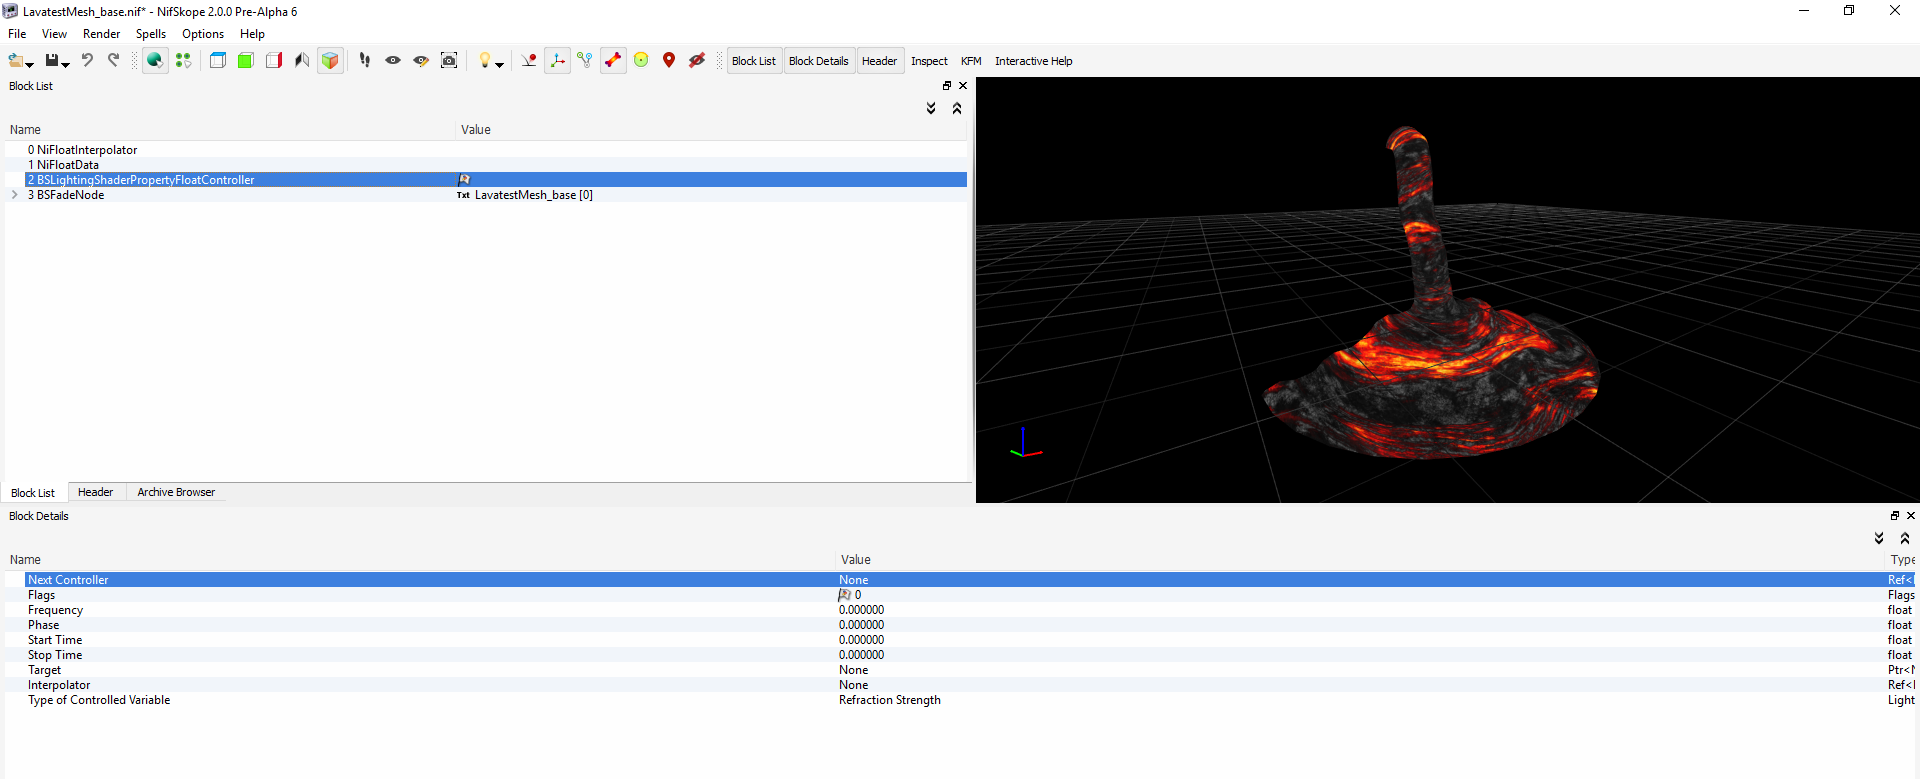
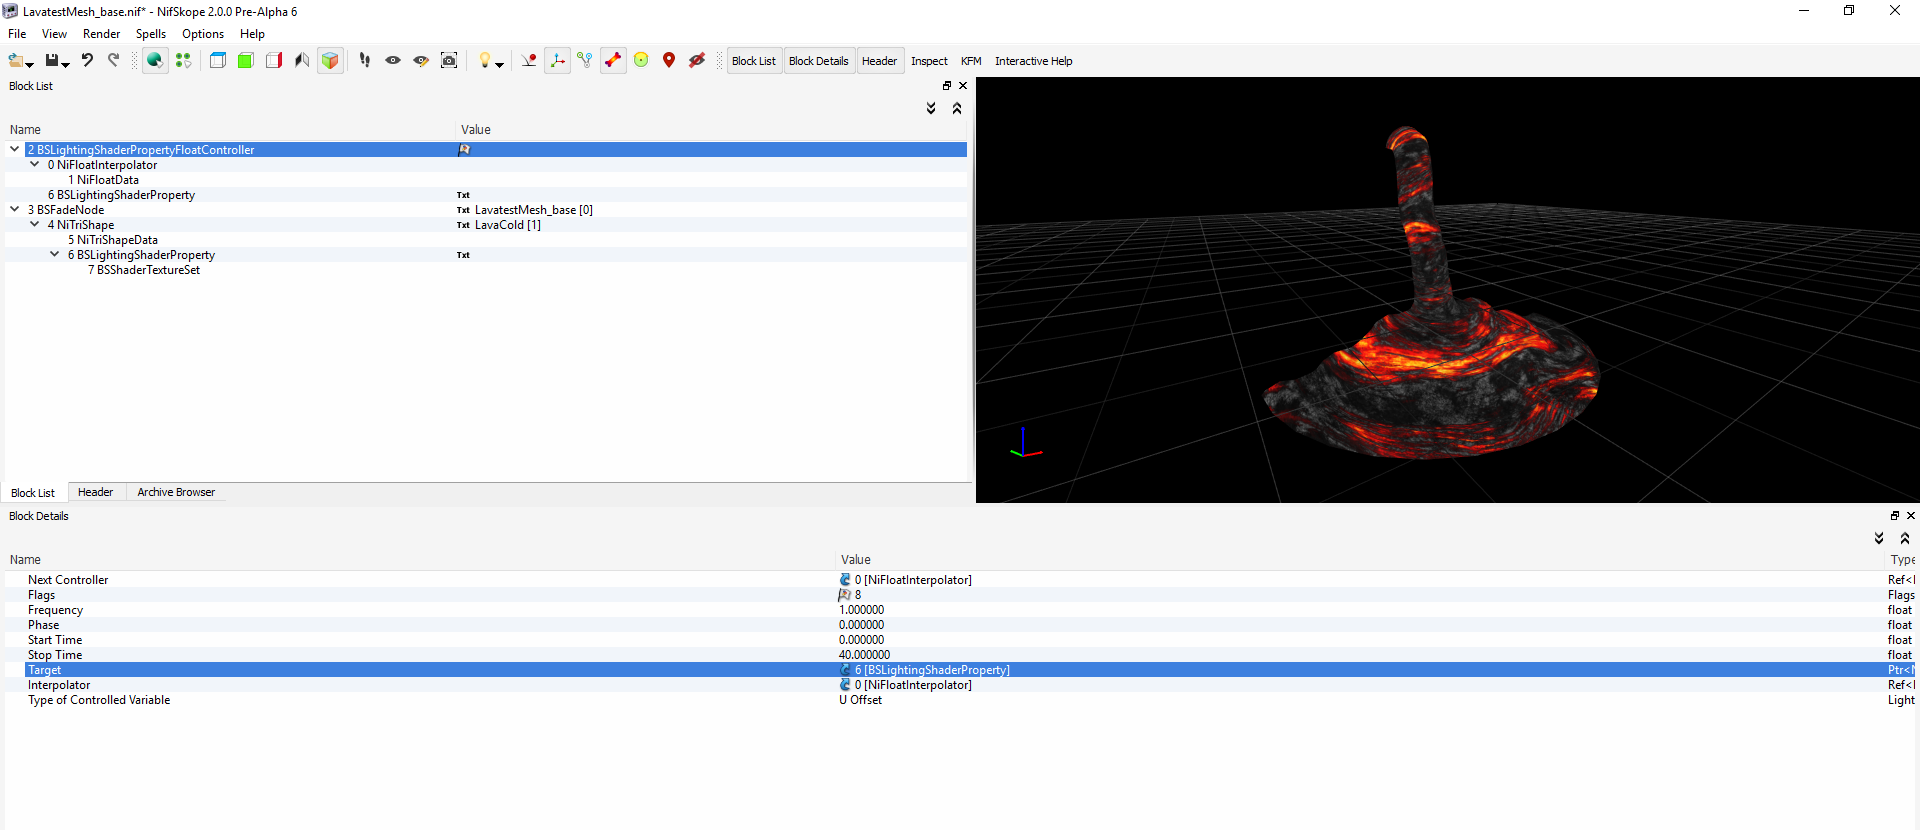
Now, the first thing we need to do is organize our new blocks. I generally start with the BSLightingShaderPropertyFloatController. When selecting the block, you can see the array of variables in the Block Details panel (bottom). From here we can link this block to the others by using the number values on the right of the block name in our Block List. The block we want within the BSLightingShaderPropertyFloatController is the NiFloatInterpolator, so to do this, I would type '0' into the 'Next Controller' value. Keep in mind that when you change the position of blocks in your tree, the numbers associated with them can also change (although if they are already linked the numbers will automatically change).
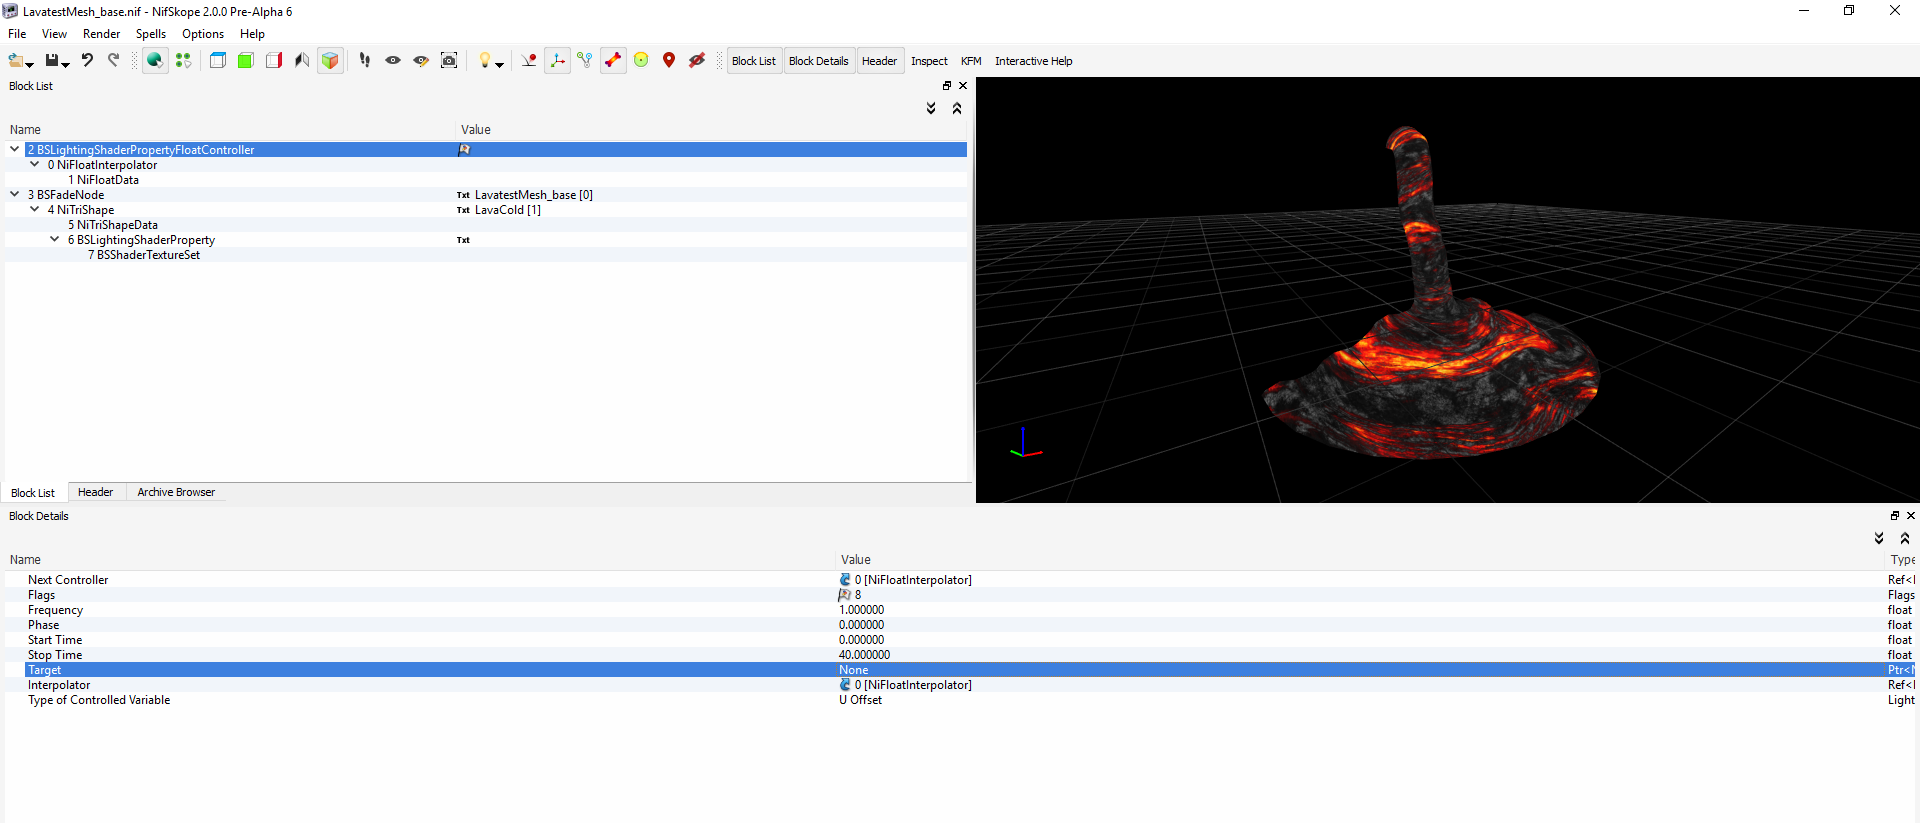
Now go ahead and edit the NiFloatInterpolator node to add the NiFloatData block into it so you have a tree similar to the above image. (BSLightingShaderPropertyFloatController -> NiFloatInterpolator -> NiFloatData)
Now I'm not going to go through every tiny detail about each of these nodes, although I will cover the basics you will need to create this animated texture.
BSLightingShaderPropertyFloatController[edit]
This node is where we tell the texture what is going to happen.
The major changes you need to make to this node after linking it up is to change the flags to active (click on the flag icon and tick Active). You will also want to change the frequency to 1, and your stop time to the full length of the texture loop (40 in my case). You can also change the Target to the BSLightingShaderProperty node in your original NiTriShape you wish this animation to effect, this will appear to create a second BSLightingShaderProperty within your NiFloatInterpolator, but you can ignore this for the time being. Your 'Type of Controlled Variable' is where you can select how you are animating your texture. There's a lot of different options so I would suggest exploring them yourself, but for the slow moving flow of this lava I'm going to change my texture to U Offset.
NiFloatInterpolator[edit]
This is the most simple node, and as long as you have linked it correctly to your NiFloatData block, you're all done with this. It acts as a bridge between the FloatController and the FloatData basically.
NiFloatData[edit]
This block essentialy controls the maths behind how the texture is going to be offset. Because we want our texture to 'flow' (or, be offset) at a steady pace, we are going to use a Linear Integration, which also means we're going to need 2 Num Keys.
- I'm not going to go into depth about the maths behind it or what's possible, these functions can be Googled and researched across various game engines
Once you have filled out your Num Keys and Interpolation values, you can click on the little green icon to refresh the 'Keys' which will give you two keys, which will be our 'start' and 'end' of the linear motion. Because we want our animation to start at time 0 and an offset of 0, we keep the first key the same.
The second key is the 'end' key, which is where the animation will then go back to your starting key to loop. The 'value' is how much the texture has been offset by since the loop started. If you are using a tileable texture, you will want this value to be 1 (or -1 to move in the opposite direction), so it has gone through 1 whole 'tile' of the texture. The time is how much time has passed in the animation, which we generally want to be the same as our Stop Time we set earlier in the BSLightingShaderPropertyFloatController, to give us a nice smooth loop.
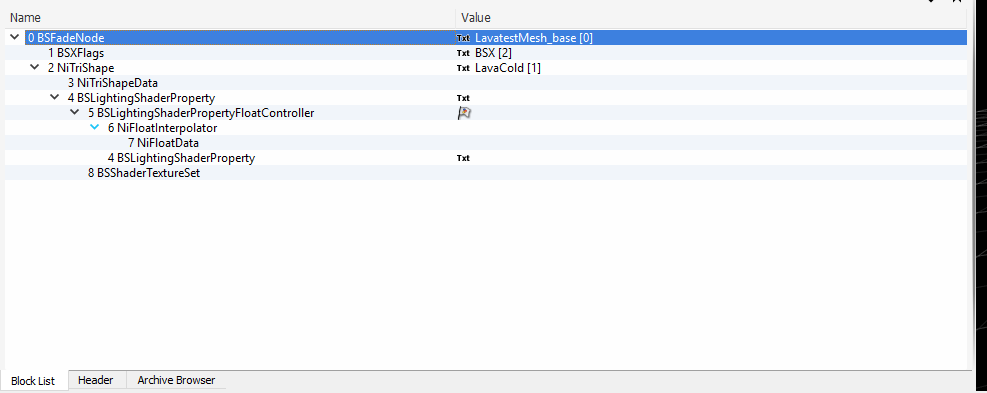
The final steps to get the mesh ready for in-game is to go into our original BSLightingShaderProperty (the one in the NiTriShapeData) and find the 'Controller' data. This is where we can link the controller and all of it's nodes to our original mesh. Fill in the Controller value and your block tree should change so you only have your BSFadeNode as your Root Node and nothing outside of it. We can then right click on our BSFadeNode and go 'Add Extra Data', adding a BSXFlags into our .nif if it didn't have one already. You'll need to edit the flags in the BSXFlags to make sure you have the 'animated' flag ticked.
The final step I usually take is use the NifSkope spell 'Reorder Blocks' which puts everything into a nice order. After that the .nif is ready to put in-game and should include your animating texture. You can incorporate multiple animated textures, as well as include NiAlphaProperties for more complicated animations. Below is a link to the example .nif, excluding the original texture files you can use to research the techniques. As always, all questions are welcome and I'll be going back through to clean up the tutorial over time.
