Difference between revisions of "Arcane University:Armour/Clothing (2D)"
m (→Hot Tips) |
|||
| (4 intermediate revisions by the same user not shown) | |||
| Line 7: | Line 7: | ||
Be sure to read our '''main [[Arcane_University:Concept_Art|Concept Art]] page''' for an overview of the basic workflow, expectations, and technical information needed for ''any'' claim. This page is additional reading. | Be sure to read our '''main [[Arcane_University:Concept_Art|Concept Art]] page''' for an overview of the basic workflow, expectations, and technical information needed for ''any'' claim. This page is additional reading. | ||
| + | |||
==Armor and Clothing== | ==Armor and Clothing== | ||
| Line 26: | Line 27: | ||
[[File:Skyrim Equipment Areas.png|thumb]] | [[File:Skyrim Equipment Areas.png|thumb]] | ||
| − | Armor and clothing consists usually of 4 separate pieces. Shoulder pads | + | Armor and clothing consists usually of 4 separate pieces. Shoulder pads are usually included on the body armor. |
*Helmet: covers your head | *Helmet: covers your head | ||
| Line 36: | Line 37: | ||
| − | + | ===Ideations=== | |
| + | It's recommended that you '''block out and clarify the major shapes''' for example jacket, pants, boots, gauntlets, etc. when concepting complicated, overlapping shapes. Use lineart and a range of values to separate parts of the armor from eachother. Try to avoid drawing too many secondary or tertiary details. You may draw ideations on the in-game model turnaround, or free hand - whichever feels better to you. As long as you keep proportions in mind! | ||
| + | ===Finished Sheet=== | ||
In the finished concept art sheet, Armor and clothing claims require a turnaround with ''front and back views at a minimum''. Ideally, a side view without the arm showing would be included to show side details along the body. A ¾ view may also be included as a [[Arcane_University:2D_definitions#Render|rendered]] version to show the materials of the clothing or armor, though this may also be done with the front view. If done with the front view, be sure to include a flat-colour non-rendered version additionally so it’s easier for the modeler to see. | In the finished concept art sheet, Armor and clothing claims require a turnaround with ''front and back views at a minimum''. Ideally, a side view without the arm showing would be included to show side details along the body. A ¾ view may also be included as a [[Arcane_University:2D_definitions#Render|rendered]] version to show the materials of the clothing or armor, though this may also be done with the front view. If done with the front view, be sure to include a flat-colour non-rendered version additionally so it’s easier for the modeler to see. | ||
| − | If any parts of the clothing or armor are very detailed or intricate, a close-up shot should be included to allow the 3D modeler to get a better idea of the details and materials. | + | If any parts of the clothing or armor are very detailed or intricate, a close-up shot should be included to allow the 3D modeler to get a better idea of the details and materials. Also see [[Arcane_University:2D_definitions#Designs_/_Patterns|Design Alpha]]. |
| + | |||
==Hot Tips== | ==Hot Tips== | ||
| − | *Make use of the supplied turnaround sheets of the in game models. You can find these in the # | + | *Make use of the supplied turnaround sheets of the in game models in your finished sheet. You can find these in the #concept-art discord channel on the AU. These turnarounds are models extracted from the game, and using these will make sure you actually draw the correct proportions - thus making it easier for the 3D artist to do their job. The in game humanoid models range in size, 0 being skinniest and 1 being big and bulky. '''Draw the design on the 0 models''', as it's easier for the 3D modeller to use. |
*To create good armour and clothing, you need to know how real life cloth and armour works. Study cloth, folds and fashion. | *To create good armour and clothing, you need to know how real life cloth and armour works. Study cloth, folds and fashion. | ||
Latest revision as of 12:44, 27 April 2021
In concept art (specifically in Skyrim modding) there are a variety of types of claims (or categories) you may encounter and choose to concept. Not all categories can be designed and presented the same way and they are often subject to different expectations.
Note that the information you read here might not apply to projects outside of Beyond Skyrim, or even within Beyond Skyrim - a project's art lead may have their own way of doing things. Be sure to clarify what their expectations are if you are unsure. But as a whole, if you follow these guidelines, you’ll be creating good Skyrim modding concept art.
Be sure to read our main Concept Art page for an overview of the basic workflow, expectations, and technical information needed for any claim. This page is additional reading.
Armor and Clothing[edit]
Armor and clothing are typically medium difficulty claims, though some may be hard.
The contents of an Armour concept art sheet varies depending on the design, but you must have:
- Your name (from the start)
- Claim name (from the start)
- A Turnaround
- Notes regarding the design that can't be explained visually
- Material image references
- Optional: Additional orthographic views
- Optional: Rendered view
- Optional: Detail shots and design alphas
- Optional: Project logo
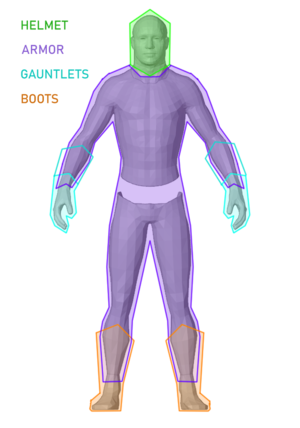
Armor and clothing consists usually of 4 separate pieces. Shoulder pads are usually included on the body armor.
- Helmet: covers your head
- Armor: covers your legs, chest and shoulders
- Gauntlets: covers your hands up to your elbow
- Boots: covers your feet and ankles
You may need to submit your concept with each of these pieces separate from each other, depending on your concept.
Ideations[edit]
It's recommended that you block out and clarify the major shapes for example jacket, pants, boots, gauntlets, etc. when concepting complicated, overlapping shapes. Use lineart and a range of values to separate parts of the armor from eachother. Try to avoid drawing too many secondary or tertiary details. You may draw ideations on the in-game model turnaround, or free hand - whichever feels better to you. As long as you keep proportions in mind!
Finished Sheet[edit]
In the finished concept art sheet, Armor and clothing claims require a turnaround with front and back views at a minimum. Ideally, a side view without the arm showing would be included to show side details along the body. A ¾ view may also be included as a rendered version to show the materials of the clothing or armor, though this may also be done with the front view. If done with the front view, be sure to include a flat-colour non-rendered version additionally so it’s easier for the modeler to see.
If any parts of the clothing or armor are very detailed or intricate, a close-up shot should be included to allow the 3D modeler to get a better idea of the details and materials. Also see Design Alpha.
Hot Tips[edit]
- Make use of the supplied turnaround sheets of the in game models in your finished sheet. You can find these in the #concept-art discord channel on the AU. These turnarounds are models extracted from the game, and using these will make sure you actually draw the correct proportions - thus making it easier for the 3D artist to do their job. The in game humanoid models range in size, 0 being skinniest and 1 being big and bulky. Draw the design on the 0 models, as it's easier for the 3D modeller to use.
- To create good armour and clothing, you need to know how real life cloth and armour works. Study cloth, folds and fashion.

