Difference between revisions of "Arcane University:Blender 2.7x Export"
m (Removed extra equals signs left over by headings from moving.) |
(Changed NifUtilSuite link to afkmods one (Google drive link was no longer available)) |
||
| (11 intermediate revisions by 3 users not shown) | |||
| Line 1: | Line 1: | ||
| − | + | {{Trail|3D Art|Mesh Export to NIF}} | |
| + | Here we cover the basics of exporting statics from Blender 2.7+ to a Skyrim [[AU: NIF Data Format| .NIF file]] as well as explain what does what when it comes to exporting. Using a version of Blender that's 2.8 or higher? Base your workflow on [https://wiki.beyondskyrim.org/wiki/Arcane_University:Blender_2.8%2B_Export Blender 2.8+ Export] instead, though it'll refer back here multiple times. | ||
| + | |||
| + | The Blender Plugin method may take a little more work to get set up, but once it is you can export directly to Skyrim with as little messing around in NifSkope as possible. This allows you to quickly test small changes to your static models with little hassle. It will be assumed that you have a basic knowledge of Blender, and this tutorial will only be covering the Blender to .nif exporting for static models with collisions. | ||
| + | |||
| + | This tutorial will not be covering loading these models/placing them into the Creation Kit, nor any modelling techniques. The Blender Nif Plugin can also not work with SSE NIFs, so to import/export those, you need to also use [https://www.nexusmods.com/skyrimspecialedition/mods/4089 SSE NIF Optimizer], which can convert between the two formats. | ||
== Getting Started == | == Getting Started == | ||
| Line 6: | Line 11: | ||
* [https://github.com/niftools/nifskope/releases NifSkope] | * [https://github.com/niftools/nifskope/releases NifSkope] | ||
* [https://github.com/niftools/blender_nif_plugin/releases Blender Nif Plugin] | * [https://github.com/niftools/blender_nif_plugin/releases Blender Nif Plugin] | ||
| − | * [https:// | + | * [https://www.afkmods.com/index.php?/files/file/2398-nifutilssuite/ NifUtilSuite] (contains ChunkMerge for collision) |
* [https://www.blender.org/download/previous-versions/ Blender 2.7x] (as 3d Program to work with) | * [https://www.blender.org/download/previous-versions/ Blender 2.7x] (as 3d Program to work with) | ||
* a .nif file to use as a template when using ChunkMerge. | * a .nif file to use as a template when using ChunkMerge. | ||
| Line 33: | Line 38: | ||
If you have not done so throughout your modeling process, you will need to create a material for each object. You can only have one material per object or your export will fail. So create a new material and play around with some of the settings. There are some Nif settings down the bottom, but they don’t need to be changed in this tutorial. For more information on how the material settings and your nif settings are linked, see [[#Overview of Plugin Options|Overview of Plugin Options]] & [[#Material Settings|Material Settings]] | If you have not done so throughout your modeling process, you will need to create a material for each object. You can only have one material per object or your export will fail. So create a new material and play around with some of the settings. There are some Nif settings down the bottom, but they don’t need to be changed in this tutorial. For more information on how the material settings and your nif settings are linked, see [[#Overview of Plugin Options|Overview of Plugin Options]] & [[#Material Settings|Material Settings]] | ||
| − | Now | + | Now go to the Texture tab, which looks like a checkered square, by default it is on the right of the Materials tab [[File:BlenderExp7.jpg|BlenderTextureTab]]. |
| − | This is where | + | This is where you actually get to apply your textures, you can also apply your normal maps, etc. here was well. Once your texture is loaded up, scroll down to Mapping section and select Map – UVMap. You should do this for every single texture on every single object or else your export will fail. Another thing worth mentioning is that you need to have all of your textures in a folder that has a folder named ‘textures’ in it’s file structure if you don’t want to get any errors. If you don’t, you will receive some errors, but your .nif will still export. |
[[File:BlenderExp8.jpg|BlenderMapping]] | [[File:BlenderExp8.jpg|BlenderMapping]] | ||
| Line 59: | Line 64: | ||
| − | Now we can save that, close down NifSkope and open up NifUtilSuite! | + | Now we can save that, close down NifSkope and open up NifUtilSuite! For files needed to set up NifUtilSuite and for use as template, NIF, see [[File:Chunkmerge_Utils.zip]]. NifUtilSuite (or rather, ChunkMerge) can take all of the geometry data from our .nif file and turn it into a collision. This part is pretty straightforward. Your target file is the file your original .nif file you exported first, the one that still has your BSLightingShaderProperty branch in it. Your collision file is the one you just edited and removed the BSLightingShaderProperty from. Your collision source should be either Collision fallback Mesh or just simply Mesh, because we are using the mesh to determine where the collisions are. Your collision materials will be different for every object, so you will need to select Name of NiTriShape for your Collision Materials. This way if you have different types of geometry on your model (wood and stone) they can be separated. Your settings should look a bit like this. |
[[File:BlenderExp10.jpg|NifUtilSuiteChunkMerge]] | [[File:BlenderExp10.jpg|NifUtilSuiteChunkMerge]] | ||
| Line 146: | Line 151: | ||
*Specular – Hardness is related to the Glossiness property. | *Specular – Hardness is related to the Glossiness property. | ||
*Specular – Intensity is related to the Specular Strength property. | *Specular – Intensity is related to the Specular Strength property. | ||
| + | |||
| + | [[Category:Arcane University-3D_Art| ]] | ||
Latest revision as of 05:55, 27 December 2021
Here we cover the basics of exporting statics from Blender 2.7+ to a Skyrim .NIF file as well as explain what does what when it comes to exporting. Using a version of Blender that's 2.8 or higher? Base your workflow on Blender 2.8+ Export instead, though it'll refer back here multiple times.
The Blender Plugin method may take a little more work to get set up, but once it is you can export directly to Skyrim with as little messing around in NifSkope as possible. This allows you to quickly test small changes to your static models with little hassle. It will be assumed that you have a basic knowledge of Blender, and this tutorial will only be covering the Blender to .nif exporting for static models with collisions.
This tutorial will not be covering loading these models/placing them into the Creation Kit, nor any modelling techniques. The Blender Nif Plugin can also not work with SSE NIFs, so to import/export those, you need to also use SSE NIF Optimizer, which can convert between the two formats.
Contents
Getting Started[edit]
To export your models, you will require these tools:
- NifSkope
- Blender Nif Plugin
- NifUtilSuite (contains ChunkMerge for collision)
- Blender 2.7x (as 3d Program to work with)
- a .nif file to use as a template when using ChunkMerge.
Once you have the appropriate files downloaded, install them all, all of the links above should have a readme file somewhere regarding each program.
Preparing in Blender[edit]
Depending on how you choose to model, you can do this as you go or at the end as one whole process, and it doesn’t matter which order you do these steps as long as they are all completed before you try to export. I recommend modeling in Blender units so you do not have to scale your model upon exporting, as 1 Blender unit is equal to 1 Skyrim unit. The reason for this is that if you are creating a tiling object, scaling on exporting will most likely put out your measurements by the slightest values and cause visible breaks and seams.
Once all of your modeling work is complete, you need to make sure to apply all of your transformations. If you don’t this can cause some issues once it is in-game. To apply all of your transformations, press ‘A’ to select all and then press ‘Ctrl + A’ and select Rotation and Scale. In the left toolbar, you will also need to select the location. After all of the transformations are applied to your completed model, you need to make sure that it is UV unwrapped just like you would with any other model. Once your model is UV mapped and has had all of its transformations applied, you can set the Nif related properties.
In the most recent version of the plugin, you will need to go to the Properties editor (by default on the right side of Blender) and select the Scene tab ![]() . Down the bottom you should see some NifTools settings where you can change the Nif Version and both User Versions. You will need to make sure that User Version 1 is set to 12, and User Version 2 is set to 83 for a Skyrim export. (For the time being, ‘Nif Version’ is no longer used)
. Down the bottom you should see some NifTools settings where you can change the Nif Version and both User Versions. You will need to make sure that User Version 1 is set to 12, and User Version 2 is set to 83 for a Skyrim export. (For the time being, ‘Nif Version’ is no longer used)
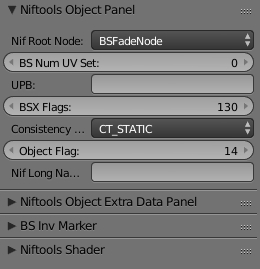
In the Properties editor select the Object tab ![]() . This is where you set the properties of the objects you are trying to export into NiTriShapes. Please keep in mind that if you have more than one object in the scene, you will need to edit the object properties for all of those objects individually for all of the following steps. For Skyrim, the settings you will require are:
. This is where you set the properties of the objects you are trying to export into NiTriShapes. Please keep in mind that if you have more than one object in the scene, you will need to edit the object properties for all of those objects individually for all of the following steps. For Skyrim, the settings you will require are:
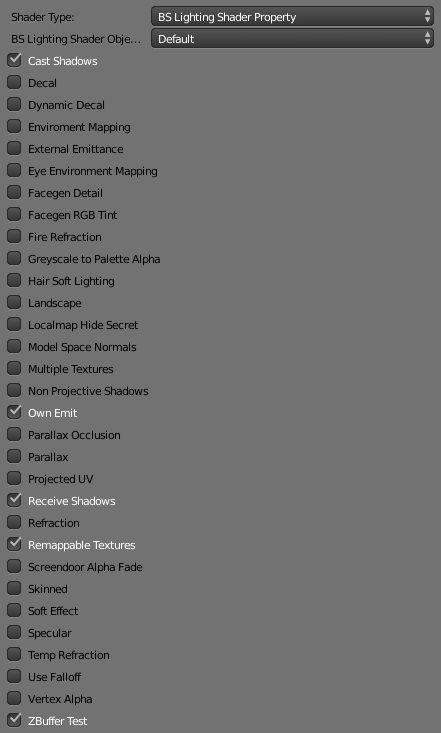
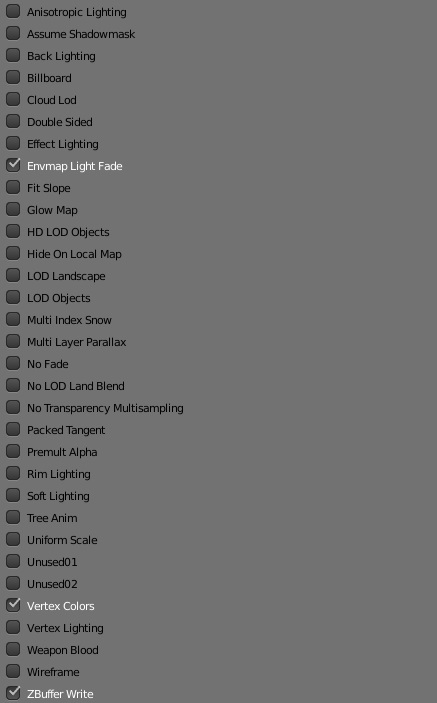
Once they are selected, you will need to select a shader type. For Skyrim statics, we usually choose BS Lighting Shader Property. You must select one. Or else your entire export will fail. A generic static nif will need these shader flags selected:
If you do not use vertex paint, uncheck "Vertex Colors". You can also do that after the export in Nifskope, your mesh might appear black first.
That is all you need to do in the Object Properties tab. I usually move on to the Material Properties, it looks like a checkered sphere ![]() . For more information on how the object properties and your nif properties are linked, see Overview of Plugin Options.
. For more information on how the object properties and your nif properties are linked, see Overview of Plugin Options.
If you have not done so throughout your modeling process, you will need to create a material for each object. You can only have one material per object or your export will fail. So create a new material and play around with some of the settings. There are some Nif settings down the bottom, but they don’t need to be changed in this tutorial. For more information on how the material settings and your nif settings are linked, see Overview of Plugin Options & Material Settings
Now go to the Texture tab, which looks like a checkered square, by default it is on the right of the Materials tab ![]() .
.
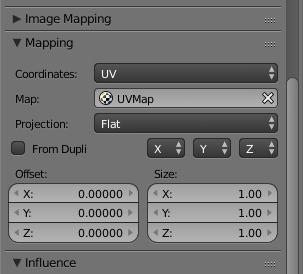
This is where you actually get to apply your textures, you can also apply your normal maps, etc. here was well. Once your texture is loaded up, scroll down to Mapping section and select Map – UVMap. You should do this for every single texture on every single object or else your export will fail. Another thing worth mentioning is that you need to have all of your textures in a folder that has a folder named ‘textures’ in it’s file structure if you don’t want to get any errors. If you don’t, you will receive some errors, but your .nif will still export.
Now we are done! Once you have followed all of the above steps, your model should export without a problem. Select everything you wish to export and go File – Export – .nif. In the side menu you need to make sure that Skyrim is selected. If it isn’t, your model will not export, and all those version numbers you spent typing in were all for nothing.
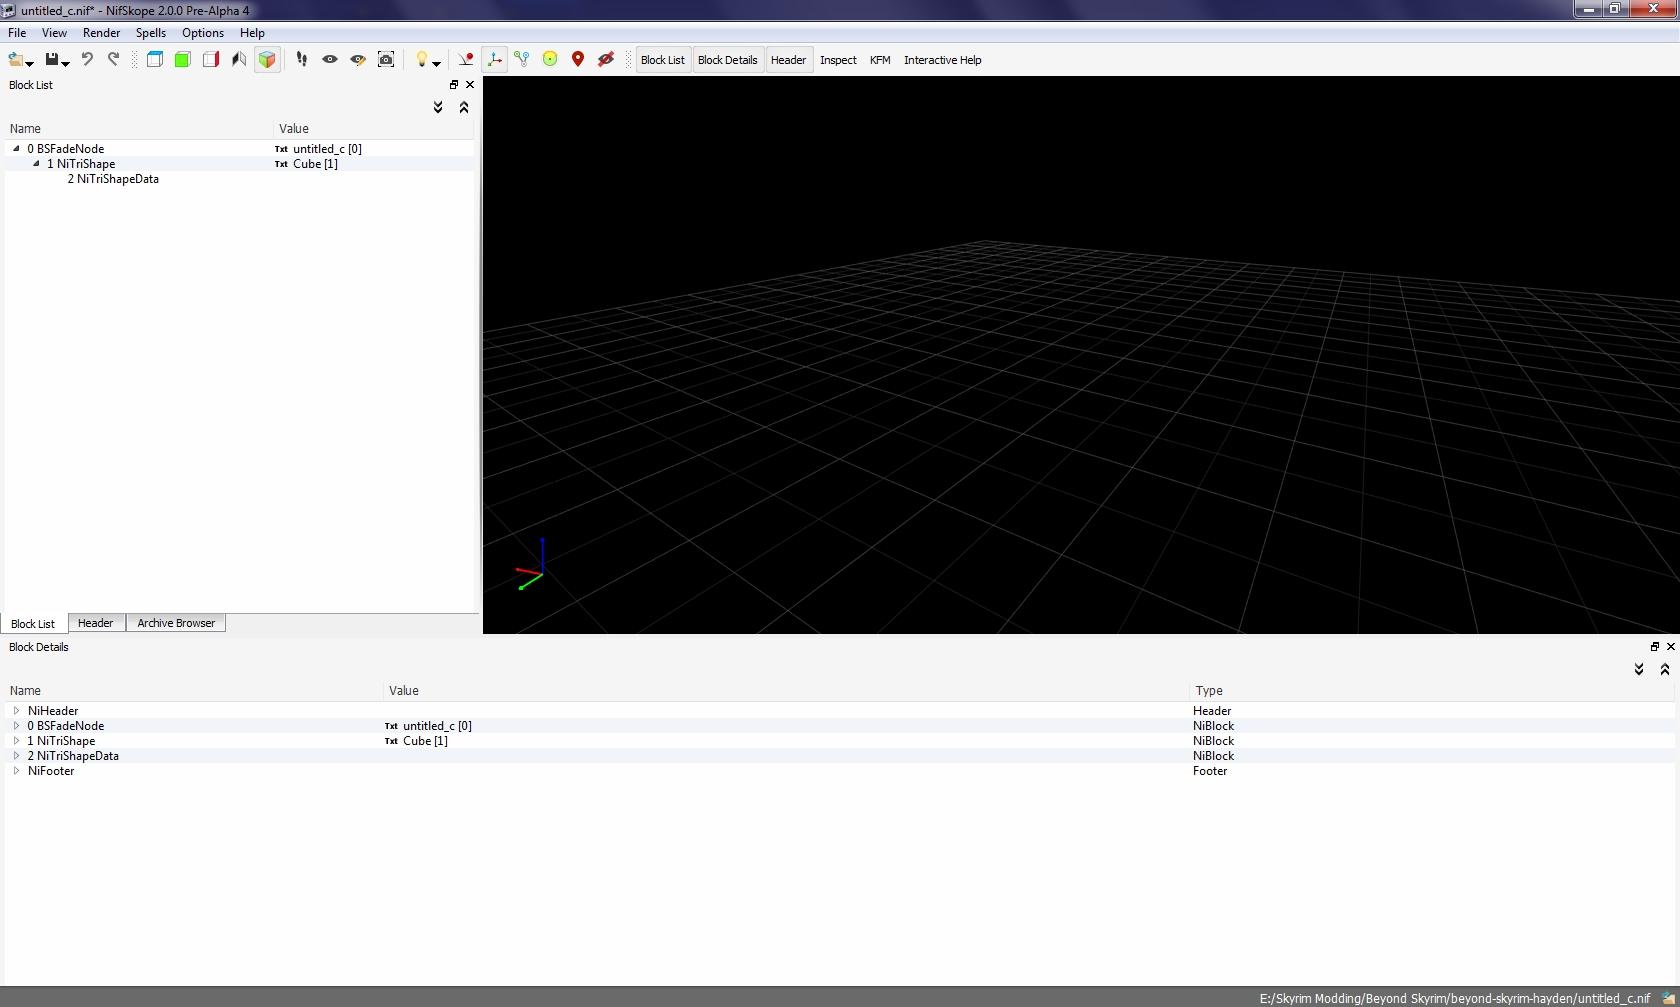
You should get this gorgeous thing up the top. If you don’t, you messed up. See the ‘Errors’ section for some help. You might also get a popup about vertex colors. You do not need to worry about that.
Collisions[edit]
Once your original model is all exported, you can start working on your collisions. The method and requirements are exactly the same as above, you pretty much have to prepare another model in Blender. Instead of having each object assigned a different material, this time you want each object to represent a different type of physics (e.g. metal, wood, etc.).
Once that is all done, select your model and give it a smooth shading, then export it as a different file as opposed to your earlier one (I put a _c after all my filenames for collisions). Now we will need to open up our collision .nif we just exported in NifSkope.
Due to my test model being very simple, my collision is also very simple. In this case it’s the exact same model, vertex paint and all. In the end this doesn’t matter, because all that data gets deleted anyway if you follow this tutorial. So, using the left hand tree browser, select your BSFadeNode drop down and expand all the way down to the NiTriShape (By all the way down I meant one branch)
The BSLightingShaderProperty holds all of our vertex paint and texture/material data. The NiTriShapeData holds all of the geometry data. Right click on the BSLightingShaderProperty and delete it, because collisions don’t need pretty colors.
P.S. As far as I know you can keep the BSLightingShaderProperty node there and nothing bad will happen. But it’s better to be safe.
Your collision .nif should now look something like this:
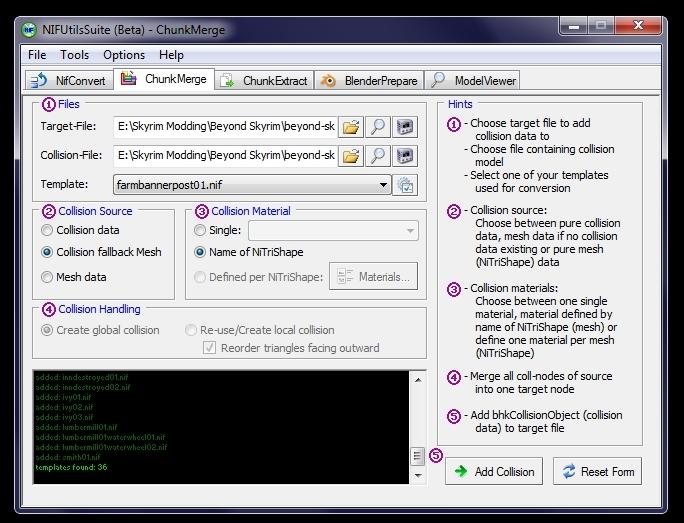
Now we can save that, close down NifSkope and open up NifUtilSuite! For files needed to set up NifUtilSuite and for use as template, NIF, see File:Chunkmerge Utils.zip. NifUtilSuite (or rather, ChunkMerge) can take all of the geometry data from our .nif file and turn it into a collision. This part is pretty straightforward. Your target file is the file your original .nif file you exported first, the one that still has your BSLightingShaderProperty branch in it. Your collision file is the one you just edited and removed the BSLightingShaderProperty from. Your collision source should be either Collision fallback Mesh or just simply Mesh, because we are using the mesh to determine where the collisions are. Your collision materials will be different for every object, so you will need to select Name of NiTriShape for your Collision Materials. This way if you have different types of geometry on your model (wood and stone) they can be separated. Your settings should look a bit like this.
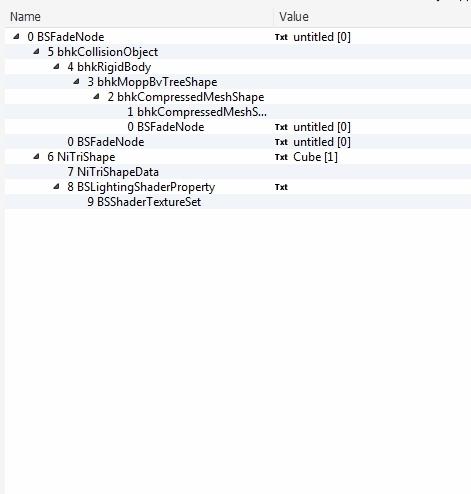
Click on Add Collision. Your collision is now a part of your model. Now you can open up your original model in NifSkope to see how it went. Expand all your branches to see what you have. It should look something like this:
If so, that’s good. We are nearly done. If it doesn’t, something went wrong.
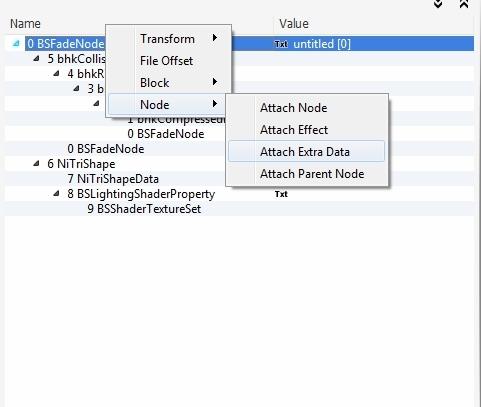
Now we need to add in some extra collision data that wasn’t added in with ChunkMerge. Right click on the top BSFadeNode and select Node – Add Extra Data, then select BSXFlags. Click on your newly created BSXFlags and see what’s inside of it. Double click on the value for Interger Data and change it to 130. This is what most static Skyrim models have theirs set to. I like to clean up my branches by moving the BSXFlags to the top of the nif by right clicking on the BSXFlags and selecting Block – Move Up.
Now your collision works! The final thing to do is to determine what kind of material each object is. Open up your nif tree again and find your bhkCompressedMeshShapeData. You may have multiple depending on how many different objects were in your collision file. Select the node and go down to Chunk Materials. Go down the two branches and you will find a line that says material. Open up the selections in the value column and select what you want that part of the mesh to be made out of.
Once that is done, you’re all ready to go! It all sounds really complicated but after a little while it becomes a lot faster. All you have to do is open up the Creation Kit and start placing your new models.
Resolved Errors[edit]
No doubt you got some errors the first time around. These are the most common one’s I have found and how to solve them.
- io_scene_nif.utility.nif_utils.NifError: 'Cube': version does not match selected export settings
- The version numbers and the game you are trying to export your nif to don’t match up. You need to make sure that all of the objects in the scene have all had their version numbers set to the correct export version. Instead of saying ‘Cube’ it will say your object’s name. Makes it a lot easier to narrow down.
- io_scene_nif.utility.nif_utils.NifError: Export version expected shader. no shader applied to mesh
- You have not applied a shader to an object. Every object must have a shader selected. In most cases, BSLightingShaderProperty.
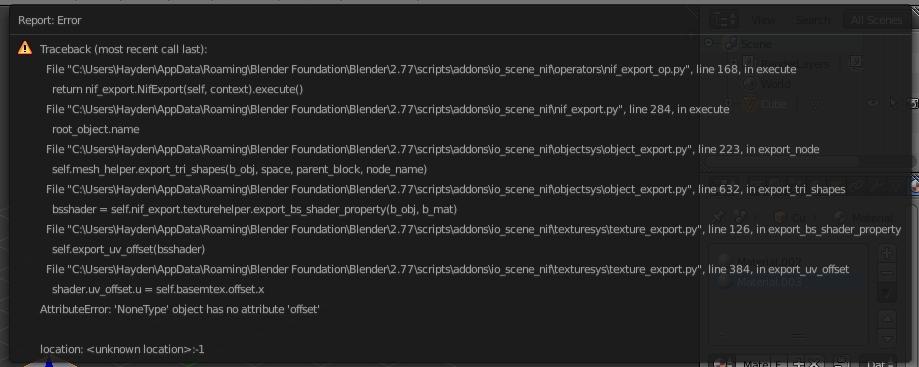
- Attributeerror: 'NoneType' object has no attribute 'offset'
- You have applied a material to an object but that material doesn’t have any textures.
- io_scene_nif.utility.nif_utils.NifError: ERROR%t|Texture is set to use UV but no UV Map is Selected for Mapping > Map
- You have not set the mapping to UVMap. Every individual texture in every material must be mapped to the UVMap.
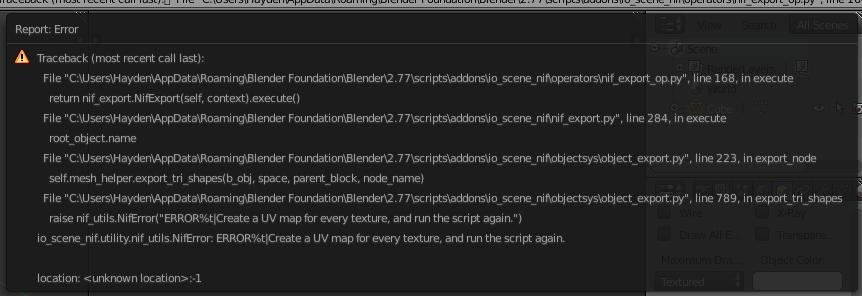
- io_scene_nif.utility.nif_utils.NifError: ERROR%t|Create a UV map for every texture, and run the script again.
- You have not UV unwrapped an object but somehow assigned a texture to the UV Map.
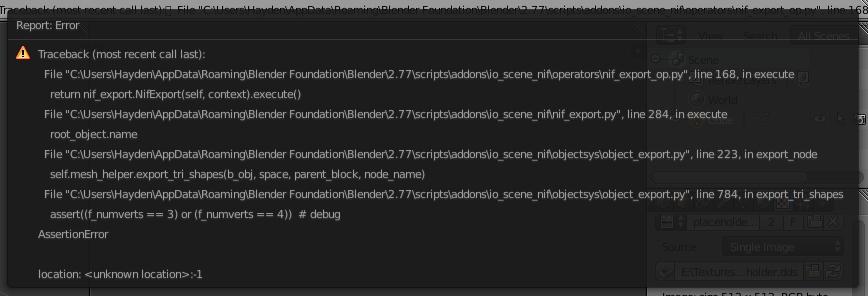
- export_tri_shapes assert
- You have n-gons in one of your objects. The exporter only supports tris and quads.
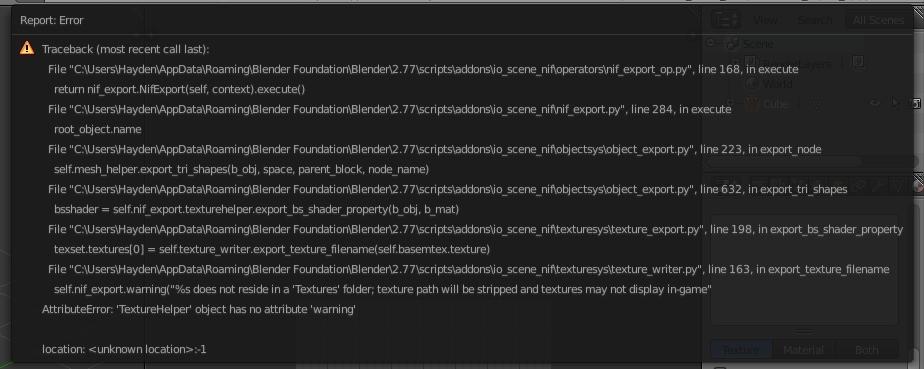
- 'TextureHelper' object has no attribute 'warning'
- One or more of your textures are not in a ‘textures’ folder. eg. C:\Users\Desktop\mytextures. You should have a texture folder in there somewhere, like C:\Users\Desktop\mytextures\textures or C:\Users\Desktop\textures. Your model will still export but you will need to fix up your texture paths in the BSShaderTextureSet.
Yet Unresolved Errors[edit]
There are some errors that we currently are investigating.
- 'ValueError: deepcopy: classes BSFadeNode and Nitrishape unrelated'
- This has only popped up in more recent versions of the plugin, as it was not yet present in the version downloaded on 2018-07-30. It can be resolved by setting the root node of the nif to NiNode, though that will have the obvious effect of the root node not being BSFadeNode. Alternatively, use the older version, for now, available here (Discord link, so may expire).
Overview of Plugin Options[edit]
This is goes into the details of what you can change in Blender that the exporter recognizes.
NifTools Object Panel[edit]
- Nif Version, User Version 1 and User Version 2: all directly relate to the Nif Version found in the Header of the .nif
- Nif Root Node: Will be the root node of your .nif. Self explanatory.
- Tangents Flags: related to each corresponding object’s ‘Extra Vectors Flags’ properties. It can have a value of None or Tangents_Bitangents, where None is any value other than 16 and Tangents_Bitangents is 16. If set to None, your model’s normal maps won’t work.
- UPB: Unknown.
- BSXFlags: Used for collision, copy the value from a similar mesh.
- Consistency Flag: Used to select Static/Mutable/Volatile. Not sure what else.
- Object Flag: Directly related to the ‘Flags’ property in each NiTriShape.
- Nif LongName: Unknown.
NifTools Object Extra Data Panel[edit]
Unknown, possibly used to add in BSXFlags and other extra nodes. I don’t believe it works at the moment.
BS Inv Marker[edit]
Used to set a rotation for an inventory item. Use transformation from radiant (pi) to degree values. Follows the common "right-hand rule" axis definition as in science & engineering.
NifTools Shader Panel[edit]
All are mostly self-explanatory and can be experimented with.
Flag Panel[edit]
Unknown
Material Color Panel[edit]
- Ambient – Unknown
- Emissive – Relates to Emissive Color in BSLightingShaderProperty
- Alpha – Unknown
- Lighting Effect 1 – Relates to Lighting Effect 1 found in BSLightingShaderProperty
- Lighting Effect 2 – Relates to Lighting Effect 2 found in BSLightingShaderProperty
NifTools Dismember Flags Panel[edit]
- Unknown
Material Settings[edit]
Several material settings relate to values in the BSLightingShaderProperty
- Specular – Hardness is related to the Glossiness property.
- Specular – Intensity is related to the Specular Strength property.
