Difference between revisions of "Arcane University:Hiding Texture Seams with Blended Decals"
| Line 11: | Line 11: | ||
* Add two vertex color layers on the new mesh. | * Add two vertex color layers on the new mesh. | ||
* In the second vertex color layer that you created, paint all the outer vertices black. | * In the second vertex color layer that you created, paint all the outer vertices black. | ||
| − | ** On a skirt mesh that covers only one of the materials, this will be all the vertices along the seam. On a skirt mesh that covers the seam and parts of both materials, this will be the vertices on both outer edges straddling the strip of faces | + | ** On a skirt mesh that covers only one of the materials, this will be all the vertices along the edge that isn't the seam. On a skirt mesh that covers the seam and parts of both materials, this will be the vertices on both outer edges straddling the strip of faces. |
** If the mesh covers all the geometry of one of the textures, then there will also be only one edge that needs to be painted black, namely the seam. | ** If the mesh covers all the geometry of one of the textures, then there will also be only one edge that needs to be painted black, namely the seam. | ||
* Apply the following proprties on the blending mesh (in order of appearance in Blender 2.79) | * Apply the following proprties on the blending mesh (in order of appearance in Blender 2.79) | ||
Revision as of 12:25, 17 September 2023

3D models are UV unwrapped into two dimensions in order for textures to be applied to them. At the seams where these models are unwrapped, there will also be seams in the texture that are plainly visible in-game. There is, however, a way to mask these seams by creating a blended transition between the two surrounding textures. This tutorial will show how to do this using decals.
- Have your mesh UV unwrapped and textured. Observe that there are seams.
- Select the faces comprising the area where a blended transition should happen.
- Often this will be a "skirt", i.e. a strip of faces running along the seam. The skirt mesh might cover only one of the materials on one side of the seam, or it can cover the seam and thus parts of both materials.
- In other cases where one of the textures is only on a small amount of geometry (like the end cap of a wooden beam), the blending zone may cover all of this texture's faces.
- Duplicate these faces (shift+D in blender) and break into a new mesh (P, selection).
- Add two vertex color layers on the new mesh.
- In the second vertex color layer that you created, paint all the outer vertices black.
- On a skirt mesh that covers only one of the materials, this will be all the vertices along the edge that isn't the seam. On a skirt mesh that covers the seam and parts of both materials, this will be the vertices on both outer edges straddling the strip of faces.
- If the mesh covers all the geometry of one of the textures, then there will also be only one edge that needs to be painted black, namely the seam.
- Apply the following proprties on the blending mesh (in order of appearance in Blender 2.79)
- cast shadows
- decal
- dynamic decal
- own emit
- receive shadows
- remappable textures
- specular
- vertex alpha
- z buffer test
- env map light fade
- vertex colors
- z buffer write
- In nifskope, apply a NiAlphaProperty in your blending node. Set "Enable Blending" and unset "Enable Testing".
- The result will be a semi-blended decal, and no seams.
Gallery
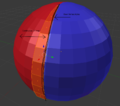
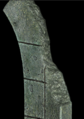
Demonstration of a skirt mesh covering only one of the materials, and the edge that must be painted black.

Demonstration of a skirt mesh (green) covering the seam (red line) and parts of both materials, and the two edges to be painted black.
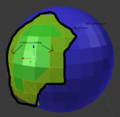
Demonstration of an object continuously textured with blue, with a red texture overlaid on part of it (overlapping area in green), and a skirt mesh used for blending.
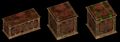
Example of using a longer object and its textures (left) to create a shorter variant (center) with blended decals to hide the seams (right)
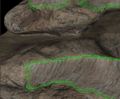
Example of a skirt mesh between two different materials
Destroyed variant of an asset with a blended decal between the intact and debris textures


