Difference between revisions of "Arcane University:Hiding Texture Seams with Blended Decals"
| (12 intermediate revisions by 2 users not shown) | |||
| Line 1: | Line 1: | ||
{{Trail|3D Art}} | {{Trail|3D Art}} | ||
[[File:Blended decals beamtutorial.jpg|thumb|right|Tutorial for the specific case of texturing end caps of wooden beams. The recommendation to set the threshold to 64 can be disregarded.]] | [[File:Blended decals beamtutorial.jpg|thumb|right|Tutorial for the specific case of texturing end caps of wooden beams. The recommendation to set the threshold to 64 can be disregarded.]] | ||
| − | + | ||
3D models are UV unwrapped into two dimensions in order for textures to be applied to them. At the seams where these models are unwrapped, there will also be seams in the texture that are plainly visible in-game. There is, however, a way to mask these seams by creating a blended transition between the two surrounding textures. This tutorial will show how to do this using decals. | 3D models are UV unwrapped into two dimensions in order for textures to be applied to them. At the seams where these models are unwrapped, there will also be seams in the texture that are plainly visible in-game. There is, however, a way to mask these seams by creating a blended transition between the two surrounding textures. This tutorial will show how to do this using decals. | ||
| − | + | Once your mesh is UV unwrapped and textured, select the faces comprising the area where a blended transition should happen. Often this will be a "skirt", i.e. a strip of faces running along the seam. The skirt mesh might cover only one of the materials on one side of the seam, or it can cover the seam and thus parts of both materials. In other cases where one of the textures is only on a small amount of geometry (like the end cap of a wooden beam), the blending zone may cover all of this texture's faces. | |
| − | + | ||
| − | + | Duplicate these faces (shift+D in blender) and break into a new mesh (P, selection). If the mesh covers only one of the materials (either as a skirt mesh or as fully duplicated geometry), UV it so it is a continuation of the ''other'' material. If it's a skirt mesh that overlaps both materials, then the UV doesn't matter. | |
| − | + | ||
| − | + | Make it so that the new mesh has two vertex color layers. In the second layer (which acts as the alpha channel), paint all the outer vertices black. These will become the more transparent vertices. The vertices with high alpha values (i.e. more white) will be more opaque. Note that, in Blender, the "second layer" is the one that is physically listed second, regardless of name. | |
| − | + | ||
| − | + | On a skirt mesh that straddles two materials, this will be the vertices on both outer edges straddling the strip of faces. In this case, be sure there are intermediate vertices that are white, or the whole thing will be invisible. If the mesh covers all the geometry of one of the textures, then only the edge going over the seam needs to be painted black. | |
| − | + | ||
| − | + | Add the following flags to the shader property, in addition to the usual shader flags. | |
| − | + | * Decal | |
| − | * | + | * Dynamic_Decal |
| − | * | + | * Vertex_Alpha |
| − | * | + | * Vertex_Colors |
| − | * | + | |
| − | + | In Nifskope, add a NiAlphaProperty to the Trishape with vertex alpha. Turn "Enable Blending" on and "Enable Testing" off. | |
| − | + | ||
| − | + | {{note|Trishapes with alpha properties can not receive Material Shaders (Directional Shaders).}} | |
| − | + | ||
| − | + | ||
| − | + | ||
| − | + | ||
| − | + | ||
| − | + | ||
| − | + | ||
== Gallery == | == Gallery == | ||
<gallery mode=traditional> | <gallery mode=traditional> | ||
| + | File:Blended decals skirt demonstration.png|Demonstration of a skirt mesh covering only the blue material, UVed with red, and the edge that must be painted black. | ||
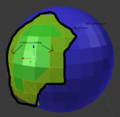
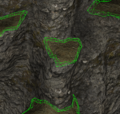
| + | File:Blended decals skirt demonstration overlapping.png|Demonstration of a skirt mesh (green) covering the seam (red line) and parts of both materials, and the two edges to be painted black. | ||
| + | File:Blended decals demonstration patch.png|Demonstration of an object continuously textured with blue, with a red texture overlaid on part of it (overlapping area in green), and a skirt mesh used for blending. | ||
File:Blended decals chest.jpg|Example of using a longer object and its textures (left) to create a shorter variant (center) with blended decals to hide the seams (right) | File:Blended decals chest.jpg|Example of using a longer object and its textures (left) to create a shorter variant (center) with blended decals to hide the seams (right) | ||
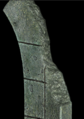
File:Blended decals skirt.png|Example of a skirt mesh between two different materials | File:Blended decals skirt.png|Example of a skirt mesh between two different materials | ||
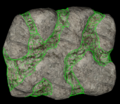
File:Blended decals destroyed.png|Destroyed variant of an asset with a blended decal between the intact and debris textures | File:Blended decals destroyed.png|Destroyed variant of an asset with a blended decal between the intact and debris textures | ||
| + | File:Blended decals patched geometry.png|Example of a continuously textured asset with another texture patched on top, also fully acting as the blended decal | ||
| + | File:Blended decals patched skirt.png|Example of a continuously textured asset with another texture patched on top, with skirt meshes for blending | ||
</gallery> | </gallery> | ||
Latest revision as of 17:25, 16 March 2024

3D models are UV unwrapped into two dimensions in order for textures to be applied to them. At the seams where these models are unwrapped, there will also be seams in the texture that are plainly visible in-game. There is, however, a way to mask these seams by creating a blended transition between the two surrounding textures. This tutorial will show how to do this using decals.
Once your mesh is UV unwrapped and textured, select the faces comprising the area where a blended transition should happen. Often this will be a "skirt", i.e. a strip of faces running along the seam. The skirt mesh might cover only one of the materials on one side of the seam, or it can cover the seam and thus parts of both materials. In other cases where one of the textures is only on a small amount of geometry (like the end cap of a wooden beam), the blending zone may cover all of this texture's faces.
Duplicate these faces (shift+D in blender) and break into a new mesh (P, selection). If the mesh covers only one of the materials (either as a skirt mesh or as fully duplicated geometry), UV it so it is a continuation of the other material. If it's a skirt mesh that overlaps both materials, then the UV doesn't matter.
Make it so that the new mesh has two vertex color layers. In the second layer (which acts as the alpha channel), paint all the outer vertices black. These will become the more transparent vertices. The vertices with high alpha values (i.e. more white) will be more opaque. Note that, in Blender, the "second layer" is the one that is physically listed second, regardless of name.
On a skirt mesh that straddles two materials, this will be the vertices on both outer edges straddling the strip of faces. In this case, be sure there are intermediate vertices that are white, or the whole thing will be invisible. If the mesh covers all the geometry of one of the textures, then only the edge going over the seam needs to be painted black.
Add the following flags to the shader property, in addition to the usual shader flags.
- Decal
- Dynamic_Decal
- Vertex_Alpha
- Vertex_Colors
In Nifskope, add a NiAlphaProperty to the Trishape with vertex alpha. Turn "Enable Blending" on and "Enable Testing" off.
| NOTE: Trishapes with alpha properties can not receive Material Shaders (Directional Shaders). |
Gallery[edit]
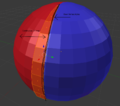
Demonstration of a skirt mesh covering only the blue material, UVed with red, and the edge that must be painted black.

Demonstration of a skirt mesh (green) covering the seam (red line) and parts of both materials, and the two edges to be painted black.
Demonstration of an object continuously textured with blue, with a red texture overlaid on part of it (overlapping area in green), and a skirt mesh used for blending.
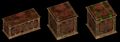
Example of using a longer object and its textures (left) to create a shorter variant (center) with blended decals to hide the seams (right)
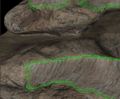
Example of a skirt mesh between two different materials
Destroyed variant of an asset with a blended decal between the intact and debris textures
Example of a continuously textured asset with another texture patched on top, also fully acting as the blended decal
Example of a continuously textured asset with another texture patched on top, with skirt meshes for blending


