Arcane University: 3DS MAX Export
This tutorial covers the export from 3DS MAX to NIF format, using the 3DS MAX plugin.
Tools[edit]
3D Studio Max (3DS Max) 2018 - 3DS Max is a robust 3D modeling program developed by Autodesk. It is an industry standard used in a wide variety of fields. As such, the professional version of the software is priced for businesses, not hobbyists. Autodesk does offer free, limited licenses of its products to students. However, the terms of those licenses have recently changed from a 3 year license to a 1 year license. Autodesk also seems to be using more means to verify that students are actively enrolled or currently hired faculty. If you are unable to obtain a copy of 3DS Max, you should instead consider using Blender, an open-source 3D modeling program with many powerful features. (Of course, the rest of this guide does not apply to a Blender workflow.)
Nif Plugin for 3ds Max 2015-2018 - This plugin for 3DS Max will allow you to import and export models in the Nif format used by Skyrim and Skyrim SE.
NifSkope - Needed to view and edit Nif files. Even with a good export from 3DS Max, there are still several settings that must be adjusted using NifSkope.
Model Preparation[edit]
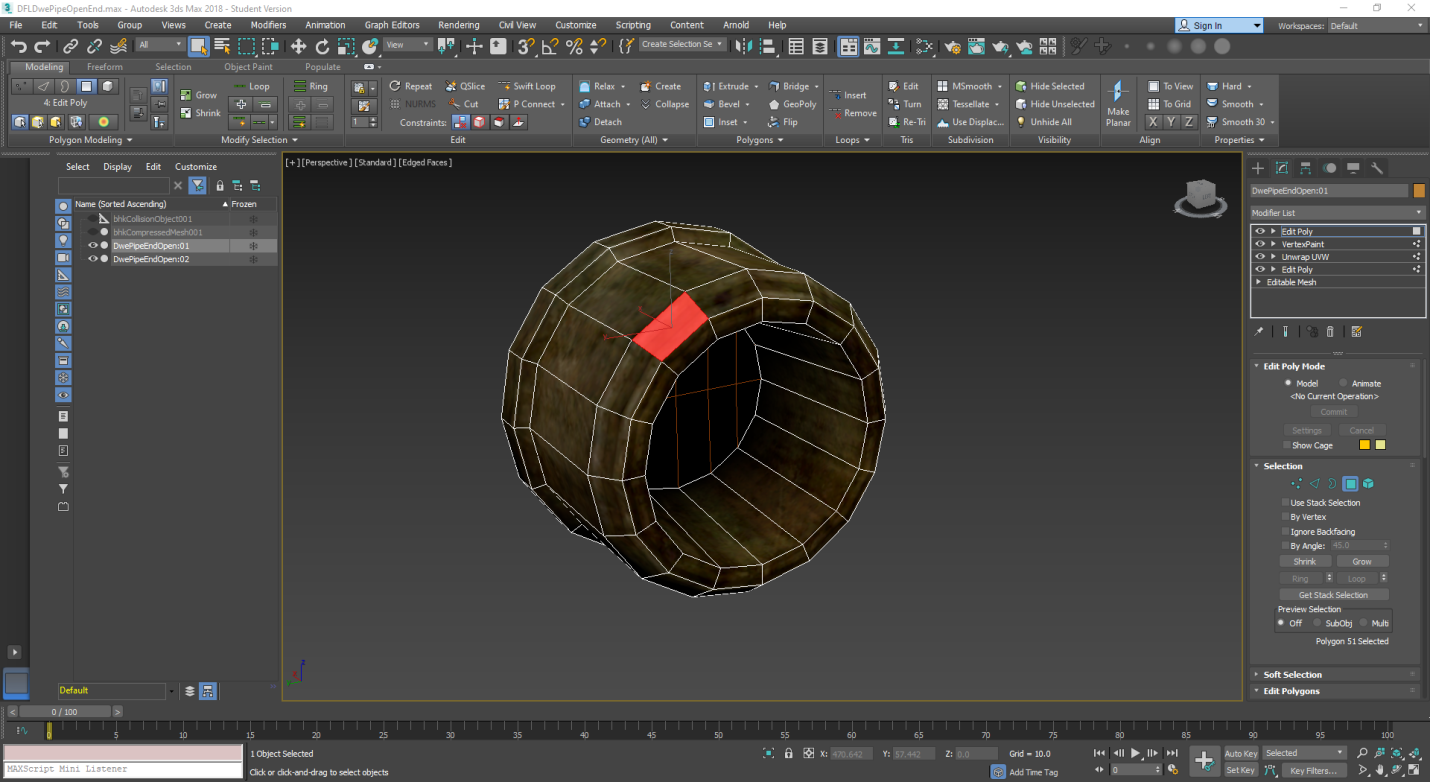
Exporting from 3DS Max uses the triangulation set up in 3DS Max. All models used by Skyrim end up triangulated. To avoid awkward triangulation, you can adjust the specific triangulation on quads and NGons in 3DS Max without having to triangulate the whole mesh. To do so, you need to have the Edit Poly modifier on your mesh and use the face selection.
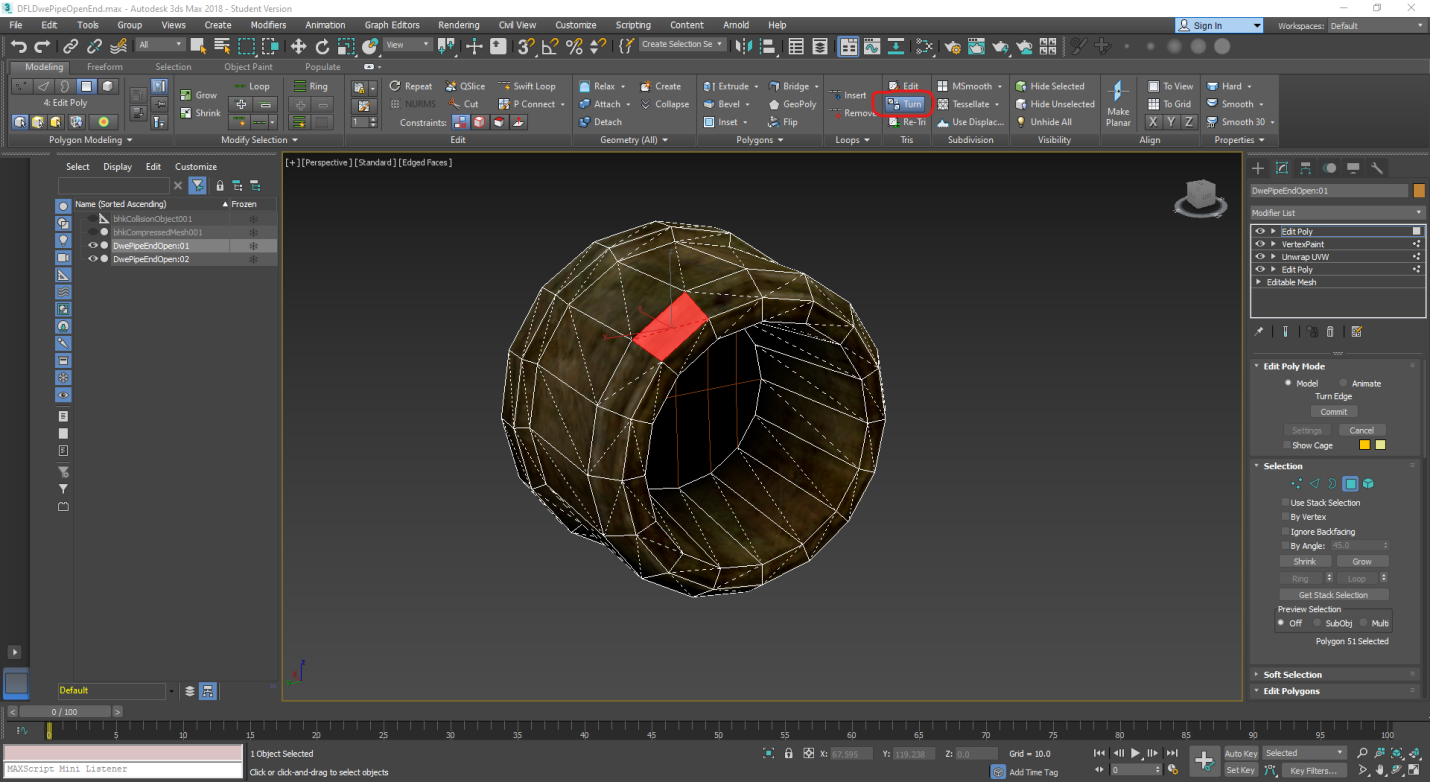
There is a sub-menu for editing the actual tris of the model, there are several options, but turn and re-tri are what you are looking for. Re-Tri tries to automatically re-triangulate selected Quads and NGons to use as few tris as possible. Since the process is semi-automated, the results may or may not be what you want. The Turn tool allows you to manually fine-tune the tri layout. You can see in the attached screenshot that the individual tris making up each quad is shown by a dashed line.
Collision[edit]
The Nif Plugin adds support for several nif specific elements including collision objects. The plugin is able to import collision from nif files, set up collision from scratch, and export custom collision to the nif file format. Collision consists of two (or more) parts. A bhkCollisionObject and a collision mesh often in the form of either a bhkCompressedMesh or bhkConvexShape (other forms are possible.)
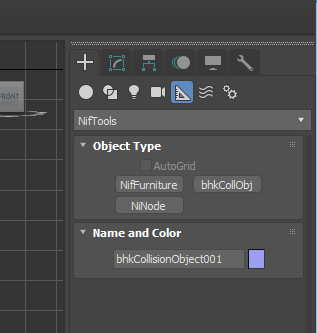
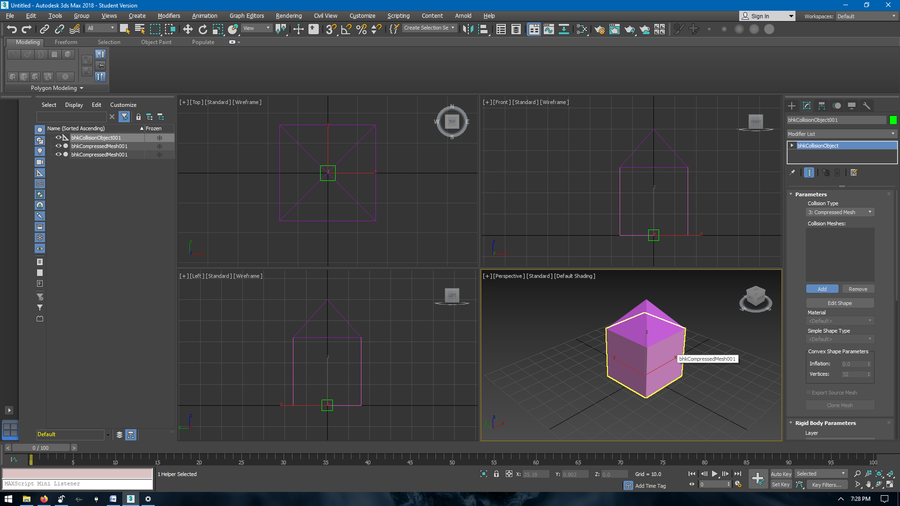
The bhkCollisionObject is a “helper” object. It does not directly define the collision geometry, but is instead a container that defines the collision properties such as material, type of collision, physics properties, center of mass, and more. To create a bhkCollisionObject from scratch, use the create tab of the command panel and select the helpers subtype. Use the dropdown menu to select the NifTools Category and select the bhkCollObj button, then click in an active view to place the object. (This menu also allows you to create NiNodes and NiFurniture nodes as necessary.)
Once you have created a bhkCollisionObject, the following properties are available on the modify tab:
bhkCollisionObject Parameters[edit]
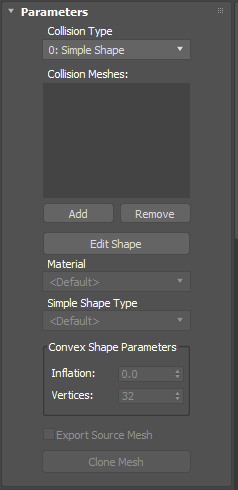
The Parameters section allows you to set the Collision Type. Collision Types 0 (Simple Shape) and 3 (Compressed Mesh) are used primarily.
The next parameters allow you to add meshes to the collision object.
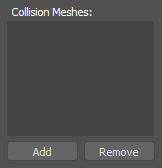
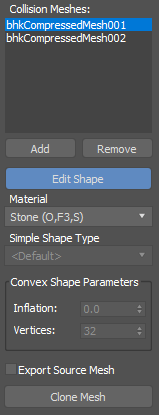
The Collision Meshes: box displays a list of all meshes linked to the collision object.
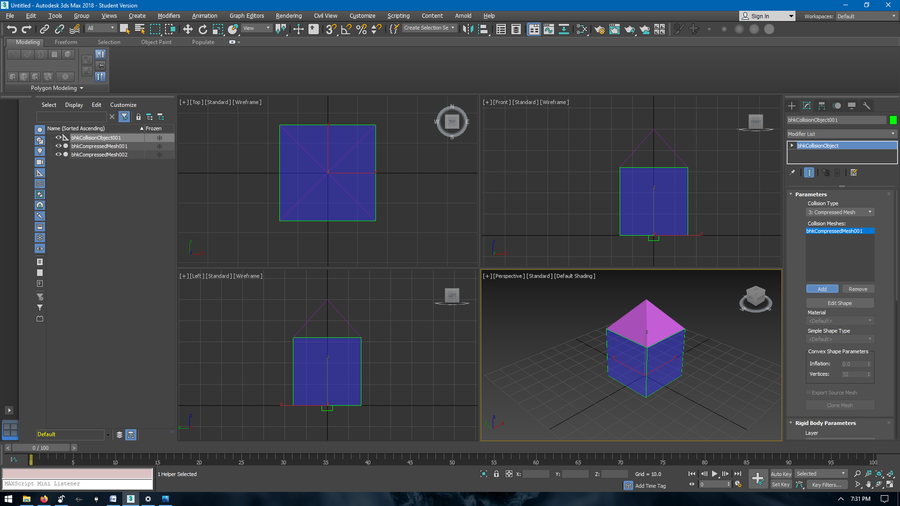
The Add and Remove buttons allow you to add or remove meshes from the collision object. You can add a mesh to the collision object by pressing the Add button then selecting it in a view pane. You may also add a mesh by selecting it in the Scene Explorer on the left.
When a mesh is part of a collision object, it will turn a transparent blue.
To remove a mesh from a collision object, highlight the mesh title in the bhkCollisionMesh parameters then click the Remove button.
It is very important that you do not delete a bhkCollisionObject while it has linked meshes. Doing so will crash 3DS Max. If you need to delete a bhkCollisionObject, first remove all linked meshes, then it will be safe to delete the collision object.
⚠️DO NOT DELETE bhkCollisionObjects without first removing all linked mesh objects!
Once you have added a mesh to the collision object, click the Edit Shape button, then select the name of a mesh in the Collision Mesh box above.
With a collision mesh selected in the bhkCollisionObject properties, you can edit the meshes collision characteristics.
All collision types will allow you to define the havok material (used for impact sounds).
The Simple Shape Type and Convex Shape Parameters will only be available with the corresponding collision type.
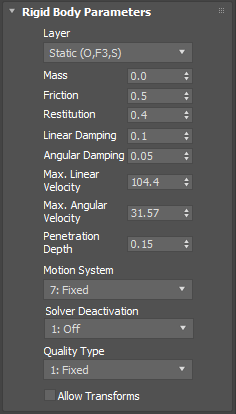
bhkCollisionObject Rigid Body Parameters[edit]
These options alter the physics data associated with a collision object. The details of these options are beyond the scope of this tutorial. However, importing or comparing values from a vanilla mesh with a similar purpose (stone stairs, iron sword, wood bucket, etc.) should provide an excellent starting point for setting these values.
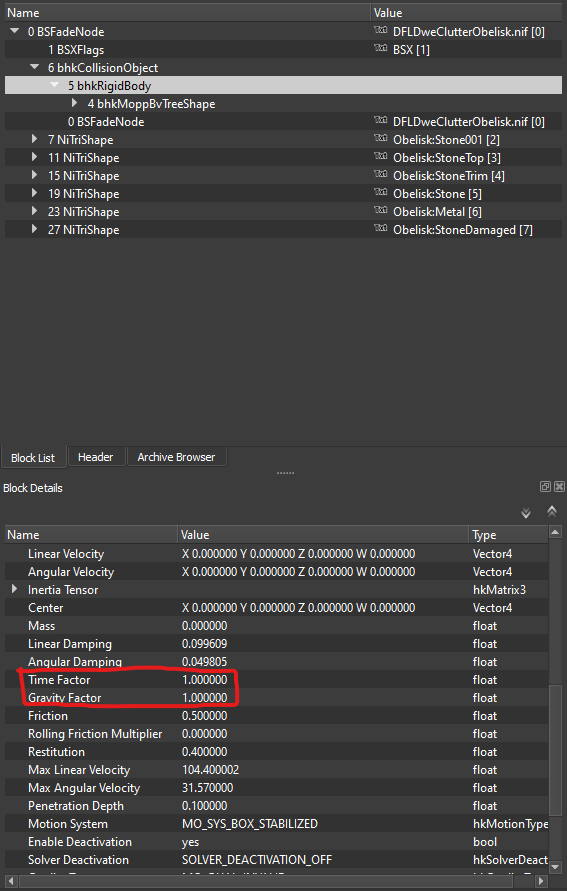
One note, this version of the nif import/exporter does not set the Time Factor or Gravity Factor values during export. Leaving these values at 0 will cause items to float in mid-air and not react to the physics simulation properly. These values must be set using NifSkope after exporting and cannot be set using 3DS Max. They can be found under in the bhkRigidBody node which is a child of the bhkCollisionObject node. The following is a screenshot showing the variables location in an example mesh viewed in NifSkope.
⚠️If exported collision is not working properly, check that the Time Factor and Gravity Factor variables are set to 1.
bhkCollisionObject Center of Mass[edit]
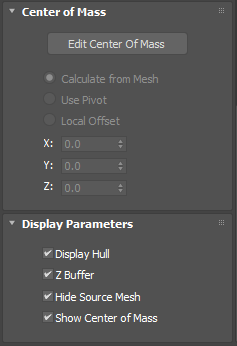
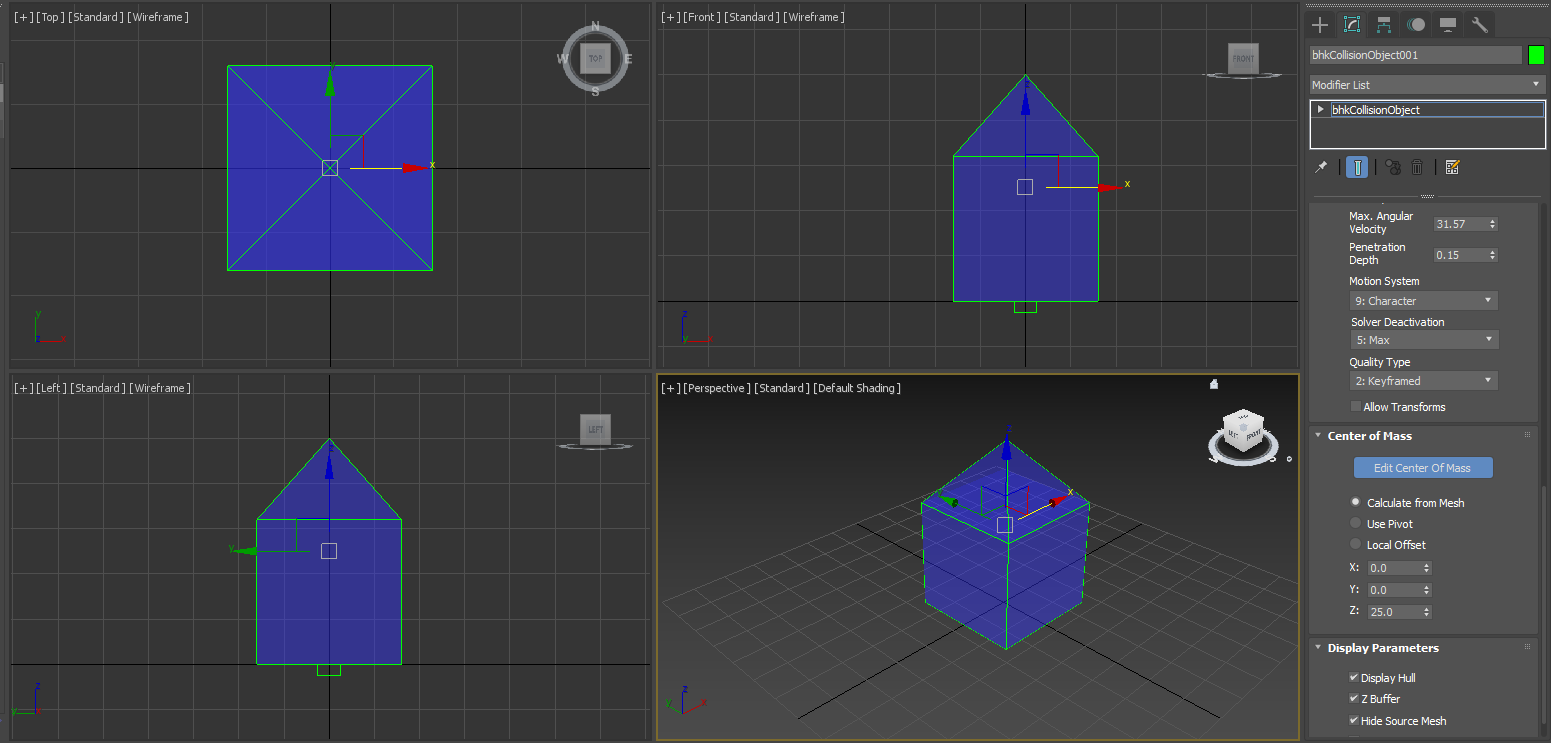
The Center of Mass parameters provides options for adjusting the center of mass of a collision object. By default, this is calculated from the mesh and for most purposes, this should suffice. If you need finer control, clicking the Edit Center of Mass button will give you fine control of the center of mass.
With the Edit Center of Mass button selected, the other options become available, and a gizmo appears in the view panes.
- Calculate from Mesh calculates the center of mass from the meshes geometry. This is the default mode
- Use Pivot is similar to Calculate from Mesh but uses only the pivot location for calculating the center of mass.
- Local Offset provides manual control over the exact location defined as the center of mass. Moving the gizmo or using the X, Y, or Z coordinate entry boxes will toggle this option. Selecting either Calculate from Mesh or Use Pivot will clear any changes made manually.
bhkCollisionObject Display Parameters[edit]
These options apply only within 3DS Max and aid in the ease of modeling. They have no effect on the exported mesh.
- Display Hull toggles whether the transparent faces of the collision object are rendered or not. Selecting this option will display the faces, deselecting will turn them off. The blue face identifies which way the collision is facing while the back face appears transparent.
- Z Buffer toggles the display of inner and back faces while the Display Hull option is toggled. This has no effect when Display Hull is turned off.
- Hide Source Mesh hides the source meshes used for collision. Turn this off to see the individual collision mesh objects.
- Show Center of Mass this option does not appear to work.
A final note about collision[edit]
When importing collision from a nif file, sometimes faces of the collision mesh become flipped. If Display Hull is turned on, they will appear transparent instead of blue. This can be fixed by editing the mesh object and flipping the faces before export. This issue only seems to occur when importing meshes, not when exporting.
Animation[edit]
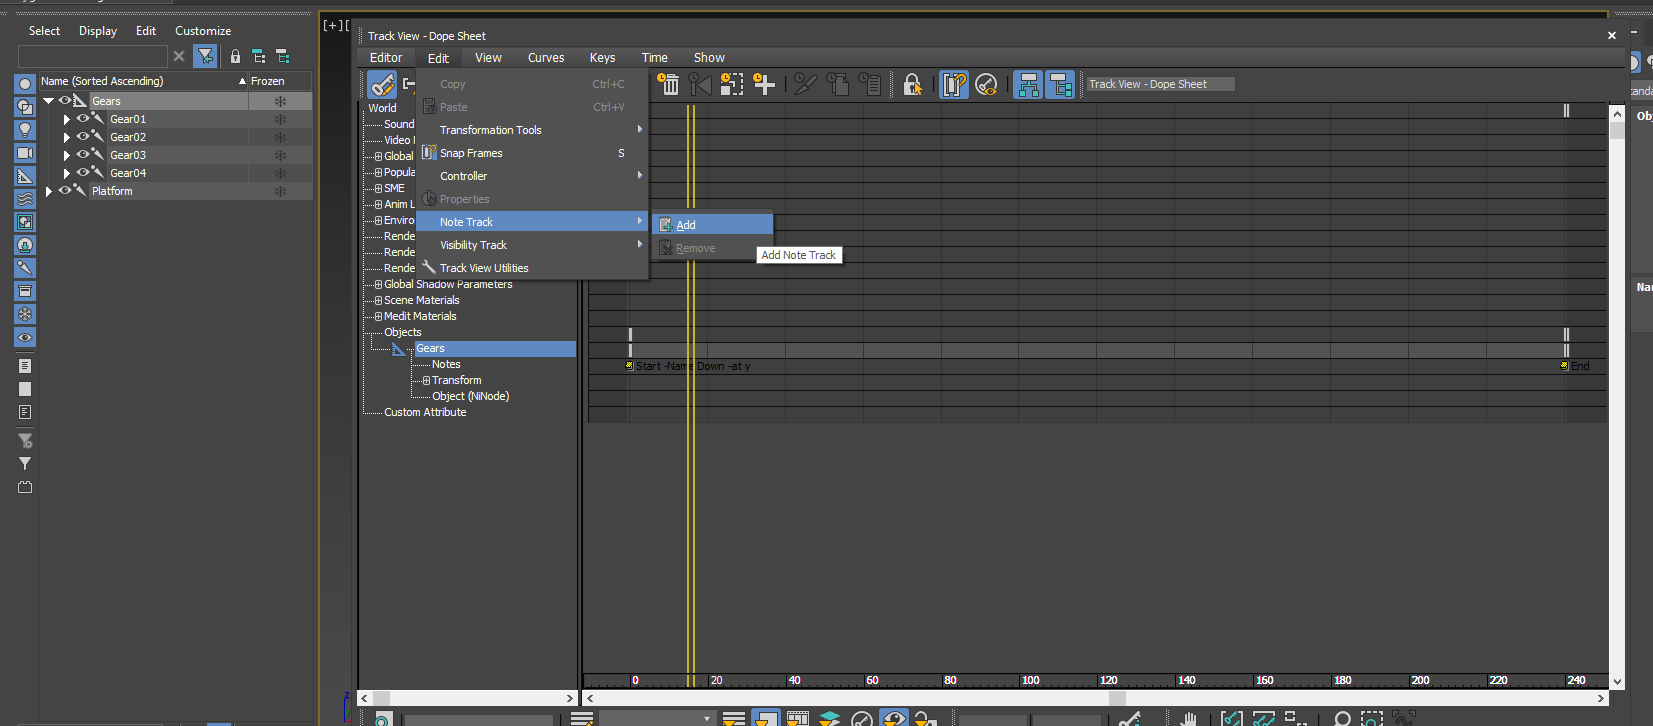
In order for animations from 3DS Max to export properly to the Nif / KF format, you need to set up a Note Track using the Track View - Dope Sheet Editor. The Dope sheet can be viewed by selecting the Graph Editors dropdown menu, then selecting the Track View – Dope Sheet... menu item.
The Note Track must be attached to a NiNode or mesh object, usually the parent node of all animated objects. To add a Note Track, select an object in the Scene Explorer, then select the item again in the Dope Sheet Editor. With the object selected in the Dope Sheet Editor, select the Edit > Note Track > Add menu item within the Dope Sheet Editor.
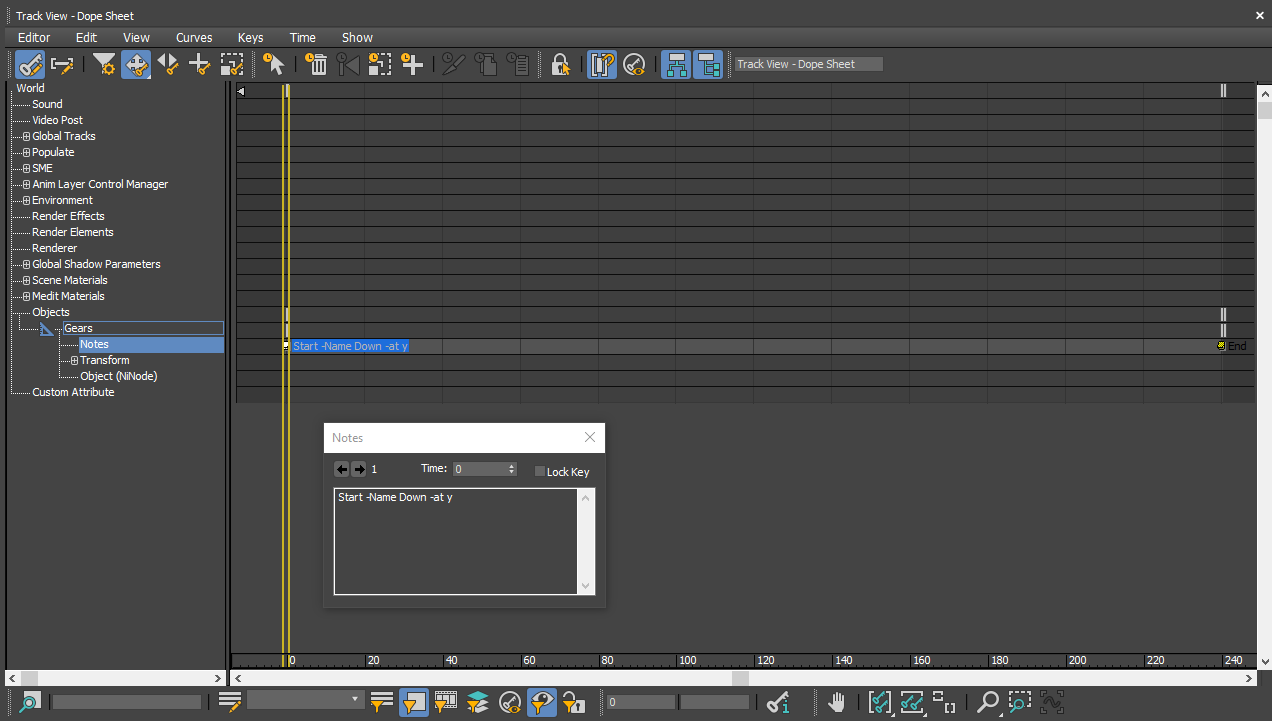
Once you have created a Note Track, you need to add notes defining the start and end of each distinct animation sequence. Add a key to the Note Track to add a note at that point in time. You may adjust the timing of a note just like any other key frame. Once you have a note created, right click on the note to bring up the Notes window.
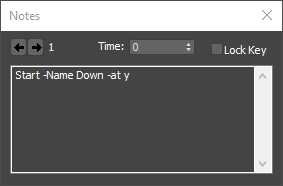
The notes window allows you to enter notes as well as manually defining the time the note occurs. Lock Key will prevent the note from moving. (The time can still be adjusted using the ‘Time’ field in the Notes window, but the move, slide, and other adjustments in the Dope Sheet Editor will not move the note position.) You may also use the arrow keys to move from one note to another within the same note track.
For Skyrim animations, all animations must be defined with a pair of notes. The start note should use the format:
Start -Name (Name of Animation) -at y
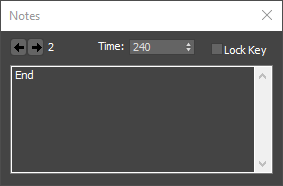
To define the end of an animation, add note consisting only of the string:
End
Exporting from 3DS Max to the Nif Format[edit]
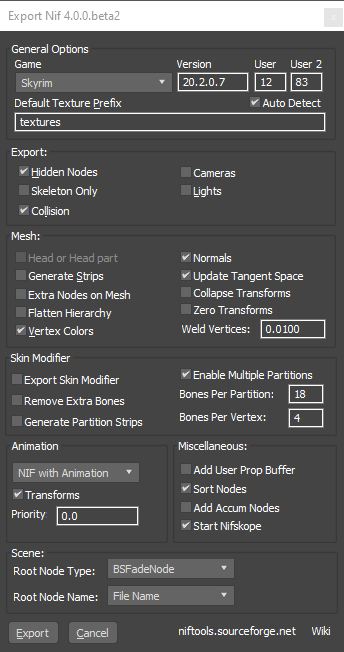
General Options[edit]
- Game Select which game format you would like to export to. Reports indicate that this particular exporter does not properly support the Skyrim Special Edition nif format. As I have personally only used this exporter to export to the Skyrim Legendary edition nif format, I cannot comment on whether the exporter works for SE nif files. However, exporting to LE and using another tool such as SSE Nif Optimizer to convert to the SE format.
- Version Allows entry of custom version numbers. Entering a version higher than the latest known at the time of release of the exporter will display a warning.
- User Skyrim Legendary Edition uses a User value of 12
- User 2 Skyrim Legendary Edition uses User 2 value of 83
- Default Texture Prefix The exporter attempts to use the texture path based on the selected game. If it is unable to determine a path, it will prefix texture names with the path defined here. The Auto Detect tick box will attempt to determine the texture path automatically.
Once you select a game, the version and user fields should auto populate.
Export[edit]
- Hidden Nodes This toggles whether or not hidden nodes and items will be exported. However, even with this option checked, sometimes hidden items do not seem to export properly. I usually unhide everything I want exported before exporting.
- Skeleton Only Checking this option will export only the bone helper items present in the scene.
- Collision Exports collision with the mesh. See Section IV above for more information on setting up collision in 3DS Max
- Cameras Toggles whether cameras will be exported. Cameras are not generally used in Skyrim nif files. Only free cameras are supported.
- Lights Toggles whether lights will be exported. Lights are generally not used in Skyrim nif files. Only Omni, Free Spot, and Free Direct light types are supported.
Mesh[edit]
- Head or Head Part Not Supported
- Generate Strips Selecting this option will “strippify” meshes. This is an optimization pass that may improve performance for Skyrim Legendary Edition (and other games that support strippified meshes. However, Skyrim Special Edition is not compatible with strippified meshes. You should usually leave this unchecked unless you have a specific case requiring strippified meshes.
- Extra Nodes on Mesh This option adds additional nodes for every mesh when exported. When exporting armor or any mesh that uses a skeleton, leave this unchecked. Usually this option should not be enabled.
- Flatten Hierarchy This eliminates all hierarchy in the model, collapsing all exported nodes to be children directly of the root node. This option will eliminate any NiNodes and break any bones hierarchies you have set up. Leave this item unchecked unless you have a specific reason for flattening the hierarchy.
- Vertex Colors Check this option if your model uses vertex colors.
- Normals Selecting this option will exports your mesh with normals. Leave this checked unless your mesh does not need them, such as a body mesh.
- Update Tangent Space Selecting this option will export tangent and binormal information (http://softimage.wiki.softimage.com/xsidocs/tex_tangents_binormals_AboutTangentsandBinormals.html) that works with the Normals to help define the surface characteristics. Leave this checked unless your mesh does not need them, such as a body mesh. Even with this option checked, you may need to manually update the tangent space in NifSkope after exporting for the normal maps to look correct.
- Collapse Transforms Enabling this option updates the vertices of meshes based on the parent’s transform. If you have a mesh that is transformed to be in a specific location, such as a helmet, you should leave this unchecked.
- Zero Transforms Enabling this option will zero out any transforms applied to exported objects. Untick this and the Collapse Transforms to use the transforms set up in 3DS Max.
- Weld Vertices This combines nearby vertices on the same mesh into a single vertex. Vertices must be on the same mesh and connected by an edge. Certain properties, such as different vertex paints will prevent vertices from merging. It is often easier (and provides a greater deal of control) to merge vertices in the actual model before export.
Skin Modifier[edit]
- Export Skin Modifier This option controls whether the vertex weight settings are exported to a NiSkinInstance. The other options in this section apply to the skin modifier and are not applicable if you are not using vertex weight settings.
- Remove Extra Bones This attempts to remove bones that are not used. For most cases, leave this setting unchecked.
- Generate Partition Strips Strippified meshes are used as an optimization for older games, such as Oblivion, Fallout 3, and Skyrim Legendary Edition. Generally you should leave this option off unless you have a specific use case.
- Enable Multiple Partitions This determines whether the skin is exported as large piece or split into smaller partitions.
- Bones per Partition Determines how many bones are allowed in a partition.
- Bones per Vertex - Leave this at 4
Animation[edit]
- Animation Export Dropdown There are 7 different animation export options:
- NIF w/o Animation Selecting this option will export a NIF file without any animations. This is the default option.
- NIF with Animation Selecting this option will export a NIF with animation embedded in the mesh in the Gamebryo format. This is a legacy format left over from games such as Oblivion and is rarely seen in Skyrim. However, both Skyrim and Skyrim Special Edition still support this animation format. It may be useful in some instances such as a static object with a looped animation like a rotating gear or swaying sign.
- Single KF with NIF Selecting this option will export a single KF file and a NIF file. All animation segments will be part of the single KF file. This is the standard setting for Morrowind based animation, but is generally not useful for Skyrim.
- Single KF w/o NIF Selecting this option will export will ONLY export the KF file, not the NIF file. Otherwise, it is the same as the previous option.
- Multi KF with NIF Selecting this option will generate a separate KF file for each animation segment defined in a scene for each root node in with animation. This is the preferred option for exporting animations to be used in Skyrim.
- Multi KF w/o NIF Selecting this option will export will ONLY export the KF files, not the NIF file. Otherwise, it is the same as the previous option.
- NIF w/ Manager Selecting this option will export a single nif with all animations baked-in using the Gamebryo animation format. Animations are controlled with NiControllerManagers within the nif. This is a legacy animation format used in Oblivion. While most animations in Skyrim use Havok animations, both Skyrim and Skyrim Special Edition still support this animation format.
- Transforms Selecting this option controls whether transform animations are exported. Leave this checked
- Priority This option sets the priority of the animation and is used for blending animations. Higher numbers take precedence over lower numbers.
Miscellaneous[edit]
- Add User Prop Buffer User Prop Buffers are strings that can be saved into 3DS max and associated with bones or meshes. This option allows these strings to be exported. I do not believe that Skyrim uses User Prop Buffers; you may leave this option unchecked.
- Sort Nodes Checking this option will attempt to sort nodes on export. Beyond simple organization, some games like Oblivion crash if the nodes are not in order. Leave this option checked.
- Add Accum Nodes Enabling this option adds accum nodes to the skeleton. Enabling this option can interfere with animations and it is generally best to leave it unchecked.
- Start NifSkope When enabled, NifSkope opens the new nif file after export. Sometimes when NifSkope is already open, the new window may appear hidden under other apps.
Scene[edit]
- Add User Prop Buffer User Prop Buffers are strings that can be saved into 3DS max and associated with bones or meshes. This option allows these strings to be exported. I do not believe that Skyrim uses User Prop Buffers; you may leave this option unchecked.
- Sort Nodes Checking this option will attempt to sort nodes on export. Beyond simple organization, some games like Oblivion crash if the nodes are not in order. Leave this option checked.
- Add Accum Nodes Enabling this option adds accum nodes to the skeleton. Enabling this option can interfere with animations and it is generally best to leave it unchecked.
- Start NifSkope When enabled, NifSkope opens the new nif file after export. Sometimes when NifSkope is already open, the new window may appear hidden under other apps.
Sources[edit]
While the niftools guides are out of date, they do provide a good basis for understanding the 2018 import/export tool:
http://niftools.sourceforge.net/wiki/3ds_Max/Guides/Exporter
http://niftools.sourceforge.net/wiki/3ds_Max/Guides/Importer
http://niftools.sourceforge.net/wiki/3ds_Max/Guides/Collision_Example_1
http://niftools.sourceforge.net/wiki/3ds_Max/Guides/Dismemberment
https://wiki.nexusmods.com/index.php/3ds_Max_exporting_custom_assets
