Arcane University: Rigging in Outfit Studio
Outfit Studio can be used to rig models to the Skyrim skeletons (or collision meshes with constraints, in the case of complex clutter). This can be done either because you prefer rigging in Outfit Studio, or because you use Outfit Studio to export to NIF from your 3D program. In any case, this tutorial will detail this process.
Copying bone weights
The easiest way to rig within Outfit Studio is to copy the weights from a similar mesh. For example, if you created a new outfit that is exactly the same as another outfit, but with pieces removed, this would be a good method to use. It can also offer a good starting point for manual rigging.
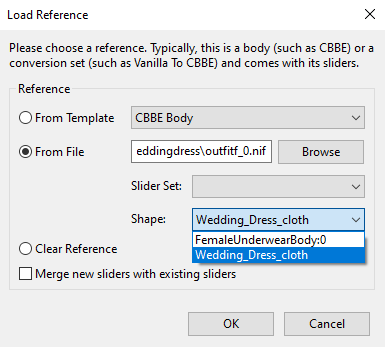
In order to copy weights from a mesh, you need to set it as the reference. This can be done via File > Load Reference... . Here you need to select the "From File" option. You can only copy weights from one (BSTri/NiTri)Shape at a time, so make sure to pick the correct one. In the example below, the intent is to rig a modified wedding dress (meshes/clothes/weddingdress/outfitf_0.nif). The modified cloth part (i.e. the part to rig) is Wedding_Dress_Cloth. Therefore this is also the part to select as reference from the original mesh.
Once you have set the reference, select the shape which needs rigging. Then copy bone weights from the reference with Shape > Copy Bone Weights. The default values should suffice, but if you want to adjust their values, it is documented on the Outfit Studio Github. If your mesh consisted of multiple shapes, then you can repeat this process, setting different references for the different shapes if necessary. In the case of the modified wedding dress, the reference for the Wedding_Dress_Cloth shape should be that same shape in the reference NIF file, and vice versa for FemaleUnderwearBody.
This mesh can then be exported using the method described in the Outfit Studio export tutorial. However, you may get the "unweighted vertices" error. In that case the vertices which have no rigging will be put under a mask (i.e. you can't edit them). This is the opposite of what you want. Therefore, press Ctrl+I to invert the mask or Ctrl+A to remove the mask, and proceed to Manual Rigging. The same effect can be accomplished via Tool > Invert Mask or Tool > Clear Mask, respectively.
Manual rigging
If there are few bones to rig to, if there is no good reference mesh, or if you want to make modifications to the copied bone weights, you may want/need to do manual rigging. In Outfit Studio, this is done by going to the "Bones" tab and selecting a bone. You may see some colors appear on your mesh. These colors indicate weight: no color means that a vertex is not affected by the bone, (dark) blue means the vertex is weakly affected by the bone, and red means that the vertex is very strongly affected by the bone.
When you have a bone selected, you can weight paint with the brush. You can adjust size, strength, focus and spacing of your brush by dropping down the Brush settings menu. Applying weight is done by clicking or moving the mouse around whilst holding it down, you can't apply weight by holding it down and not moving. By default, the brush will increase the weight. You can instead make it decrease weight by holding down the "Alt" button. You could also make it so the brush, instead of adding, sets it to a specific level dependent on the strength by ticking the Fixed Weight Brush checkbox under the bones list. The interface will also show you which vertex is closest to the brush. However, this is not necessarily the only vertex which is affected by the brush. For this, you will need to look at the circle. Because weighting is only done on vertices, if there is no vertex within your circle, then you are not actually doing anything.
Rigging different outfit weights
If you have made the different size outfits in your 3D program, then doing the same process is not guaranteed to give the same exact bone weights. This would lead to a broken weight slider in Skyrim, where a person would have either the 0 or the 1 weight mesh, and nothing in between. Not only is this not realistic, it may also lead to seams with other, properly weighted equipment.
Luckily, Outfit Studio has a method to deal with this issue. First, rig one of the two (usually, the 0 outfit is made before the 1 outfit, so this tutorial will assume you have made that first). Then, load the 1 mesh into Outfit Studio like you would for the normal process. Then, instead of using a vanilla file as the reference, load the 0 outfit as your reference. After that, select your 1 weight shape, and use the Shape > Transfer Selected Weights. If you made only the correct type of changes to your 1 mesh (i.e. no deleting/adding of vertices), then the vertex weights will be copied exactly to your shape. Like with copying bone weights, do this process for every shape that needs to be rigged.
You can now export the mesh to NIF, like described in Outfit Studio Export.
