Arcane University:Unified Style Guide
The unified style guide is a set of guidelines for any game writing for the Beyond Skyrim or Nirn Uncharted Projects. Adhering to the rules here is paramount for both consistency and to allow for the easy automation of dialogue and quest implementation. Note that some projects deviate slightly, but the format and examples presented here will be accepted by any project aforementioned. This text is copied from the document found here. It is up to date as of May 2024.
The purpose of this style guide is to maintain consistency within and across the projects using it. It integrates the disparate style sheets that have been used in the past in order to present a unified overall style. Please familiarize yourself with the rules and conventions. When in doubt, look to vanilla Skyrim. This page has all dialogue found in vanilla, and it can help you see how words and phrases have been used. Be aware, however, that Bethesda was not always consistent in how they worded things. If that isn't sufficient, ask the writing lead for your specific project. Additional resources that writers and editors may find useful may be found in the Universal Resource List. Each project has its own special requirements, so be sure to consult your project's addendum for further information.
Contents
General Notes[edit]
- There is a character limit of 80 characters per line for player dialogue and 149 for NPC lines. Use Ctrl+Shift+C to quickly check character/word count on Google Docs.
- Spelling should default to American English (AmE). On Google Docs select File → Language → English (United States). Google Docs will flag non-standard spellings that can then be changed to American spellings: "color" not "colour", "utilize" not "utilise", "traveled" not "travelled", "center" not "centre", etc.
- Avoid modern idioms and terms, especially if associated with popular modern media of some sort. Try to keep the dialogue immersive. If in doubt, ask.
- To minimize both form counts and VO duplication, consider reusing the same NPC response lines multiple times so that they can share assets during implementation. Write all repeated dialogue lines (known as "sharedinfos") in cornflower blue.
Document Formats and Requirements[edit]
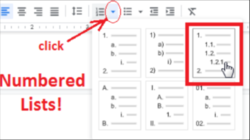
- All writing needs to be written directly into Google Drive with the third numbering tool used to auto-number dialogue lines.
- DISABLE auto-substitution of "..." and turn off smart quotes in Google docs before you begin:
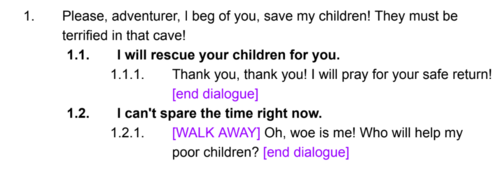
- All player lines should be in bold, and NPC lines in plain text. All text on player lines--such as # implementation notes and skill check levels--should also be bold.
- Text colors are used to denote the following:
- [Implementation notes] e.g. [end dialogue] [go to ...] [start combat] All text is purple, lowercase, and enclosed in square brackets.
- [Voice Acting notes] e.g. [happy] [sad] [angry] All text is orange, lowercase, and enclosed in square brackets.
- Identical lines (known as "sharedinfos") are set in cornflower blue so that implementers and voice actors know if a line is used more than once.
- [success] in green, within square brackets, indicates that a skill check has been passed.
- [failure] in red, within square brackets, indicates that a skill check has failed.
- At the end of each NPC response thread, there should be an implementation notation directing where the conversation should go next (whether back to general dialogue, back to the previous options, or go down to a specific segment). Please do not leave them blank.
- All documents should have the name of the writer(s) at the top left of the document. Use the Discord tag you are recognized by on your project's server.
NPC Document Requirements[edit]
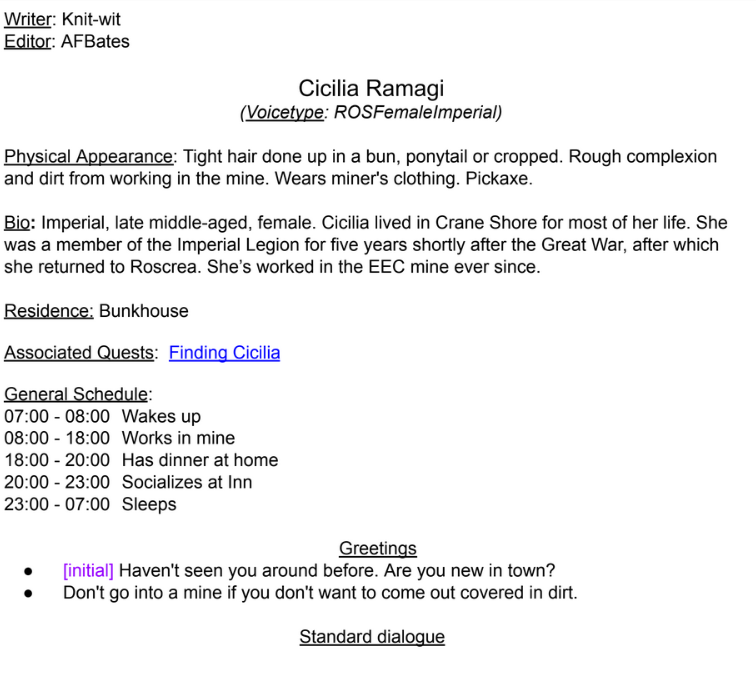
- Include an overview of the character in every general dialogue document, (or in the quest doc if the character does not have general dialogue) that includes, if applicable:
- Brief bio that includes race, gender, and occupation; family members, if any; relevant backstory.
- Appearance (including outfit and other inventory items).
- A barebones schedule for the character, using 24-hour clock.
- Voicetype or the general demeanor for a voicetype to be chosen. (These may be added later by leads.)
- List of associated quests, with links to quest documents.
- Greetings and farewells:
- In general, greetings and farewells can be offered in any order, so use bullets rather than line numbering.
- Ideally each character will have between 1 and 3 unique greetings, and 1 to 3 farewells. Quest related greetings are not included in this count.
- In rare cases, unique greetings and farewells are not necessary in standard dialogue, as the NPC can just use generic versions. In such cases include "[No unique greetings]" or "[No unique farewells]" in the relevant sections.
- If you wish for a specific greeting to be the first greeting that the NPC says, it should be marked [initial]. If a second set of greetings follows a condition such as completion of a quest, a second [initial] may be used. Note: [initial] lines are never played again, unless specified.
- If you wish for a specific line to end a dialogue without triggering one of the standard farewells, you may end the line with [end dialogue] [no farewell].
- Passive/Active Greetings: Lines played when the player is within a certain radius of the NPC but does not interact with them actively.
- Normal greetings can be marked as [PASSIVE] to play only when no player interaction occurs.
- Normal greetings can be marked as [ACTIVE] to play only if the player interacts with the NPC.
- Normal greetings that are not tagged as Active or Passive will be used for both situations by default.
- Walk Away Farewells: If the player exits a dialogue with an NPC before it is complete, one of the NPC's standard farewells will play.
- Because not all farewells would be appropriate in such a situation, the writer can mark a general farewell as [WALK AWAY].
- If a specific line within a dialogue tree should serve as a walk away farewell appropriate only to that dialogue tree option, that line can be marked within the dialogue tree:
- Barks:
- Like greetings and farewells, barks can be offered in any order, so use bullets rather than numbering.
- NPCs have 3 types of dialogue that can occur outside of a dialogue tree, and these are known as barks.
- Idle Barks: Lines said by the NPC every x seconds.
- Entry Barks: Lines that trigger a scene or dialogue when the player enters an interior.
- Combat Barks: Lines said by an NPC during active combat.
- Follower Barks: Lines said by a follower when certain conditions are met, such as entering a cave. Ask your lead or a senior writer before including such barks.
- Merchants
- Merchant dialogue must include entry barks if the merchant is within a shop interior.
- Merchants located at a stall or outside a shop must have idle barks.
- In rare cases, an NPC will have an initial encounter that then unlocks the standard dialogue. Describe this circumstance and then include the dialogue under the heading "Initial Dialogue". Follow with the section headed "Standard Dialogue".
NPC Document Example[edit]
Quest Document Requirements[edit]
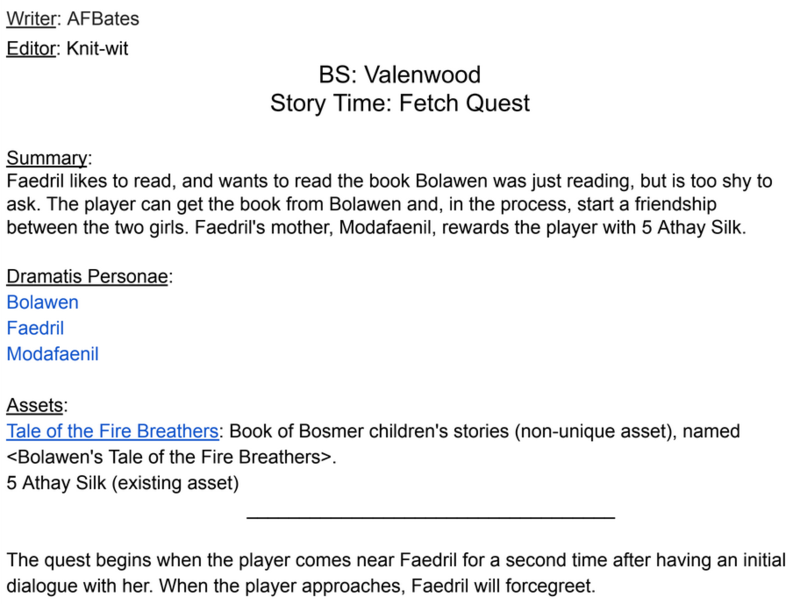
- All quests should have the following sections filled out at the top of the document before submitting for review:
- Quest Title and Type: The name of your quest and the type (Fetch, Misc., Side, etc.).
- Summary: A rough summary that outlines the events of your quest.
- Dramatis Personae: The main characters, with links to each. Indicate if there are any NPCs that are not pre-existing characters.
- Assets: A list of the unique assets required for the quest. Generally quests should try not to require assets. But when they do, make sure to ask a writing director.
- All notes/journals/books referenced in a quest should have their own separate documents listed among the Assets, with links provided in the quest document.
- Information on how to include objectives and journal entries can be found in "Quest Objectives and Journal Entries" in the Implementation Guide below.
Quest Document Example[edit]
Text Formatting Guide[edit]
Punctuation[edit]
- Dashes: The em-dash (—) and en-dash (–) are banned. They don't show up in-game. Where these would ordinarily be used for pauses, stuttering, interruptions, or trailing off, use the following:
- Pauses: To indicate a pause between two connected clauses, use a singular hyphen (-) with spaces on either side.
- e.g. That's exactly what this is - a road to an early death!
- Interruptions: To show that someone has been interrupted or a line cut off, use two hyphens at the end of the word.
- EXAMPLE (Scene between two NPCs)
- NPC 1: What is the meaning of--
- NPC 2: Stop right there, criminal scum!
- EXAMPLE (Scene between two NPCs)
- Stuttering: To show that someone is stuttering, use a hyphen with no spaces on either side.
- e.g. Sh-she's sleeping, over there. I-I don't know what to s-say.
- Trailing off: To indicate that someone's speech has trailed off into silence, use three dots:
- e.g. I tried to tell her that I... Oh, I don't know what I mean!
- Pauses: To indicate a pause between two connected clauses, use a singular hyphen (-) with spaces on either side.
- Quotation Marks:
- Use quotation marks ("), not apostrophes or inverted commas (') for quoted material.
- As per American English, quoted material at the end of the sentence includes punctuation within the quotation marks, not without. For a full explanation, see: Grammarly
- Apostrophes:
- When using the possessive apostrophe with a name that ends in "s", use a second "s" to denote it, rather than a lone apostrophe. (This also helps for lip sync generation.)
- e.g. Arrys's ship
- Not Arrys' ship
- For other rules regarding apostrophes, see: Grammarly.
- When using the possessive apostrophe with a name that ends in "s", use a second "s" to denote it, rather than a lone apostrophe. (This also helps for lip sync generation.)
- Commas:
- Please follow standard usage. For a full explanation, see: Grammarly
- Avoid comma splices. This means not joining two separate independent sentences with a comma.
- e.g. That mer had better watch out. I've got my eye on her.
- Not That mer had better watch out, I've got my eye on her.
- Use a comma before "and" only if what follows is an independent clause.
- e.g. I'm going to Roscrea, and I'm going to mine mithril
- Not I'm going to mine mithril, and copper.
- Use serial (Oxford) commas throughout; that is, when you are listing three or more items, commas should separate each element of the list.
- e.g. I'm going to mine mithril, copper, and gold.
Capitalization[edit]
In addition to commonly-accepted capitalization rules (e.g. proper nouns), there are usages specific to our game-writing conventions. There are two sets of rules for capitalization: general rules that apply to all of our written text, and rules which are contextual depending on where the text will appear and what function it serves. When in doubt, ask a lead or consult the word list.
- General rules
- Gods/gods
- Non-specific references to gods are lowercase, as are pronoun references to gods in game.
- e.g. May the gods watch over your battles, friend.
- Not May the Gods watch over your battles, friend.
- e.g. May Mara bless you with her love.
- Not May Mara bless you with Her love.
- Specific references to individual gods (Mara, Akatosh, Shor, Molag Bal, etc.) and the "Eight/Nine Divines" should be capitalized, as should the names of totems (Bear, Whale, Owl, etc.)
- Daedra/Daedric should be capitalized.
- e.g. Those Divines don't have Daedric artifacts.
- Not Those divines don't have daedric artifacts.
- Non-specific references to gods are lowercase, as are pronoun references to gods in game.
- Race names
- Capitalize correct as well as Imperialized versions of specific names of races (Dunmer, Orc, Bosmer, etc.).
- e.g. Any Dunmer worth their weight in ash would say the same.
- e.g. I'm a Dark Elf and I live in Windhelm.
- Lowercase slang, colloquial, or derogatory terms.
- e.g. You damn gray-skin. Go back to Morrowind!
- Lowercase references to macro-species names such as "human", "elven", or "beastfolk".
- Capitalize correct as well as Imperialized versions of specific names of races (Dunmer, Orc, Bosmer, etc.).
- Faction names
- When referring to a specific faction, capitalize all words in the faction name, even if they are not proper nouns: the Thieves Guild, the East Empire Company.
- When using a short form of the faction name, also capitalize: the College [College of Whispers], the Company [East Empire Company]. If the full faction name could be said in place of it, it's valid to capitalize the partial.
- Bandits and corsairs are not included as factions, though their specific clan names are.
- e.g. Those corsairs are getting out of hand.
- e.g. I hear the Claws are operating out of Bravil.
- Titles
- Capitalize a title such as "count" when it is part of the name of the person and acting as a modifier.
- e.g. Count Pertinax sends his regards.
- Capitalize a title when it is being used as part of a formal title.
- e.g. He is the Count of Kvatch.
- Capitalize a title when it is used in direct address.
- e.g. Hello, Canonreeve, how do you like the weather we're having?
- Do not capitalize when the word is used in other general senses as an ordinary noun.
- e.g. The count came to see me yesterday.
- e.g. In a world before emperors ruled...
- EXCEPTION: "Emperor/Empress" is a special case and should be capitalized, even when not used as part of a full title.
- e.g. We must speak with the Empress.
- Refer to project-specific guidelines or word lists for other exceptions. The top of this document contains links for each project.
- Capitalize a title such as "count" when it is part of the name of the person and acting as a modifier.
- Species names
- Use lowercase unless used as part of another proper noun.
- e.g. Make love like a sabre cat.
- e.g. Bring me the Cloak of Sabre Cats.
- If a proper noun exists in the species name, capitalize only the proper noun.
- e.g. Kill the Atmoran wolf.
- Not Kill the Atmoran Wolf.
- Not Kill the atmoran wolf.
- Use lowercase unless used as part of another proper noun.
- Herbs and Ingredients
- When used in dialogue, objectives, and journal entries, capitalize only the proper noun portion of an ingredient name. Otherwise, ingredient names are lowercase.
- e.g. Can you bring me some Jerall flowers?
- Not Can you bring me some Jerall Flowers?
- e.g. Can you bring me some blue mountain flowers?
- Not Can you bring me some Blue Mountain Flowers?
- When used in implementation notes or other out-of-universe text, capitalize ingredient names:
- e.g. [add Corundum Ore]
- When used in dialogue, objectives, and journal entries, capitalize only the proper noun portion of an ingredient name. Otherwise, ingredient names are lowercase.
- Currency references are always lowercase:
- e.g. You need to work for your septims.
- Diseases should always be capitalized:
- e.g. I think that wolf might've given me Rockjoint.
- Locations and Regions
- Specific location and region names should always be capitalized:
- e.g. Sunnyside Vineyard is on the cliffside just outside Anvil.
- e.g. The Morae Isles are unlike any other place in Alinor.
- General terms for locations and regions should be lowercase.
- e.g. Is he going to the mine today?
- e.g. These islands hold many secrets.
- Specific location and region names should always be capitalized:
- Gods/gods
- Contextual rules
- Capitalization can vary depending on whether the text in question is in-universe text (e.g. lines of dialogue, a note or book) or out-of-universe text (e.g. text of objectives, loading screens, tooltips).
- Out-of-universe text assigns significance to game systems and mechanics and so capitalizes important terms like names of specific quest items, attacks, skills, or stats. Do not capitalize when referring to something general or non-specific, such as "a sword" or "her bow."
- e.g. (Tooltip) Hold left-click to perform a Power Attack.
- e.g. (Objective) Steal Barnaby's Journal
- e.g. (Loading Screen) Ayleid Wells can be used to give you a Magicka boost once per day.
- In-universe text does NOT assign significance to game systems and mechanics, and so does not capitalize such terms.
- e.g. (Readable Book) His enthusiasm makes up for his lack of stamina.
- e.g. (Dialogue) Go to the castle and steal Barnaby's journal.
- e.g. (Dialogue) I've often found that the lesser-known schools of magicka bear the most fruit.
Numbers[edit]
- Write out ALL numbers, no matter how large, for anything said out loud (either by a character or theoretically by the player, even though the player doesn’t actually speak). This aids in lip syncing for voice generation files.
- Numbers contained in parenthesis, such as at the end of a line to denote a price in game terms, should be written with numerals.
- EXAMPLE (NPC and PC barter)
- That'll be five hundred septims for the item, please.
- Sure, here's the money. (500 gold)
- That'll be five hundred septims for the item, please.
- This rule also applies to titles.
- e.g. That was in the time of the great Titus Mede the Second.
- Not That was in the time of the great Titus Mede II.
- EXAMPLE (NPC and PC barter)
- EXCEPTION: Books or written texts can use either Titus Mede the Second, OR Titus Mede II as they are not spoken by the player nor a character.
- Numerals may be used in the text of objectives, as these are not spoken.
- e.g. Bring 10 fire salts to Balimund
Implementation Guide[edit]
Implementation refers to anything that instructs someone on how to read a line, when to show a line, where to go after a line is said, or other procedural matters. Because it involves elements larger than the written dialogue itself, it has precise rules that must be followed. Please read this section carefully. If you have questions about implementation, consult your writing lead.
ALL IMPLEMENTATION NOTES ARE REQUIRED TO BE EITHER AT THE BEGINNING OR THE END OF THE LINE IN SQUARE BRACKETS OF THE CORRESPONDING COLOR.
Implementation Notes[edit]
- Implementation notes can be used for a variety of purposes:
- Something taken from PC
- e.g. I'd like to rent a room. (10 gold) [remove 10 gold]
- e.g. I found the tome. (Give tome) [remove Ancient Tome]
- Something given to PC
- e.g. Thank you so much for all of your help. [add 100 gold]
- e.g. You'll need permission from the Jarl. [add Permission Papers]
- e.g. It's at Frost Maw Cave. I'll mark it on your map. [place quest marker on Frost Maw Cave]
- Dialogue progression
- Concluding a dialogue with NPC
- e.g. I will look forward to your return. [end dialogue]
- Returning dialogue to the first set of options
- e.g. There isn't much else to say about that. [back to root]
- Returning dialogue to the most recent set of options.
- e.g. Did you have any other questions about that? [back to options]
- These progression instructions should be the final instruction given when there is a group that is stacked. See examples below.
- Concluding a dialogue with NPC
- Disposition of NPC toward PC
- e.g. Thank you so much for all of your help. [increase disposition by 1]
- e.g. This is awful! What am I going to do now? [decrease disposition by 1]
- e.g. You are the best of them, friend. [set disposition to 3]
- e.g. I can't stand the sight of you. [set disposition to -3]
- Quest granted or completed
- e.g. I will look forward to your return. [Quest granted: Old Friends]
- e.g. Good work, my friend. [Quest completed: Old Friends]
- Objective granted or completed
- e.g. I need that gold as soon as possible. I have debts of my own to pay. [Objective granted: Recover payment from Reslyn]
- e.g. Ah, there's the gold I'm owed! Good work, my friend. [Objective completed: Recover payment from Reslyn]
- Something taken from PC
- Implementation notes can be stacked next to each other when multiple indications need to be made at the end or beginning of a line:
- e.g. I will look forward to your return. [Quest granted: Old Friends] [Objective granted: Recover payment from Reslyn] [end dialogue]
- e.g. Good work, my friend. [Objective completed: Recover payment from Reslyn] [Objective granted: Recover payment from Mattieu] [end dialogue]
Keywords[edit]
- Directional notes can require a lot of cross-references to move the dialogue forward or backward to a particular point. Rather than using line numbers (go to 2.3.1.2.2.1.1.), use keywords. These will remain the same, even when text is added or deleted, while line numbers will change and need to be corrected each time a document is edited.
- Set keywords as bold and uppercase so they can be easily located. Do this both within an implementation note and where a keyword is placed.
- The placement of the keyword matters, so pay close attention to where they occur in the examples that follow.
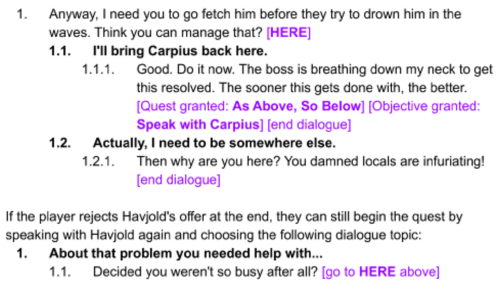
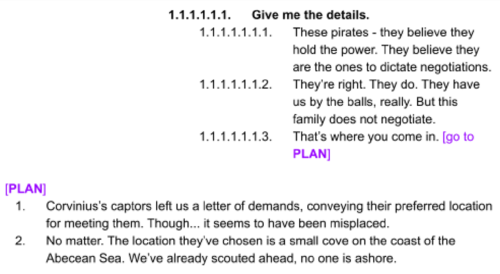
- If you place the keyword before a list of dialogue options, the NPC will not speak and that list of dialogue options will be presented to the player. See the HERE example below.
- If you place the keyword before a line, you will be indicating that the NPC speaks that line of dialogue. See STEPS example below.
- Referencing a list of options
- Moving forward or backward within a dialogue branch
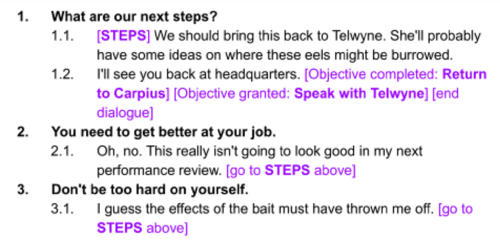
- Use the words "go to" followed by the keyword to continue dialogue within the dialogue tree.
- You may add "below" or "above" for clarity. This is especially helpful when the keyword is located far from the line where the implementation note is.
- In this example, the keyword STEPS is used to direct the implementer to other dialogue points in the same branch.
- Continuing text when you run out of room
- Branching
- Locking and unlocking dialogue
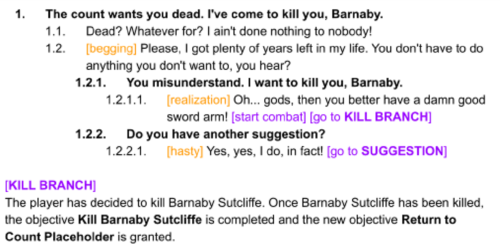
- Use [locked] to indicate that an option should not be shown to the player until another portion of dialogue has been completed. Then [unlock] the option by reference to a keyword, not a line number (even if the lines are near one another). Line numbers change if text is moved during editing; keywords stay the same.

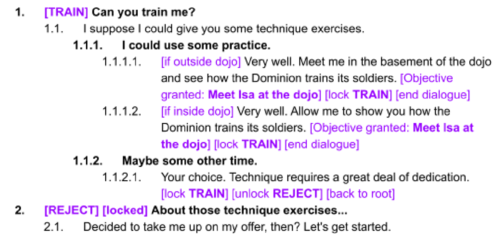
- Use [locked] to indicate that an option should not be shown to the player until another portion of dialogue has been completed. Then [unlock] the option by reference to a keyword, not a line number (even if the lines are near one another). Line numbers change if text is moved during editing; keywords stay the same.
Conditional Dialogue[edit]
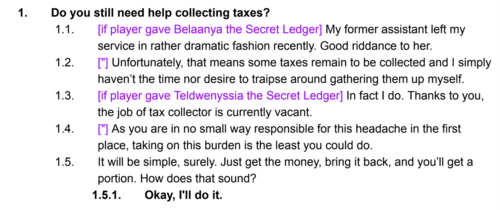
- There are occasions where a player option or dialogue line should only be available if certain conditions have been met. In these cases, the condition should be placed at the beginning of the line, in purple type and within square brackets.
- Conditions can be achieved easily by implementation but it should be noted that they will not be attached to the script that handles persuasion and intimidation because they will not reward XP.
- When conditioning a line of dialogue, you must specify every condition:
- e.g. [if PC is Khajiit] Kin of kin! Khajiit welcomes his own.
- e.g. [if PC is not Khajiit] Warm sands, friend.
- When conditioning a line of dialogue as either one thing or the other, write out the separate lines in their entirety.
- e.g. [if PC is male] Get him, before he gets away!
- e.g. [if PC is female] Get her, before she gets away!
- Not Get [him/her], before [he/she] gets away!
- An option or line can be conditioned to be available only under certain circumstances. Once the condition is met, the option will always succeed, so there is no need to provide a failure line.
- Thresholds
- An option can be conditioned to be available only once the player has passed a threshold of having a certain skill level or gold level.
- e.g. [if PC gold > 100] Fine, I'll pay. Here. (100 gold)
- e.g. [if Smithing > 50] I know your steel is poor quality.
- An option can be conditioned to be available only once the player has passed a threshold of having a certain skill level or gold level.
- Specific items found in player inventory
- e.g. [if PC has Dragonstone] I found the Dragonstone you were looking for. (Give Dragonstone) [remove Dragonstone]
- Thresholds
- An option or line can be conditioned to show up only if the player is in a certain place in the worldspace or in the progression of a quest.
- Completion of objectives/quests or specific outcomes of quests
- e.g. [if Iron Lung is complete] Gaeridil is breathing much easier now.
- e.g. [if A'alani is dead] You'll have to ask Indur for a reading of the stars.
- Specific locations
- e.g. [if at forge] Need your blades sharpened, do you?
- Completion of objectives/quests or specific outcomes of quests
- Dialogue can also be conditioned on the player's three primary attributes, Health, Stamina, and Magicka. These are much more rare as there are limited circumstances when an action or persuasion would be dependent on these attributes.
- e.g. [if Health > 250] I know how to take a hit. (Brawl)
- For multiple dialogue lines that fulfill the same condition, use ["] in purple.
Player Actions, Skill Checks, and Rewards[edit]
- Actions: The player can take a number of actions in dialogue:
- Place all player actions shown in in-game text such as (Persuade), (Intimidate), (Give X), (Illusion), (Brawl), (Lie), etc., at the end of the line within parentheses and in the same type as the player line (bold and black). This is what the player sees, and the characters in these notations are counted toward the character limit of 80 for a player line.
- e.g. You can tell me. I'm only here to help. (Persuade)
- e.g. You feel the urgent need to open the door for me. (Illusion)
- (Persuade) is an action based on the player's Speech skill. As such, Speech perks will decrease these thresholds when they are acquired. Very Easy can only be failed if the player has a Speech-reducing disease.
- (Intimidate) is an action based on the player's Speech skill, while also taking into account the NPC's confidence level. Avoid specifying different difficulty levels for different Intimidate checks on the same NPC for implementation reasons.
- (<BribeCost> gold) is an action dependent on the player having enough gold, and, as such, has the potential to succeed or fail. Please do not specify an amount, as this will be calculated by the game.
- (X gold) is an action dependent on the player having the amount of gold specified by the numeral X, so it has the potential to succeed or fail. This action is to be used whenever you want the player to pay a flat amount of gold.
- (Lie) is an action that is not tied to any skill. The single outcome of this action is entirely dependent on the narrative circumstances.
- (Brawl) is an action used to indicate that an option will result in a (non-lethal) brawl. As such, there are success and failure options for this action.
- (Attack) is an action used to indicate that an option will result in combat.
- (Give X) is an action presented whenever the player has an item to give. This action follows the rules of out-of-universe text:
- Quest items require capitalization:
- e.g. Oh, you mean this old stone? (Give Dragonstone)
- Generic items do not require capitalization:
- e.g. Here's the spell tome you asked for. (Give tome)
- Do not quantify the amount given in parenthesis:
- e.g. I have five samples right here. (Give Netch Jelly)
- Do not include the recipient of the item:
- e.g. Here's the sword. (Give sword)
- Quest items require capitalization:
- Place all player actions shown in in-game text such as (Persuade), (Intimidate), (Give X), (Illusion), (Brawl), (Lie), etc., at the end of the line within parentheses and in the same type as the player line (bold and black). This is what the player sees, and the characters in these notations are counted toward the character limit of 80 for a player line.
- Skill checks
- Skill checks are denoted as actions, but also include the relevant skill and the conditions necessary to pass the skill check.
- Difficulty
- Skill checks have a difficulty range of Very Easy, Easy, Average, Hard, and Very Hard. Denote this in words in boldface purple type within square brackets at the end of the line.
- e.g. You feel the urgent need to open the door for me. (Illusion) [easy]
- The values for passing the skill checks, from Very Easy to Very Hard are:
- Speech skill checks: 10, 25, 50, 75, 100
- Illusion skill checks: 20, 35, 50, 75, 100
- Skill checks have a difficulty range of Very Easy, Easy, Average, Hard, and Very Hard. Denote this in words in boldface purple type within square brackets at the end of the line.
- Passing a skill check
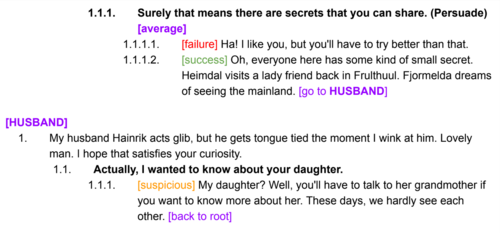
- Success and failure on a skill check or action are indicated in dark green and red and placed before the NPC line, as shown in the example below.
- Because passing a skill check rewards the player with XP, it is important to lock the skill check so that the player cannot farm the dialogue for infinite XP.
- If the NPC has multiple lines of dialogue in response to a success/failure check, you may use ["] in the appropriate color.
- However, if a player line follows the success or failure dialogue, you must use a full merge with a keyword. This also applies to reward dialogue, or any dialogue that changes the player's inventory: "Give me that. [remove artifact]". This only applies if the player has subsequent lines.
- If dialogue continues after a skill check, it must start in a new dialogue tree so the player can select the dialogue without passing the skill check again.
- Auto-pass and Auto-fail
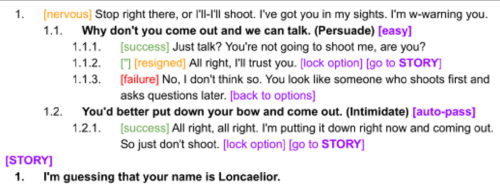
- In lieu of assigning difficulty, you may also use [auto-pass] or [auto-fail]. There is only one outcome in this kind of check, so there is no need to include a line for [failure] for an auto-pass or [success] for an auto-fail. (See the example above.)
- Rewards and Payments are placed at the end of the line where they are received, in purple and within square brackets:
- EXAMPLES:
- Here's the potion you asked for.
- Thank you. Now let me give you something for your trouble. [add 50 gold]
- I'd like to rent a room. (10 gold)
- Okay, it's yours for a day. [remove 10 gold]
- Here's the potion you asked for.
- EXAMPLES:
- Leveled Rewards
- Writers can either indicate a specific reward or scale the reward to reflect the difficulty of a task, using the leveled rewards built into Skyrim.
- e.g. [add Potion of Minor Stamina] to give the player a specific potion.
- e.g. [add Leveled Stamina Potion] to give the player a potion commensurate with the player's level in the game, such as a Minor, Plentiful, Extreme, or Ultimate Potion of Stamina.
- Generally, the amount of a leveled reward depends on the player's level, but in the case of gold rewards, the magnitude of the reward can be indicated within the implementation note, using all caps.
- e.g. [add SMALL leveled gold reward]
- The leveled list for gold rewards is:
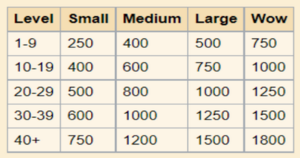
- The full range of leveled rewards can be found at Leveled List page on UESP.
- Writers can either indicate a specific reward or scale the reward to reflect the difficulty of a task, using the leveled rewards built into Skyrim.
[edit]
- All notes for the attention of the voice director/actor at the beginning of the line in orange text, within square brackets.
- VA notes are copied into a separate box in the CK which is attached to the line as a whole. The VA will only get the notes as an addendum to the line they need to read. The position of the notes will not be preserved through this process, so placing them within a line is pointless.
- Voice Actor Notes can be used for a variety of purposes:
- Stress To emphasize a certain word or phrase. (Do not use italics for this.)
- e.g. [emphasis: still] Is that a chapel up there? Really? We're at the end of the world, and we still can't escape those damned priests!
- Homophones To clarify any homophones that could be confusing.
- e.g. [all past tense] He saw me and he gave me the book and I read it.
- e.g. [all present tense] And now I read it over and over. It... changes.
- Pronunciation If the pronunciation of a name in a dialogue line could be confusing or complicated, include a phonetic breakdown of the name in orange, in parentheses, to assist the voice actors. Capitalize the stressed syllable(s).
- e.g. [KATH-noh-kway, YIN-slay-ah, EZZ-ree-oh-nyet] During his reign, Uriel the Fifth conquered Cathnoquey, Yneslea, and Esrionet as well.
- Emotion To indicate a particular emotion the line should convey or a change in emotion.

- Other languages If the NPC is speaking in a conlang (e.g. Roscrean, Ta'agra), the translation in orange type tells the VA what the line means, and thus how to deliver the line. The player will only see and hear the foreign language.
- e.g. [Ta'agra: Hello, brother] Dras'kay, liter.
- Stress To emphasize a certain word or phrase. (Do not use italics for this.)
- Vocalizations Do not use VA notes in orange type for anything that is actually voiced.
- Use black type and parentheses to add vocalizations that are part of an NPC's line of dialogue: (sigh) (laugh) (chuckle) (sob), etc.
- Use nouns, not verbs, for vocalizations, and do not capitalize them.
- e.g.(sigh) I suppose you’re right.
- Not (sighs) I suppose you’re right.
- Not (He sighs) I suppose you’re right.
- Not (Sigh) I suppose you’re right.
- When a vocalization is put at the end of a line or between sentences, it should follow the terminal punctuation.
- e.g. He fell flat on his back. (chuckle)
- Not He fell flat on his back (chuckle).
- e.g. He fell flat on his back. (chuckle) You should have seen it.
- Not He fell flat on his back (chuckle). You should have seen it.
- The examples here are taken from Skyrim. Writers should feel free to create their own vocalizations as long as they follow the above rules.
- Sharedinfos
- Reusing the same NPC response lines multiple times saves on form counts and voice actor work, so this practice is both useful and economical.
- Write all shared dialogue lines in black the first time they are used, and in cornflower blue for every instance of exact repetition of the line.
- Keeping the first use of the line in black enables voice actors to know that a line has not already been recorded. Blue shows them that a line does not need to be recorded again.
Quest Objectives and Journal Entries[edit]
- Progress through a quest is shown through objectives and journal entries.
- Fetch and Misc. quests require only a "Misc. objective", but no journal entries.
- Longer or more complex quests require both objectives and journal entries.
- Implementation notes within dialogue trees or instructions tell when objectives are granted and completed.
- Put each notation in square brackets in purple type. These can be stacked with other implementation notes.
- e.g. [Objective completed: Bring corundum ore to Indirel] [Objective granted: Meet Indirel to conduct the ritual to Azura] [end dialogue]
- Put each notation in square brackets in purple type. These can be stacked with other implementation notes.
- Objectives begin with a capital letter but end without a period, and they follow the capitalization rules for sentences, not titles.
- Objectives are set in bold type in both implementation notes and lists of objectives. Ideally, they should not exceed 60 characters.
- The objectives show up in-game so they must be written in a way that reminds the player of the progression of tasks that have been completed and what still needs to be done.
- e.g. Bring corundum ore to Indirel
- Not Get ore
- Objectives completed, failed, and current should be specified whenever a quest updates.
- If an objective is not required for the quest to be completed "(Optional)" may be added before the wording of the objective:

- If there are two choices that the player can make, each with its own objective, they may be shown like this:

- If the objective involves collecting multiple items that the game will count to determine when the objective is fulfilled, use the form x/10:

- Journal entries follow the quest update and are set in italics.
- Journal entries show up in-game and serve as reminders to the player of what has already been accomplished in a quest and what the next step is. Since a player may wait hours, days, or even months before continuing a quest, these must be specific.
- e.g. Azura has spoken to me. The priest in Jehanna will want to know this.
- Not I need to tell the priest what happened.
- In general, try to avoid using "must" and "should" in journal entries so that the player can decide what actions need to be taken.
Miscellanea[edit]
- Naming conventions
- Redguard heritage naming goes: Name at-Ancestor or Name al-Location, or Name af-Relative, e.g. Marona at-Orane.
- Orcs are always Name gro-Fathersname for males and Name gra-Mothersname for females (chieftain society), e.g. Grakzul gro-Khaarn.
- Khajiit names in Skyrim do not have capitalization after an apostrophe: M'aiq, J'zargo, Ma'randru-jo. We follow this precedent, despite names from earlier titles such as Oblivion having inconsistent rules in this regard.
- Argonian names should have all parts of the name capitalized, e.g. Stands-In-Shallows.
- Player Name Use <Alias=Player> when you need to insert an instance of the player's name. This should only be used in player options, as NPCs will never say the player's name.
- e.g. Nice to meet you. I'm <Alias=Player>.
