Arcane University: 2D definitions
Contents
Render
A render is a realistic or semi-realistic view of the asset that portrays texture, light, shadow, and form. It can be painted (matte painting) or built up by integrating real textures from photos (photobashing) or a mix of both. A finished render has little to no lineart. Other than simply being cool to look at, the point of a render is to display the materials (e.g glass, fur, leather etc), shapes, and textures of the asset to provide a realistic reference for the 3D artist.
Perspective View
To be written.
Isometric View
To be written.
Orthographic View
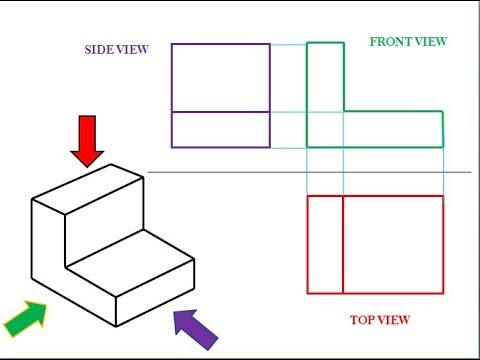
Means to portray the flat front view, top view, back view, and side view(s) of the asset. Orthographic view is painted without perspective.
These are often used by the 3D modeler as blueprints - they import the views into their modelling program and align the shapes along the lineart. This makes the modeling process much faster and easier. It is recommended that these drawings are clear, flat black lines so the modeler can clearly see the details of the design.
That's why it's important that the 2D Artist makes sure the different views align - everything is the right height, width, size and place on all of the views. If the asset is symmetrical, only one sideview is needed. But if the object/character is asymmetrical (the design on the right side doesn’t match the left) then that side will need to be added to the turnaround as well. The front view can be duplicated and rendered to show the materials, or another ¾ view can be drawn and rendered.
Turnarounds
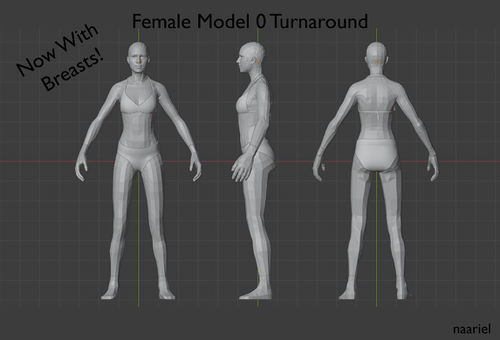
Turnarounds is pretty much the same as orthographic view, but used mostly in relation to armour and clothing. The same principles apply: drawing a front, side and back view of the asset. Top views are rarely, if ever, used for armour.
The in game model turnaround templates are pinned to the #2D channel on the Arcane University discord. When drawing concept art for a project it is recommended - if not required - that the artist displays the clothing on the template to make the job of making armour as easy as possible for the 3D artist. Again you must make sure all the elements align across your views - same height, shape, width, size, placement.
Designs / Patterns
These must be made as a separate file – black (or a visible solid color) on transparent background so that the design can later be ‘stamped’ on 3D object. This is referred to as an ‘alpha’. Though creating a separate file is recommended, clear designs/patterns can also be placed on the main concept piece as long as it is clear and easy for the 3D modeler to remove and make an alpha from it. In some cases it’s important that the pattern is repeatable. How you do this depends on your software - time to go Googling “how to make repeatable pattern in X”.
Materials
In order to texture the 3D model, the modeler must know what textures or ‘materials’ to use – what the parts of the concept are supposed to be made of (for example, leather pants should probably look like leather). This is shown through rendering the piece or by supplying the artist photos of the texture. The details of the materials can also be written on the concept art. Remember, a major part of the concepting process is making it as easy as possible for the people that are going to use it next.
Cross section
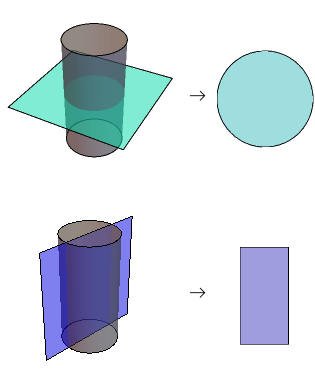
Is basically the top view silhouette if you slice a thing in half. Useful for when the top view obstructs elements beneath it and when details arent easy to deduct from a sideview.


