Difference between revisions of "Arcane University:Editing Animation Skeletons"
| (28 intermediate revisions by 4 users not shown) | |||
| Line 1: | Line 1: | ||
This tutorial was written by opusGlass. | This tutorial was written by opusGlass. | ||
| − | Editing skeletons is not a substitute for editing animations, nor is it a substitute for creating a new creature behavior. | + | [[File:Vvardvark-anim.gif]] |
| + | |||
| + | Editing skeletons is not a substitute for editing animations, nor is it a substitute for creating a new creature behavior. For that, see [[Arcane University: Implementation of Custom Animations|Implementation of Custom Animations]]. | ||
It is a useful tool in some cases: when an existing creature’s behavior and animations match very well with your custom creature, so you just need a quick and easy (and compatible) way to alter the shape a little. But even then, you should realize that skeleton changes may interact with the existing animations in unexpected ways. | It is a useful tool in some cases: when an existing creature’s behavior and animations match very well with your custom creature, so you just need a quick and easy (and compatible) way to alter the shape a little. But even then, you should realize that skeleton changes may interact with the existing animations in unexpected ways. | ||
| Line 41: | Line 43: | ||
==Step 2(A): Make a balloon animal.== | ==Step 2(A): Make a balloon animal.== | ||
If you choose this option. | If you choose this option. | ||
| + | |||
First check this folder, I may have already made one for your skeleton: https://drive.google.com/drive/folders/1H2AwmfG81XK0SU8dldYKmB9TmamJPjzC?usp=sharing | First check this folder, I may have already made one for your skeleton: https://drive.google.com/drive/folders/1H2AwmfG81XK0SU8dldYKmB9TmamJPjzC?usp=sharing | ||
| + | |||
If your creature isn’t in that folder and you make your own, please send it to opusGlass13@gmail.com and I will add it to the folder. | If your creature isn’t in that folder and you make your own, please send it to opusGlass13@gmail.com and I will add it to the folder. | ||
I prefer to make a sphere+cylinder object, then duplicate it around the scene. It will be easiest if the sphere is centered on the origin, with one end of the cylinder centered there too. It’s *very important* that the cylinder only have vertices at the two ends – no vertices along its length. Basically, we want every vertex to clearly belong to exactly 1 bone. | I prefer to make a sphere+cylinder object, then duplicate it around the scene. It will be easiest if the sphere is centered on the origin, with one end of the cylinder centered there too. It’s *very important* that the cylinder only have vertices at the two ends – no vertices along its length. Basically, we want every vertex to clearly belong to exactly 1 bone. | ||
| + | |||
Place duplicates of the object at the location of each bone, with the cylinder pointing to the next bone in the hierarchy. Lengthen/shorten the cylinder to reach the next bone – it doesn’t need to be exact but all vertices need to be near a single bone. | Place duplicates of the object at the location of each bone, with the cylinder pointing to the next bone in the hierarchy. Lengthen/shorten the cylinder to reach the next bone – it doesn’t need to be exact but all vertices need to be near a single bone. | ||
| + | |||
Since some bones have multiple children, you will need to place multiple cylinders on those bones. It doesn’t matter if there are also extra spheres on that bone. | Since some bones have multiple children, you will need to place multiple cylinders on those bones. It doesn’t matter if there are also extra spheres on that bone. | ||
| + | |||
When you reach a bone that has no children, point the cylinder in whatever direction makes most sense based on what you know about the creature/skeleton. For example, the last toe bones should point along the toe. (Note in the example below, I chose to treat the head as an end node, even though it was actually the parent of the 3 wattle bones. That just made sense to me to help visualize where the head is pointing.) | When you reach a bone that has no children, point the cylinder in whatever direction makes most sense based on what you know about the creature/skeleton. For example, the last toe bones should point along the toe. (Note in the example below, I chose to treat the head as an end node, even though it was actually the parent of the 3 wattle bones. That just made sense to me to help visualize where the head is pointing.) | ||
| + | |||
Feel free to join the segments together and add a mirror modifier when useful – I did this to make the 2nd leg. | Feel free to join the segments together and add a mirror modifier when useful – I did this to make the 2nd leg. | ||
Skeleton.nif: | Skeleton.nif: | ||
| − | + | ||
| + | [[File:01_skeleton.png]] | ||
Balloon animal (with and without the bone nodes highlighted): | Balloon animal (with and without the bone nodes highlighted): | ||
| − | + | ||
| + | [[File:02_balloonAnimal.png]] | ||
Now we must rig the balloon animal. | Now we must rig the balloon animal. | ||
| + | |||
First join all the segments together. Then parent them to skeleton (select balloon, shift select skeleton, ctrl+p) and choose Armature Deform With Empty Weights. | First join all the segments together. Then parent them to skeleton (select balloon, shift select skeleton, ctrl+p) and choose Armature Deform With Empty Weights. | ||
| + | |||
In edit mode, select the vertices around a single bone, then find that bone in the Vertex Groups. Select the bone and click Assign. If you then go into Edit Mode you can see that the results look like this: | In edit mode, select the vertices around a single bone, then find that bone in the Vertex Groups. Select the bone and click Assign. If you then go into Edit Mode you can see that the results look like this: | ||
| − | + | ||
| + | [[File:03_balloon_rigging1.png]] [[File:04_balloon_rigging2.png]] | ||
| + | |||
For the segments that don’t have children, select the whole thing and assign it, instead of just the vertices next to the bone: | For the segments that don’t have children, select the whole thing and assign it, instead of just the vertices next to the bone: | ||
| − | + | [[File:05_balloon_rigging3.png]] [[File:05_balloon_rigging4.png]] | |
Once that’s done you might be able to export it right away (without a shader) depending on your version of Niftools. It’ll be invisible in nifskope if it doesn’t have a shader though. To avoid any issues, I recommend copying the NiTriShape node and the NiSkinInstance (whole branch) into the vanilla animal nif, and then replacing the existing NiTriShape and NiSkinInstance. Then for a quick test you can place that nif in the Skyrim/Data directory in the correct spot to override the vanilla creature skin, and boot the game to see your balloon animal walking around! | Once that’s done you might be able to export it right away (without a shader) depending on your version of Niftools. It’ll be invisible in nifskope if it doesn’t have a shader though. To avoid any issues, I recommend copying the NiTriShape node and the NiSkinInstance (whole branch) into the vanilla animal nif, and then replacing the existing NiTriShape and NiSkinInstance. Then for a quick test you can place that nif in the Skyrim/Data directory in the correct spot to override the vanilla creature skin, and boot the game to see your balloon animal walking around! | ||
| Line 70: | Line 84: | ||
There’s not much to say for this step, you will just need to design a low poly version of the model you will eventually make. The most important thing is that it has accurate anatomical proportions for your final product, but it doesn’t need any details such as a face, unless there are animated facial bones on the skeleton that you want to use. You should probably exclude things like long hanging fur, since that will be represented by alpha planes attached to the skin later. Use a minimal amount of vertices to speed up the drafting process later. You also might want some stand-in texture just to better see how it’s animating. | There’s not much to say for this step, you will just need to design a low poly version of the model you will eventually make. The most important thing is that it has accurate anatomical proportions for your final product, but it doesn’t need any details such as a face, unless there are animated facial bones on the skeleton that you want to use. You should probably exclude things like long hanging fur, since that will be represented by alpha planes attached to the skin later. Use a minimal amount of vertices to speed up the drafting process later. You also might want some stand-in texture just to better see how it’s animating. | ||
| + | [[File:07_lowPoly.png]] | ||
| + | |||
(This example has ugly topology because I just started from the chicken and drafted it quickly…it will probably help to do better.) | (This example has ugly topology because I just started from the chicken and drafted it quickly…it will probably help to do better.) | ||
| − | + | ||
| + | Reference image from The Elder Scrolls: Legends: | ||
| + | |||
| + | [[File:08_lowPoly_reference.png]] | ||
==Step 3: Add proxy nodes to the skeleton== | ==Step 3: Add proxy nodes to the skeleton== | ||
My recommendation for this step is to install the tool ck-cmd by Aerisarn. By my request Aerisarn added a function to automatically insert “proxy” nodes above every bone in a skeleton Nif. If you wish to insert these nodes one-at-a-time instead, you can definitely do that. Note that ck-cmd is also a “soft requirement” for one of the later steps in this tutorial though. | My recommendation for this step is to install the tool ck-cmd by Aerisarn. By my request Aerisarn added a function to automatically insert “proxy” nodes above every bone in a skeleton Nif. If you wish to insert these nodes one-at-a-time instead, you can definitely do that. Note that ck-cmd is also a “soft requirement” for one of the later steps in this tutorial though. | ||
| + | |||
The basic issue with skeleton edits is that they are usually overridden by animations at runtime. Usually, the translation (position) and rotation of each bone is overridden, while the scale of each bone is maintained, but sometimes the scale is overridden too. | The basic issue with skeleton edits is that they are usually overridden by animations at runtime. Usually, the translation (position) and rotation of each bone is overridden, while the scale of each bone is maintained, but sometimes the scale is overridden too. | ||
| + | |||
The way to circumvent this is to apply your translations and rotations to proxy nodes above the bone that you actually want to affect. Since these proxy nodes don’t exist in vanilla, the vanilla animations do not override them. The transformations you make to these nodes will “stack” with the transformations applied by the animation system. | The way to circumvent this is to apply your translations and rotations to proxy nodes above the bone that you actually want to affect. Since these proxy nodes don’t exist in vanilla, the vanilla animations do not override them. The transformations you make to these nodes will “stack” with the transformations applied by the animation system. | ||
| + | |||
With ck-cmd: | With ck-cmd: | ||
| − | 1) Add the vanilla skeleton.nif file into the input folder | + | |
| − | 2) Open a Windows terminal (a.k.a. command prompt) | + | 1) Add the vanilla skeleton.nif file into the input folder |
| − | 3) Navigate the terminal to your install folder with this command: | + | |
| + | 2) Open a Windows terminal (a.k.a. command prompt) | ||
| + | |||
| + | 3) Navigate the terminal to your install folder with this command: | ||
cd “my\install\folder\path” | cd “my\install\folder\path” | ||
| − | 4) Enter this command: | + | |
| + | 4) Enter this command: | ||
| + | |||
ck-cmd addnodestoskeleton -i "input/skeleton.nif" -e "output" | ck-cmd addnodestoskeleton -i "input/skeleton.nif" -e "output" | ||
| − | i. This assumes that the skeleton is named “skeleton.nif”, which it usually is. | + | i. This assumes that the skeleton is named “skeleton.nif”, which it usually is. |
| − | 5) The modified skeleton is now in the output folder. | + | |
| + | 5) The modified skeleton is now in the output folder. | ||
Alternatively, you can add the nodes manually in NifSkope. You will be inserting the proxy node between a parent bone and its child bone. | Alternatively, you can add the nodes manually in NifSkope. You will be inserting the proxy node between a parent bone and its child bone. | ||
| − | 1) On the parent bone, right click -> node -> attach node -> NiNode. | + | |
| − | 2) On the new proxy node, set the child bone as one of its children. | + | 1) On the parent bone, right click -> node -> attach node -> NiNode. |
| − | 3) On the parent bone’s children: | + | |
| − | a. Replace the child bone with the proxy node | + | 2) On the new proxy node, set the child bone as one of its children. |
| − | b. Remove the 2nd copy of the proxy node from the bottom | + | |
| − | c. Decrease the Num Children by one. | + | 3) On the parent bone’s children: |
| − | + | ||
| + | a. Replace the child bone with the proxy node | ||
| + | |||
| + | b. Remove the 2nd copy of the proxy node from the bottom | ||
| + | |||
| + | c. Decrease the Num Children by one. | ||
| + | |||
| + | [[File:09_proxyNodes.png]] | ||
==Step 4 (optional): Copy a transparent reference skin into the skeleton.nif== | ==Step 4 (optional): Copy a transparent reference skin into the skeleton.nif== | ||
To see where your bones should move, you’ll probably want a reference. If you’re doing a low-poly skin, use that. If you’re doing a balloon animal and you have a completed model, use that. If you’re doing a balloon animal but you don’t have a model yet, I recommend just looking at reference images / anatomy images. | To see where your bones should move, you’ll probably want a reference. If you’re doing a low-poly skin, use that. If you’re doing a balloon animal and you have a completed model, use that. If you’re doing a balloon animal but you don’t have a model yet, I recommend just looking at reference images / anatomy images. | ||
| + | |||
1) Open your skeleton.nif in NifSkope | 1) Open your skeleton.nif in NifSkope | ||
| + | |||
2) Copy the NiTriShape from your skin.nif into skeleton.nif outside the main tree. | 2) Copy the NiTriShape from your skin.nif into skeleton.nif outside the main tree. | ||
| + | |||
3) Remove the skin instance branch. | 3) Remove the skin instance branch. | ||
| + | |||
4) Set the alpha in the BSLightingShaderProperty to 0.5 and uncheck the “Skinned” shader flag. | 4) Set the alpha in the BSLightingShaderProperty to 0.5 and uncheck the “Skinned” shader flag. | ||
| + | |||
| + | [[File:10_skeletonRefSkin.png]] | ||
| + | |||
| + | |||
| + | |||
5) Make sure to enable the setting “Show Nodes” to see the bones too. | 5) Make sure to enable the setting “Show Nodes” to see the bones too. | ||
| − | + | [[File:11_showBoneNodes.png]] | |
| + | |||
| + | [[File:12_skeletonRefSkinResult.png]] | ||
| + | |||
(You can safely leave this invisible skin in your skeleton nif while testing.) | (You can safely leave this invisible skin in your skeleton nif while testing.) | ||
==Step 5: Apply transforms to the proxy nodes== | ==Step 5: Apply transforms to the proxy nodes== | ||
I’ll just go over the technical details of *how* here, I’ll give advice about shaping these skeletons later. | I’ll just go over the technical details of *how* here, I’ll give advice about shaping these skeletons later. | ||
| + | |||
1) Select a proxy node in the tree | 1) Select a proxy node in the tree | ||
| + | |||
2) Right click -> Transform -> Edit | 2) Right click -> Transform -> Edit | ||
| + | |||
3) Adjust the Translation and Rotation as necessary | 3) Adjust the Translation and Rotation as necessary | ||
| + | |||
4) Accept and save file | 4) Accept and save file | ||
| + | |||
| + | [[File:13_transformProxy.png]] | ||
• Each bone node should be thought of anatomically as a joint, not a bone. A node named “thigh” must actually be placed at the position of the hip joint. It’s called the “thigh” bone because, when rigging, the vertices of the thigh should move according to the rotations of that joint. | • Each bone node should be thought of anatomically as a joint, not a bone. A node named “thigh” must actually be placed at the position of the hip joint. It’s called the “thigh” bone because, when rigging, the vertices of the thigh should move according to the rotations of that joint. | ||
| − | • Ignore the positions of the proxy nodes. Since they really encode “offsets” in transformations, they are not very visually meaningful. In your head just imagine the child bones are connected directly to their parent bones. | + | |
| − | + | • Ignore the positions of the proxy nodes. Since they really encode “offsets” in transformations, they are not very visually meaningful. In your head just imagine the child bones are connected directly to their parent bones. | |
| + | |||
| + | [[File:14_ignoreProxies.png]] | ||
==Step 6: Applying skeleton edits to an existing skin nif, WITHOUT deforming that skin.== | ==Step 6: Applying skeleton edits to an existing skin nif, WITHOUT deforming that skin.== | ||
(Skip this step for balloon animals, they are intended to deform with the skeleton edits.) | (Skip this step for balloon animals, they are intended to deform with the skeleton edits.) | ||
| + | |||
Skins include a copy of every bone’s 3D data. When transforms are applied to the skeleton.nif, the skin nif uses its copy of the bones to decide how each vertex should move. So, if you move the jaw bone of a skeleton and then preview that creature in-game / in-CK, you will find that vertices rigged to the jaw have moved to a new position. | Skins include a copy of every bone’s 3D data. When transforms are applied to the skeleton.nif, the skin nif uses its copy of the bones to decide how each vertex should move. So, if you move the jaw bone of a skeleton and then preview that creature in-game / in-CK, you will find that vertices rigged to the jaw have moved to a new position. | ||
| + | |||
But what if the skin was already in the correct position, and you just need to adjust the bone placement to work better with that existing skin? You move the jaw bone to the position of the skin’s jaw, look in the CK, and now your jaw is no longer where it should be. | But what if the skin was already in the correct position, and you just need to adjust the bone placement to work better with that existing skin? You move the jaw bone to the position of the skin’s jaw, look in the CK, and now your jaw is no longer where it should be. | ||
| + | |||
Other 3D editing software might handle rigging differently but with Blender, this step was also necessary when going back and forth between skin (rig) edits and skeleton edits. | Other 3D editing software might handle rigging differently but with Blender, this step was also necessary when going back and forth between skin (rig) edits and skeleton edits. | ||
| + | |||
Using ck-cmd: | Using ck-cmd: | ||
| − | 1) Add your custom skin.nif and skeleton.nif to the ck-cmd input folder | + | |
| − | 2) Open a Windows terminal (a.k.a. command prompt) | + | 1) Add your custom skin.nif and skeleton.nif to the ck-cmd input folder |
| − | 3) Navigate the terminal to your install folder with this command: | + | |
| + | 2) Open a Windows terminal (a.k.a. command prompt) | ||
| + | |||
| + | 3) Navigate the terminal to your install folder with this command: | ||
cd “my\install\folder\path” | cd “my\install\folder\path” | ||
| − | 4) Enter this command: | + | |
| + | 4) Enter this command: | ||
ck-cmd retargetskin -i "input/skin.nif" -s "input/skeleton.nif" -e "output" | ck-cmd retargetskin -i "input/skin.nif" -s "input/skeleton.nif" -e "output" | ||
| − | i. Change “skin.nif” to whatever your skin is named. | + | |
| + | i. Change “skin.nif” to whatever your skin is named. | ||
The modified skin is now in the output folder. | The modified skin is now in the output folder. | ||
==Step 7: Preview in Creation Kit== | ==Step 7: Preview in Creation Kit== | ||
Note: If you convert the animation HKX files you can import them into blender instead, which might speed up drafting, I haven’t tried it. Just be sure you test all the animations. | Note: If you convert the animation HKX files you can import them into blender instead, which might speed up drafting, I haven’t tried it. Just be sure you test all the animations. | ||
| + | |||
1) In your Skyrim\Data\meshes folder, place the skeleton.nif and balloonSkin.nif into the appropriate directories to override the vanilla creature you’re using as a base. The file names need to match as well. Note: it is important that you do this BEFORE proceeding, or at least before Step 5. | 1) In your Skyrim\Data\meshes folder, place the skeleton.nif and balloonSkin.nif into the appropriate directories to override the vanilla creature you’re using as a base. The file names need to match as well. Note: it is important that you do this BEFORE proceeding, or at least before Step 5. | ||
| + | |||
| + | [[File:15_overrideVanillaFiles.png]] | ||
| + | |||
2) Open the Creation Kit and load Skyrim.esm (if your base creature is from a DLC, load that too). You don’t need to set any active file. | 2) Open the Creation Kit and load Skyrim.esm (if your base creature is from a DLC, load that too). You don’t need to set any active file. | ||
| + | |||
3) In the Object Window, select Actors>Actor. | 3) In the Object Window, select Actors>Actor. | ||
| + | |||
4) Use the filter box to narrow it down until you see the base creature. | 4) Use the filter box to narrow it down until you see the base creature. | ||
| + | |||
5) Right click -> Preview. You should see your balloon animal, deformed to fit whatever skeleton adjustments you’ve made. (Error dialogs are likely to pop up, you can ignore them at this stage.) | 5) Right click -> Preview. You should see your balloon animal, deformed to fit whatever skeleton adjustments you’ve made. (Error dialogs are likely to pop up, you can ignore them at this stage.) | ||
| + | [[File:16_ckPreview1.png]] | ||
| + | |||
6) In Animations > Havok Anims, select an animation to see how it interacts with your changes. | 6) In Animations > Havok Anims, select an animation to see how it interacts with your changes. | ||
| + | [[File:16_ckPreview2.png]] | ||
| + | |||
7) After making further skeleton edits (or skin edits), you can replace the files in Data and then click Havok > Reset in the preview window to see your new model. You don’t need to close and reopen Creation Kit. | 7) After making further skeleton edits (or skin edits), you can replace the files in Data and then click Havok > Reset in the preview window to see your new model. You don’t need to close and reopen Creation Kit. | ||
| + | |||
Be sure to check all the animations, or at least most of them! The more creative you are being, the more likely that one of the animations will surprise you (probably in a bad way). | Be sure to check all the animations, or at least most of them! The more creative you are being, the more likely that one of the animations will surprise you (probably in a bad way). | ||
| − | |||
==Step 8: Try stuff, a lot== | ==Step 8: Try stuff, a lot== | ||
Repeat steps 2B – 7 as necessary until the result is satisfactory. | Repeat steps 2B – 7 as necessary until the result is satisfactory. | ||
| + | |||
This part is not easily explained and really just requires lots of trial and error. You’ll learn both the general skill of editing skeletons, and the quirks of whichever animation you’re working on that day. | This part is not easily explained and really just requires lots of trial and error. You’ll learn both the general skill of editing skeletons, and the quirks of whichever animation you’re working on that day. | ||
| + | |||
You can also import your retargeted skin from Step 6 into blender to see the latest bone positions while you rig. | You can also import your retargeted skin from Step 6 into blender to see the latest bone positions while you rig. | ||
| − | |||
| + | [[File:17_finalResult.png]] | ||
==Tips and hints for skeleton editing and creative rigging== | ==Tips and hints for skeleton editing and creative rigging== | ||
| − | • Animations in Skyrim are almost always pure rotations (with the pivot of the rotation at the position of the bone node). As a result: | + | • Animations in Skyrim are almost always pure rotations (with the pivot of the rotation at the position of the bone node). As a result: |
| + | |||
o The anatomy rigged to a specific bone node does not need to point from that bone node toward its child(ren). We saw this with the chicken head – the children of the head “bone”, which is actually the joint connecting the neck to the skull, are the 3 waddles. But the anatomy connected to the head bone (namely, the chicken’s skull) points in a completely different direction that is not determined by anything in the skeleton.nif file and actually extends further away than the child bones. | o The anatomy rigged to a specific bone node does not need to point from that bone node toward its child(ren). We saw this with the chicken head – the children of the head “bone”, which is actually the joint connecting the neck to the skull, are the 3 waddles. But the anatomy connected to the head bone (namely, the chicken’s skull) points in a completely different direction that is not determined by anything in the skeleton.nif file and actually extends further away than the child bones. | ||
| + | |||
o “Strength” of animations will scale with distance from the bone. If a child bone is at nearly the same location as its parent, the parent will not contribute meaningfully to the animations of the child. This can be useful if you want to use the animations of a child bone but not the animations of its parent. Note that you can still rig to the parent bone as usual – it’s only the vertices rigged to the *child* that will no longer be meaningfully affected by the parent. | o “Strength” of animations will scale with distance from the bone. If a child bone is at nearly the same location as its parent, the parent will not contribute meaningfully to the animations of the child. This can be useful if you want to use the animations of a child bone but not the animations of its parent. Note that you can still rig to the parent bone as usual – it’s only the vertices rigged to the *child* that will no longer be meaningfully affected by the parent. | ||
| + | |||
o Rotating a bone along the plane that it already rotates along for its animations will have no effect, except possibly as an easy way to move all the child bones. But rotating it in any other direction will change the plane through which it rotates, so for example if there are ear bones that rotate backward toward the torso and you want them to move sideways or forward instead, you can do that. | o Rotating a bone along the plane that it already rotates along for its animations will have no effect, except possibly as an easy way to move all the child bones. But rotating it in any other direction will change the plane through which it rotates, so for example if there are ear bones that rotate backward toward the torso and you want them to move sideways or forward instead, you can do that. | ||
| + | |||
• The vertices of soft tissue (in other words, the majority of vertices on most creatures) is often not rigged entirely to a single bone. Here’s a penguin skeleton where you can see that the neck is a long S-curve. Yet when we see a live penguin, the neck seems straight and vertical. If you watch closely you might make out just a hint of the underlying S-shape. In very soft, stretchy tissue like that where there are a lot of bone nodes nearby, no vertices should be rigged to 100% on any bone. | • The vertices of soft tissue (in other words, the majority of vertices on most creatures) is often not rigged entirely to a single bone. Here’s a penguin skeleton where you can see that the neck is a long S-curve. Yet when we see a live penguin, the neck seems straight and vertical. If you watch closely you might make out just a hint of the underlying S-shape. In very soft, stretchy tissue like that where there are a lot of bone nodes nearby, no vertices should be rigged to 100% on any bone. | ||
| + | |||
o You can also use soft weighting when you the animation of a certain bone moves your geometry too far. In the above example of ears, you could rig the ears 50% to the ear bone and 50% to the parent head bone to reduce their motion by half. | o You can also use soft weighting when you the animation of a certain bone moves your geometry too far. In the above example of ears, you could rig the ears 50% to the ear bone and 50% to the parent head bone to reduce their motion by half. | ||
| + | |||
| + | [[File:18_softRigReference.jpg]] | ||
| − | • Often times you can get useful results through creative combinations of skeleton edits and rigging. The vvardvark is rigged to the chicken, which does not have a tail bone: | + | • Often times you can get useful results through creative combinations of skeleton edits and rigging. The vvardvark is rigged to the chicken, which does not have a tail bone: |
| − | + | ||
| + | [[File:19_vvardvarkTailWeights.png]] | ||
| + | |||
| + | (animated gif at top of page) | ||
| + | |||
By partially rigging the tail to the same bone as the head, the tail will appear to counter-balance the head. This is because it’s on the opposite side of the head bone compared to the actual head (skull), and therefore as the head bone rotates, it will turn in the opposite direction. It’s important that the weighting is small because it’s so far from the head bone. And it’s important that every “slice” of vertices is rigged with an increasing weight as the go farther, in order to create the illusion that the tail curves – otherwise all the weighted vertices would just move as one solid block. Also note that neither the head nor tail is rigged to the actual “head” of the skeleton, but rather Neck0, which avoids the bobbing head of the chicken. | By partially rigging the tail to the same bone as the head, the tail will appear to counter-balance the head. This is because it’s on the opposite side of the head bone compared to the actual head (skull), and therefore as the head bone rotates, it will turn in the opposite direction. It’s important that the weighting is small because it’s so far from the head bone. And it’s important that every “slice” of vertices is rigged with an increasing weight as the go farther, in order to create the illusion that the tail curves – otherwise all the weighted vertices would just move as one solid block. Also note that neither the head nor tail is rigged to the actual “head” of the skeleton, but rather Neck0, which avoids the bobbing head of the chicken. | ||
| − | • If two subsequent bones rotate similar amounts at the same time, such as the Neck1 and Neck2 bones on the chicken, you can rotate them so that they will cancel each other out along one axis, but both not on the perpendicular axis. If a vertex is rigged equally to each of these bones, it can create the effect of a translation instead of a rotation. For the vvardvark (gif | + | |
| + | • If two subsequent bones rotate similar amounts at the same time, such as the Neck1 and Neck2 bones on the chicken, you can rotate them so that they will cancel each other out along one axis, but both not on the perpendicular axis. If a vertex is rigged equally to each of these bones, it can create the effect of a translation instead of a rotation. For the vvardvark (animated gif at top of page) I’ve set them up to partially cancel, letting the tongue dart forward and back. | ||
| + | |||
| + | [[Category:Arcane University| ]][[Category:Arcane University-3D Art| ]][[Category:Arcane University-Animation]] | ||
Latest revision as of 17:06, 28 January 2023
This tutorial was written by opusGlass.
Editing skeletons is not a substitute for editing animations, nor is it a substitute for creating a new creature behavior. For that, see Implementation of Custom Animations.
It is a useful tool in some cases: when an existing creature’s behavior and animations match very well with your custom creature, so you just need a quick and easy (and compatible) way to alter the shape a little. But even then, you should realize that skeleton changes may interact with the existing animations in unexpected ways.
The approach I outline here also involves no HKX/Havok files at all. You might be able to streamline your testing process by importing HKX animations into your 3D editor but I won’t cover that.
If anyone doesn’t want the step-by-step and just wants to see what technology I’m using, skip to Steps 3, 5, and 6.
Contents
- 1 Prerequisites
- 2 Step 1: Choose a vanilla skeleton/animation/behavior.
- 3 Step 2: Preparing a skin
- 4 Step 2(A): Make a balloon animal.
- 5 Step 2(B): Make a very low poly model
- 6 Step 3: Add proxy nodes to the skeleton
- 7 Step 4 (optional): Copy a transparent reference skin into the skeleton.nif
- 8 Step 5: Apply transforms to the proxy nodes
- 9 Step 6: Applying skeleton edits to an existing skin nif, WITHOUT deforming that skin.
- 10 Step 7: Preview in Creation Kit
- 11 Step 8: Try stuff, a lot
- 12 Tips and hints for skeleton editing and creative rigging
Prerequisites[edit]
- NifSkope
- Creation Kit
- ck-cmd (recommended)
- Blender with niftools (or other environment for rigging Nifs)
Ck-cmd: This link is to the latest build: https://ci.appveyor.com/project/aerisarn/ck-cmd/branch/master/artifacts
Extract that zip to any folder (this will be your ck-cmd install folder so make sure you can find it later). Add subfolders named “input” and “output” to your install folder.
I will not go into detail about how to rig a skin, please see this tutorial if you need to: https://wiki.beyondskyrim.org/wiki/Rigging_with_Blender_2.79
Step 1: Choose a vanilla skeleton/animation/behavior.[edit]
Since we are NOT changing animations at all, and we are NOT adding any new bones to the skeleton, you need to find an existing vanilla creature that matches your custom creature.
- Body plan should match. You can discard parts of the body plan you don’t need, and we will learn how to adjust the proportions of the existing body parts, but you can’t add new ones.
- Behavior and animation should match. There are some changes that can be made to behavior in the Creation Kit, but they are limited. Almost all of behavior is encoded in the Havok files which are not designed to be modified, and that’s a far more advanced topic.
- Audio should match. Much of the audio filepaths are encoded in the Havok files too.
Step 2: Preparing a skin[edit]
There are two very different approaches you might take during this step.
A) Make a balloon animal which will let you see your skeleton edits clearly. This is a good option if the 3D model is already completed, or if your creature is very similar to the vanilla creature you’re targeting.
B) Make a low-poly skin shaped roughly like your intended creature. This is the best option if you haven’t created the high-poly / textured model already. It allows you to experiment with your skin and skeleton shape to find an optimal result before you continue to the detailed sculpting work. If your creature diverges from the vanilla body plan a lot, or if there is not a 1-to-1 matching between the joints of each creature (in other words, if it’s unclear how to rig the creature), then this option will be far more useful. The downside is that this will involve more work as you alternately adjust your rigging and skeleton, and each depends on the other so it will require a lot more creativity to find a good result.
Of course, you can also create a balloon animal and a low poly to get the best of both worlds.
The reason you want to use one of these instead of a finished 3D model, is that (A) will be faster due to avoiding the chicken-or-egg problem of not being able to test your skeleton without a finished rig, but not knowing how to rig your skin without a finished skeleton. On the other hand, (B) allows you to adjust your body plan on the fly, which would require you to remake your high-poly model from scratch; and also it can have less vertices and isn’t textured, both of which will speed things up if you need to adjust the rig / move vertices / adjust topology.
Step 2(A): Make a balloon animal.[edit]
If you choose this option.
First check this folder, I may have already made one for your skeleton: https://drive.google.com/drive/folders/1H2AwmfG81XK0SU8dldYKmB9TmamJPjzC?usp=sharing
If your creature isn’t in that folder and you make your own, please send it to opusGlass13@gmail.com and I will add it to the folder.
I prefer to make a sphere+cylinder object, then duplicate it around the scene. It will be easiest if the sphere is centered on the origin, with one end of the cylinder centered there too. It’s *very important* that the cylinder only have vertices at the two ends – no vertices along its length. Basically, we want every vertex to clearly belong to exactly 1 bone.
Place duplicates of the object at the location of each bone, with the cylinder pointing to the next bone in the hierarchy. Lengthen/shorten the cylinder to reach the next bone – it doesn’t need to be exact but all vertices need to be near a single bone.
Since some bones have multiple children, you will need to place multiple cylinders on those bones. It doesn’t matter if there are also extra spheres on that bone.
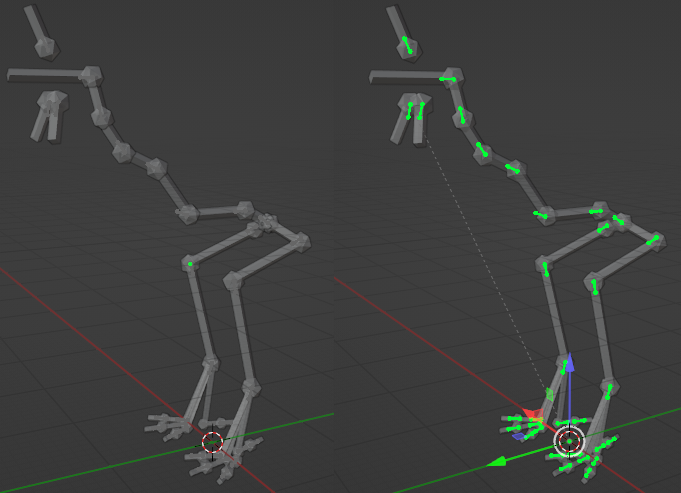
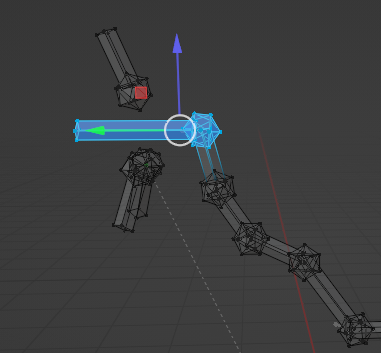
When you reach a bone that has no children, point the cylinder in whatever direction makes most sense based on what you know about the creature/skeleton. For example, the last toe bones should point along the toe. (Note in the example below, I chose to treat the head as an end node, even though it was actually the parent of the 3 wattle bones. That just made sense to me to help visualize where the head is pointing.)
Feel free to join the segments together and add a mirror modifier when useful – I did this to make the 2nd leg.
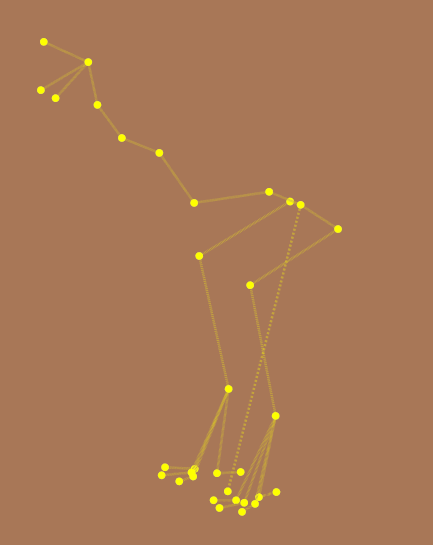
Skeleton.nif:
Balloon animal (with and without the bone nodes highlighted):
Now we must rig the balloon animal.
First join all the segments together. Then parent them to skeleton (select balloon, shift select skeleton, ctrl+p) and choose Armature Deform With Empty Weights.
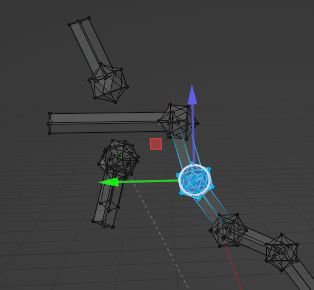
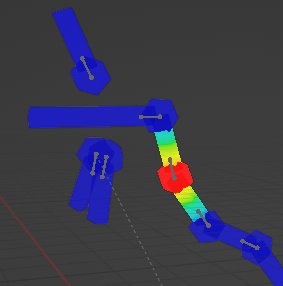
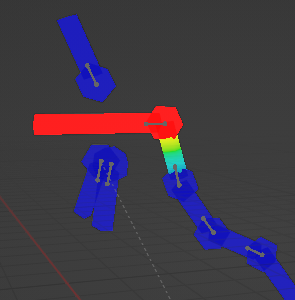
In edit mode, select the vertices around a single bone, then find that bone in the Vertex Groups. Select the bone and click Assign. If you then go into Edit Mode you can see that the results look like this:
For the segments that don’t have children, select the whole thing and assign it, instead of just the vertices next to the bone:
Once that’s done you might be able to export it right away (without a shader) depending on your version of Niftools. It’ll be invisible in nifskope if it doesn’t have a shader though. To avoid any issues, I recommend copying the NiTriShape node and the NiSkinInstance (whole branch) into the vanilla animal nif, and then replacing the existing NiTriShape and NiSkinInstance. Then for a quick test you can place that nif in the Skyrim/Data directory in the correct spot to override the vanilla creature skin, and boot the game to see your balloon animal walking around!
Step 2(B): Make a very low poly model[edit]
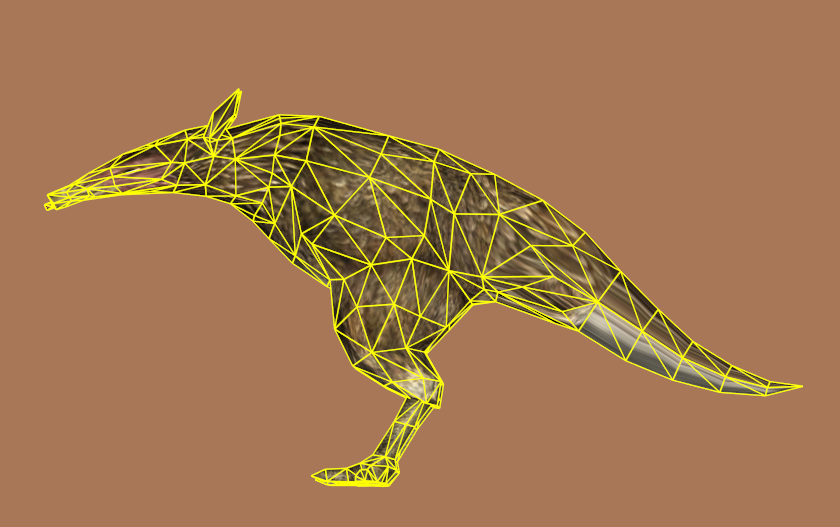
If you choose this option. There’s not much to say for this step, you will just need to design a low poly version of the model you will eventually make. The most important thing is that it has accurate anatomical proportions for your final product, but it doesn’t need any details such as a face, unless there are animated facial bones on the skeleton that you want to use. You should probably exclude things like long hanging fur, since that will be represented by alpha planes attached to the skin later. Use a minimal amount of vertices to speed up the drafting process later. You also might want some stand-in texture just to better see how it’s animating.
(This example has ugly topology because I just started from the chicken and drafted it quickly…it will probably help to do better.)
Reference image from The Elder Scrolls: Legends:
Step 3: Add proxy nodes to the skeleton[edit]
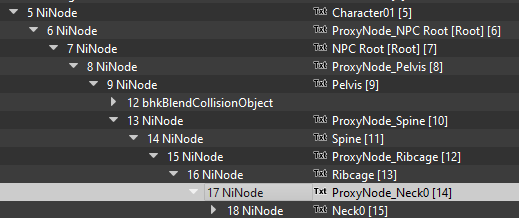
My recommendation for this step is to install the tool ck-cmd by Aerisarn. By my request Aerisarn added a function to automatically insert “proxy” nodes above every bone in a skeleton Nif. If you wish to insert these nodes one-at-a-time instead, you can definitely do that. Note that ck-cmd is also a “soft requirement” for one of the later steps in this tutorial though.
The basic issue with skeleton edits is that they are usually overridden by animations at runtime. Usually, the translation (position) and rotation of each bone is overridden, while the scale of each bone is maintained, but sometimes the scale is overridden too.
The way to circumvent this is to apply your translations and rotations to proxy nodes above the bone that you actually want to affect. Since these proxy nodes don’t exist in vanilla, the vanilla animations do not override them. The transformations you make to these nodes will “stack” with the transformations applied by the animation system.
With ck-cmd:
1) Add the vanilla skeleton.nif file into the input folder
2) Open a Windows terminal (a.k.a. command prompt)
3) Navigate the terminal to your install folder with this command: cd “my\install\folder\path”
4) Enter this command:
ck-cmd addnodestoskeleton -i "input/skeleton.nif" -e "output" i. This assumes that the skeleton is named “skeleton.nif”, which it usually is.
5) The modified skeleton is now in the output folder.
Alternatively, you can add the nodes manually in NifSkope. You will be inserting the proxy node between a parent bone and its child bone.
1) On the parent bone, right click -> node -> attach node -> NiNode.
2) On the new proxy node, set the child bone as one of its children.
3) On the parent bone’s children:
a. Replace the child bone with the proxy node
b. Remove the 2nd copy of the proxy node from the bottom
c. Decrease the Num Children by one.
Step 4 (optional): Copy a transparent reference skin into the skeleton.nif[edit]
To see where your bones should move, you’ll probably want a reference. If you’re doing a low-poly skin, use that. If you’re doing a balloon animal and you have a completed model, use that. If you’re doing a balloon animal but you don’t have a model yet, I recommend just looking at reference images / anatomy images.
1) Open your skeleton.nif in NifSkope
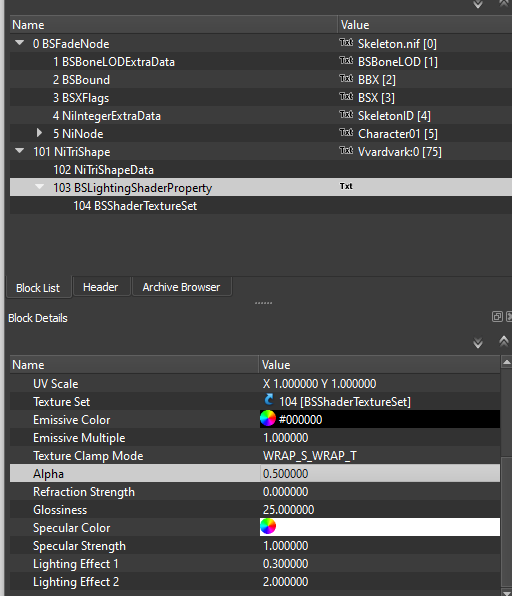
2) Copy the NiTriShape from your skin.nif into skeleton.nif outside the main tree.
3) Remove the skin instance branch.
4) Set the alpha in the BSLightingShaderProperty to 0.5 and uncheck the “Skinned” shader flag.
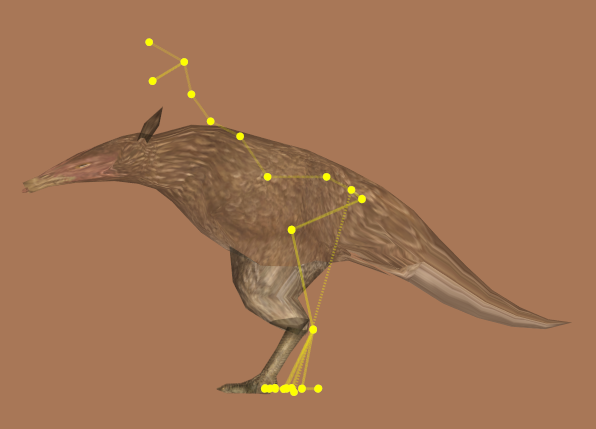
5) Make sure to enable the setting “Show Nodes” to see the bones too.
(You can safely leave this invisible skin in your skeleton nif while testing.)
Step 5: Apply transforms to the proxy nodes[edit]
I’ll just go over the technical details of *how* here, I’ll give advice about shaping these skeletons later.
1) Select a proxy node in the tree
2) Right click -> Transform -> Edit
3) Adjust the Translation and Rotation as necessary
4) Accept and save file
• Each bone node should be thought of anatomically as a joint, not a bone. A node named “thigh” must actually be placed at the position of the hip joint. It’s called the “thigh” bone because, when rigging, the vertices of the thigh should move according to the rotations of that joint.
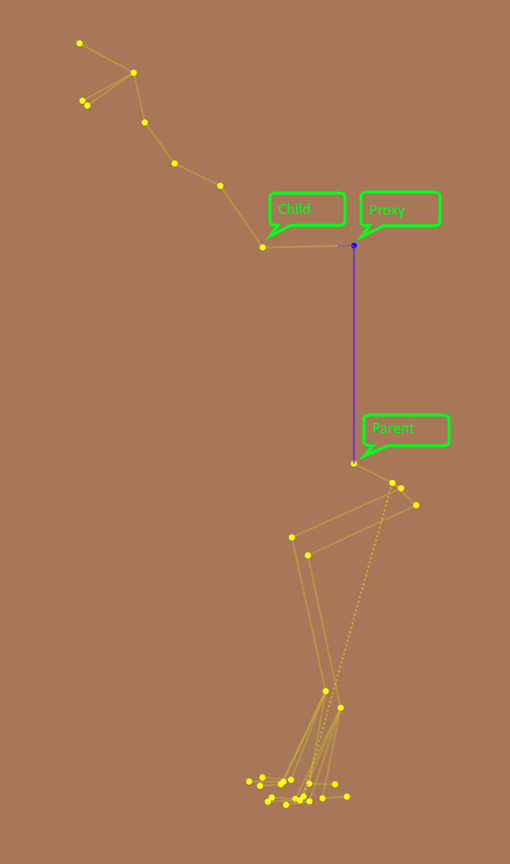
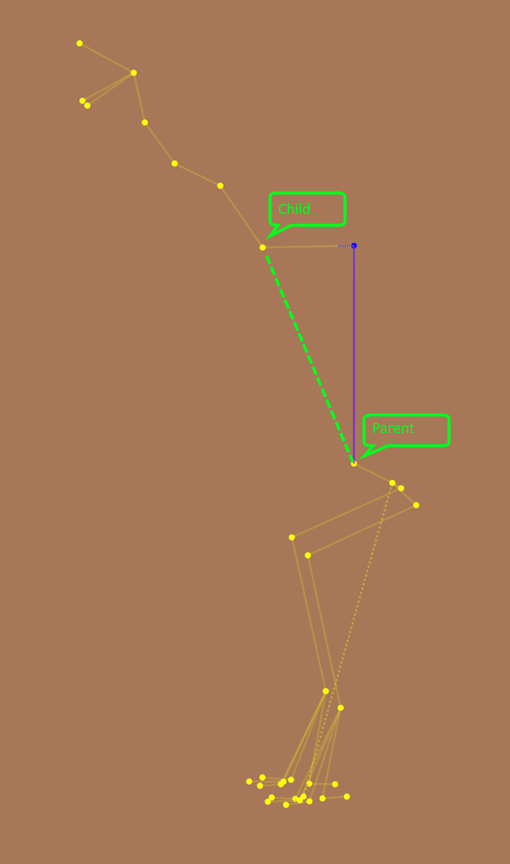
• Ignore the positions of the proxy nodes. Since they really encode “offsets” in transformations, they are not very visually meaningful. In your head just imagine the child bones are connected directly to their parent bones.
Step 6: Applying skeleton edits to an existing skin nif, WITHOUT deforming that skin.[edit]
(Skip this step for balloon animals, they are intended to deform with the skeleton edits.)
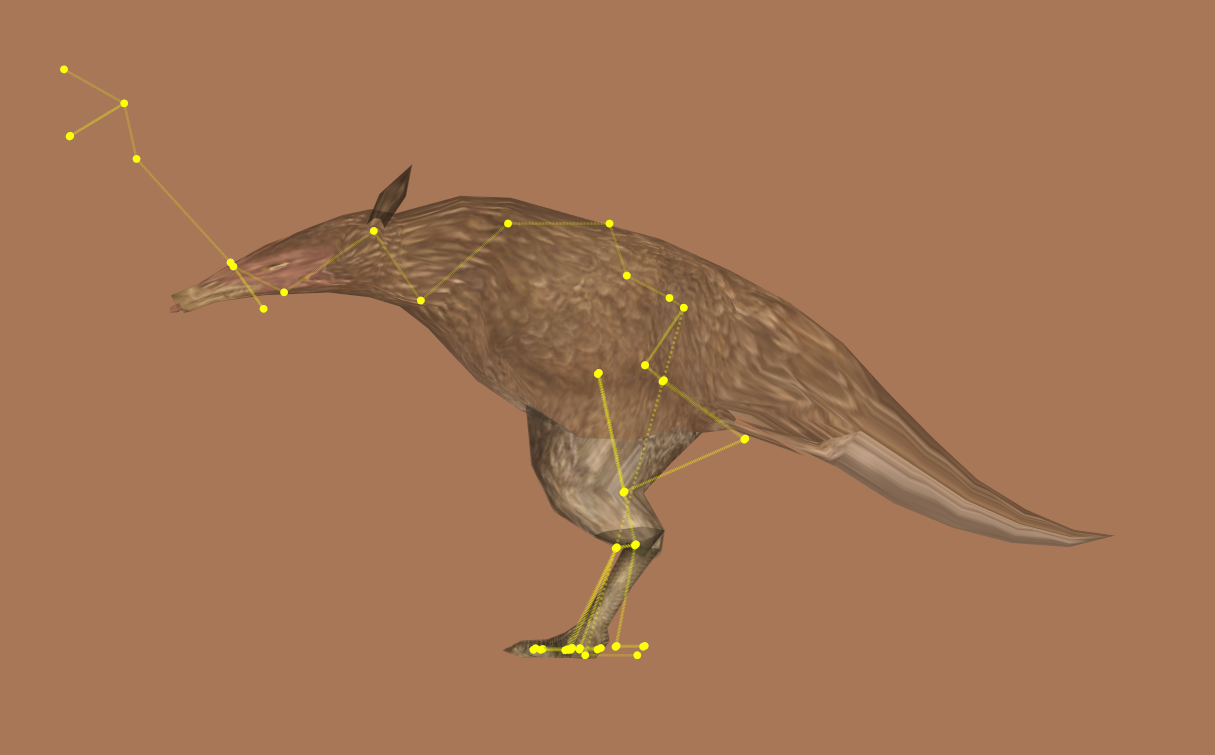
Skins include a copy of every bone’s 3D data. When transforms are applied to the skeleton.nif, the skin nif uses its copy of the bones to decide how each vertex should move. So, if you move the jaw bone of a skeleton and then preview that creature in-game / in-CK, you will find that vertices rigged to the jaw have moved to a new position.
But what if the skin was already in the correct position, and you just need to adjust the bone placement to work better with that existing skin? You move the jaw bone to the position of the skin’s jaw, look in the CK, and now your jaw is no longer where it should be.
Other 3D editing software might handle rigging differently but with Blender, this step was also necessary when going back and forth between skin (rig) edits and skeleton edits.
Using ck-cmd:
1) Add your custom skin.nif and skeleton.nif to the ck-cmd input folder
2) Open a Windows terminal (a.k.a. command prompt)
3) Navigate the terminal to your install folder with this command: cd “my\install\folder\path”
4) Enter this command: ck-cmd retargetskin -i "input/skin.nif" -s "input/skeleton.nif" -e "output"
i. Change “skin.nif” to whatever your skin is named. The modified skin is now in the output folder.
Step 7: Preview in Creation Kit[edit]
Note: If you convert the animation HKX files you can import them into blender instead, which might speed up drafting, I haven’t tried it. Just be sure you test all the animations.
1) In your Skyrim\Data\meshes folder, place the skeleton.nif and balloonSkin.nif into the appropriate directories to override the vanilla creature you’re using as a base. The file names need to match as well. Note: it is important that you do this BEFORE proceeding, or at least before Step 5.
2) Open the Creation Kit and load Skyrim.esm (if your base creature is from a DLC, load that too). You don’t need to set any active file.
3) In the Object Window, select Actors>Actor.
4) Use the filter box to narrow it down until you see the base creature.
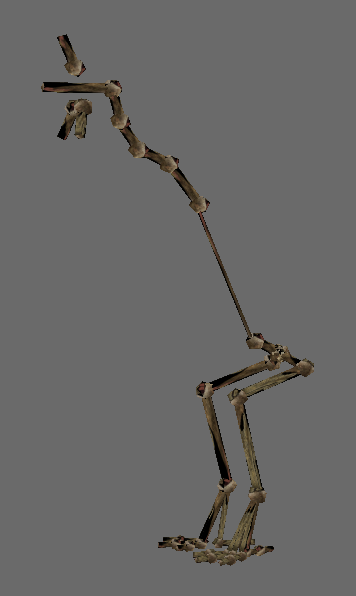
5) Right click -> Preview. You should see your balloon animal, deformed to fit whatever skeleton adjustments you’ve made. (Error dialogs are likely to pop up, you can ignore them at this stage.)
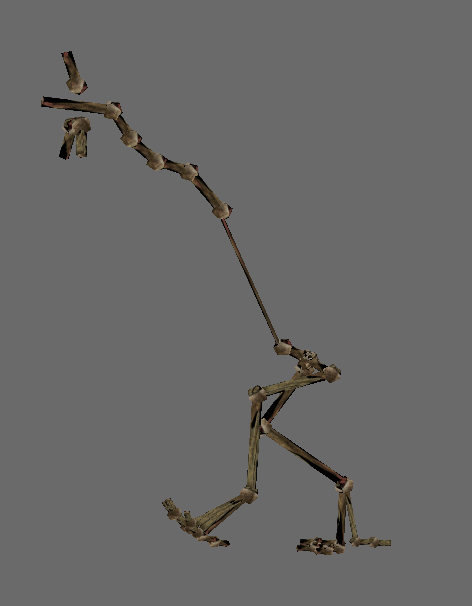
6) In Animations > Havok Anims, select an animation to see how it interacts with your changes.
7) After making further skeleton edits (or skin edits), you can replace the files in Data and then click Havok > Reset in the preview window to see your new model. You don’t need to close and reopen Creation Kit.
Be sure to check all the animations, or at least most of them! The more creative you are being, the more likely that one of the animations will surprise you (probably in a bad way).
Step 8: Try stuff, a lot[edit]
Repeat steps 2B – 7 as necessary until the result is satisfactory.
This part is not easily explained and really just requires lots of trial and error. You’ll learn both the general skill of editing skeletons, and the quirks of whichever animation you’re working on that day.
You can also import your retargeted skin from Step 6 into blender to see the latest bone positions while you rig.
Tips and hints for skeleton editing and creative rigging[edit]
• Animations in Skyrim are almost always pure rotations (with the pivot of the rotation at the position of the bone node). As a result:
o The anatomy rigged to a specific bone node does not need to point from that bone node toward its child(ren). We saw this with the chicken head – the children of the head “bone”, which is actually the joint connecting the neck to the skull, are the 3 waddles. But the anatomy connected to the head bone (namely, the chicken’s skull) points in a completely different direction that is not determined by anything in the skeleton.nif file and actually extends further away than the child bones.
o “Strength” of animations will scale with distance from the bone. If a child bone is at nearly the same location as its parent, the parent will not contribute meaningfully to the animations of the child. This can be useful if you want to use the animations of a child bone but not the animations of its parent. Note that you can still rig to the parent bone as usual – it’s only the vertices rigged to the *child* that will no longer be meaningfully affected by the parent.
o Rotating a bone along the plane that it already rotates along for its animations will have no effect, except possibly as an easy way to move all the child bones. But rotating it in any other direction will change the plane through which it rotates, so for example if there are ear bones that rotate backward toward the torso and you want them to move sideways or forward instead, you can do that.
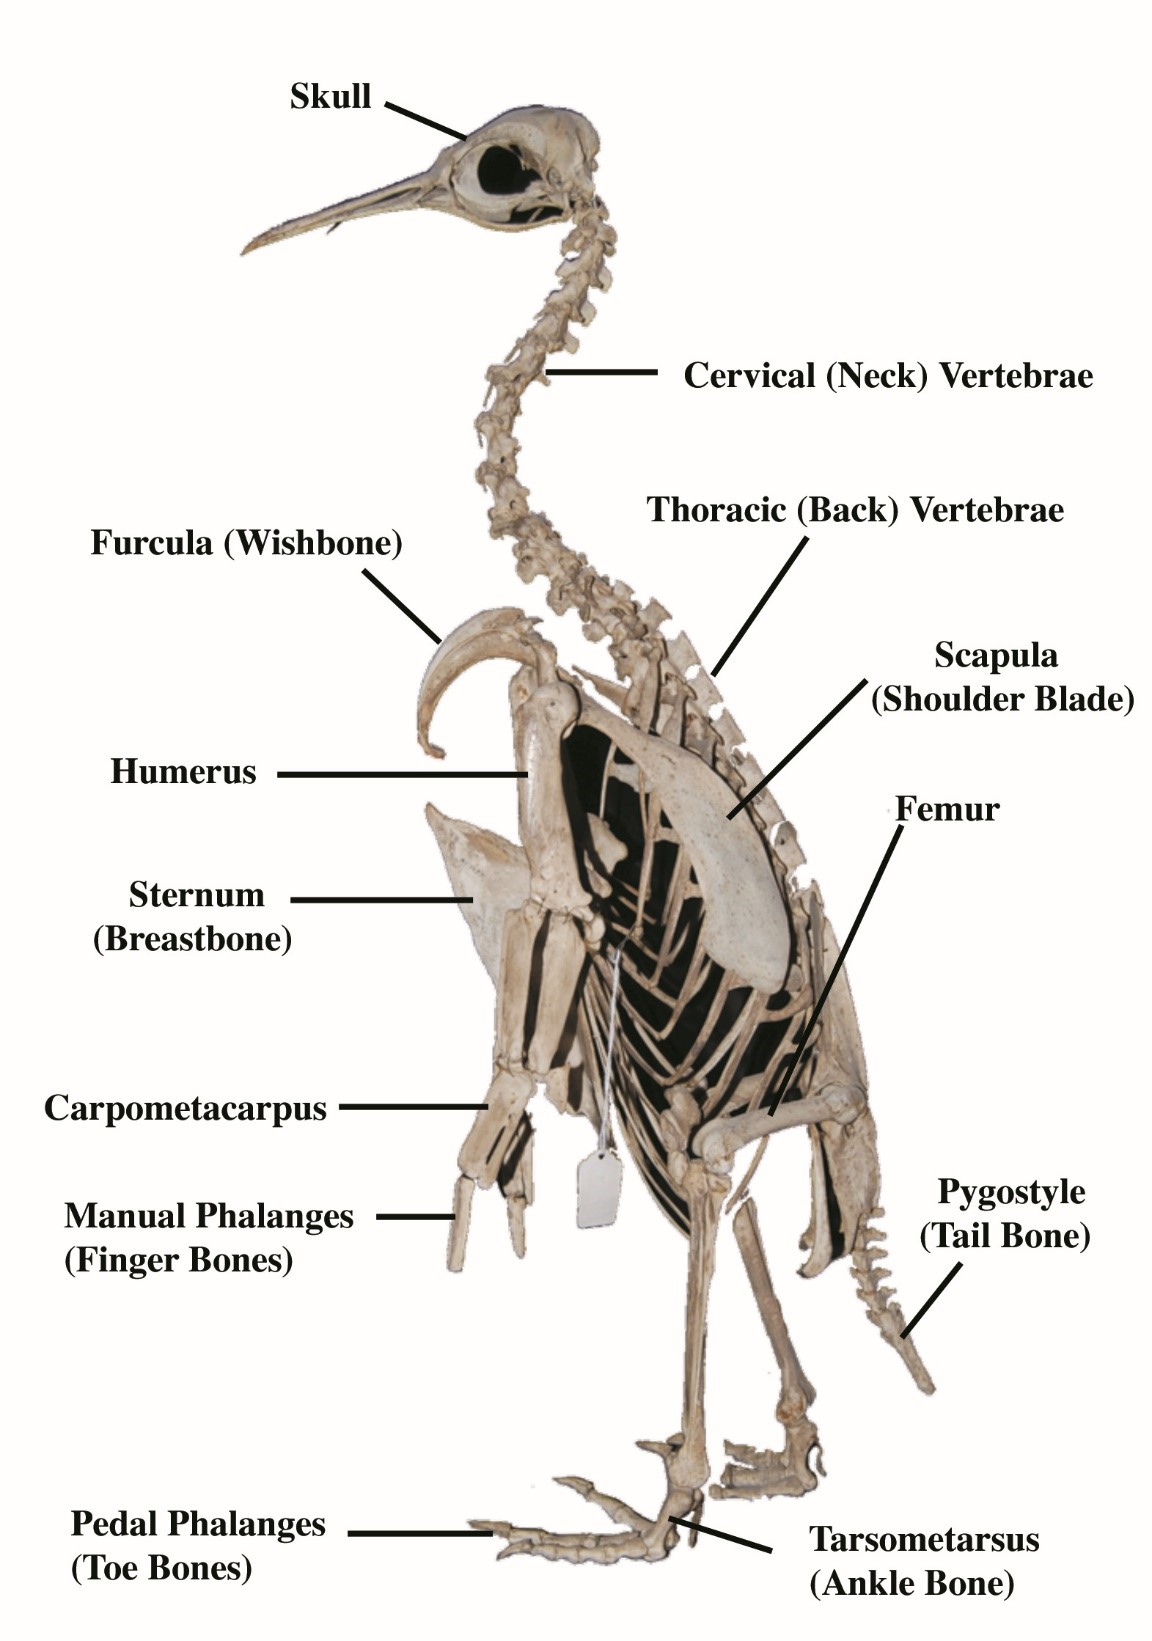
• The vertices of soft tissue (in other words, the majority of vertices on most creatures) is often not rigged entirely to a single bone. Here’s a penguin skeleton where you can see that the neck is a long S-curve. Yet when we see a live penguin, the neck seems straight and vertical. If you watch closely you might make out just a hint of the underlying S-shape. In very soft, stretchy tissue like that where there are a lot of bone nodes nearby, no vertices should be rigged to 100% on any bone.
o You can also use soft weighting when you the animation of a certain bone moves your geometry too far. In the above example of ears, you could rig the ears 50% to the ear bone and 50% to the parent head bone to reduce their motion by half.
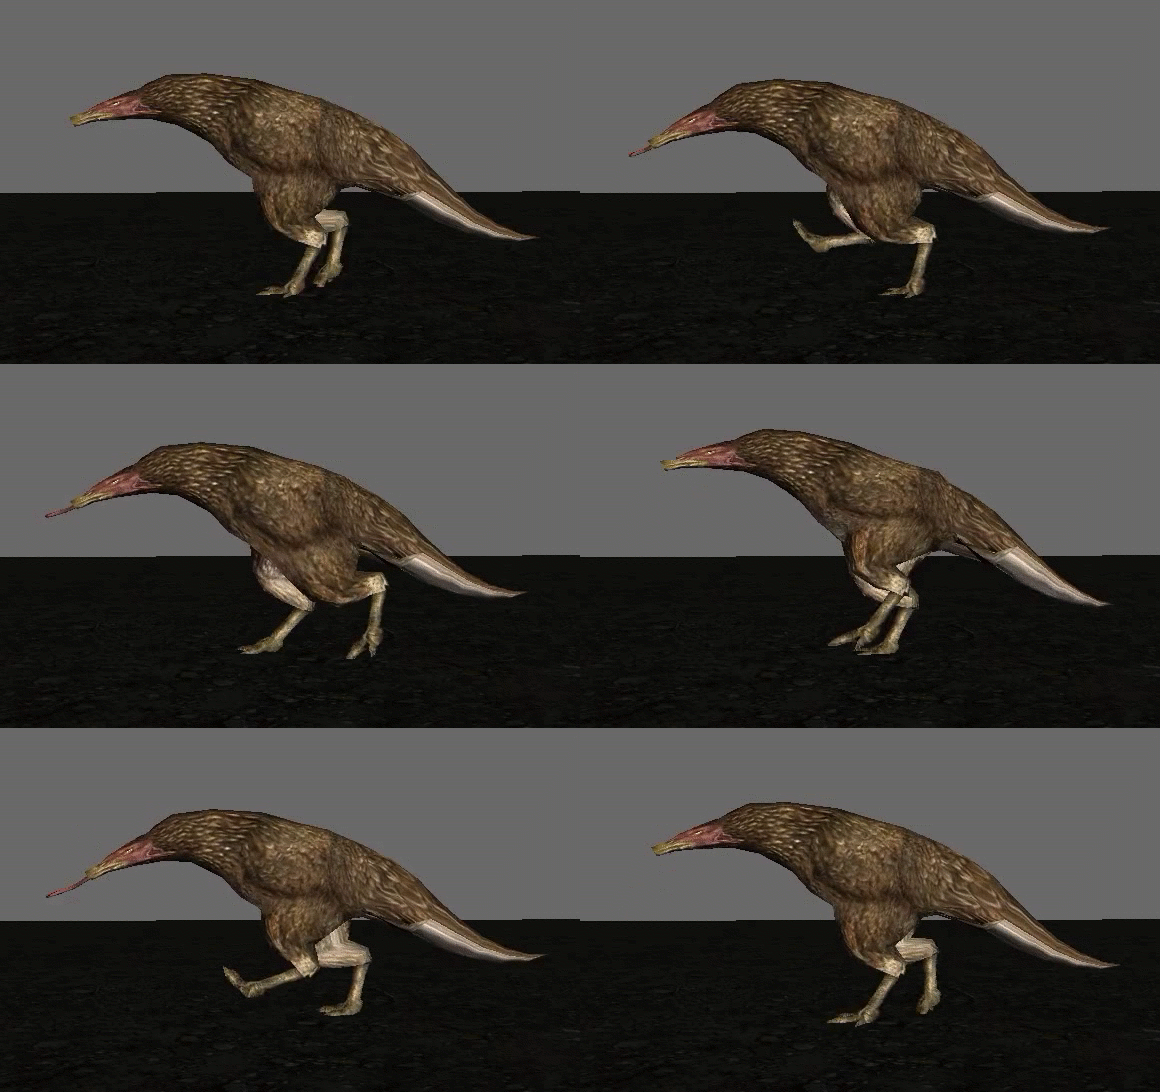
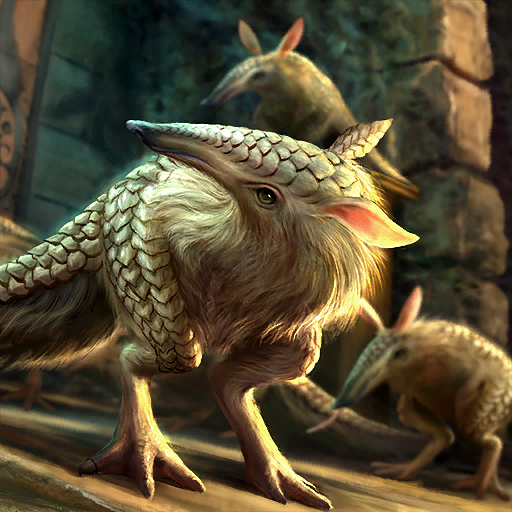
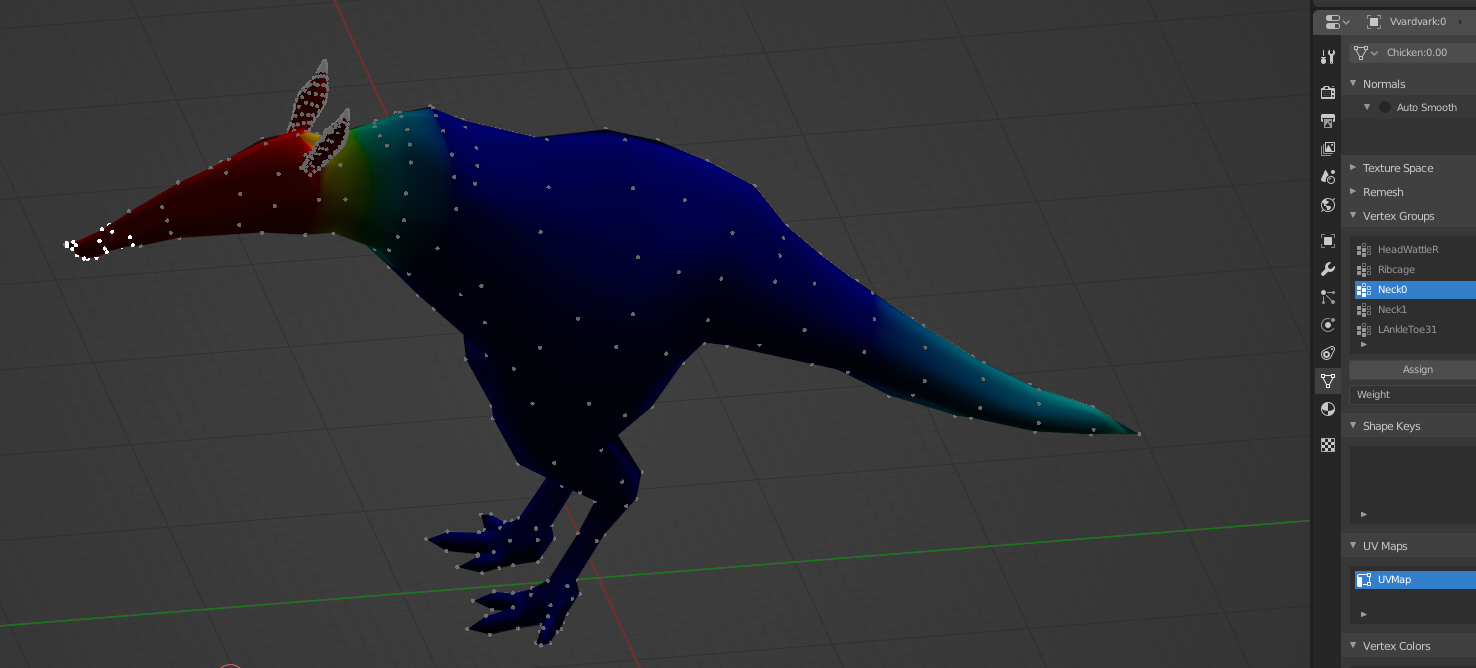
• Often times you can get useful results through creative combinations of skeleton edits and rigging. The vvardvark is rigged to the chicken, which does not have a tail bone:
(animated gif at top of page)
By partially rigging the tail to the same bone as the head, the tail will appear to counter-balance the head. This is because it’s on the opposite side of the head bone compared to the actual head (skull), and therefore as the head bone rotates, it will turn in the opposite direction. It’s important that the weighting is small because it’s so far from the head bone. And it’s important that every “slice” of vertices is rigged with an increasing weight as the go farther, in order to create the illusion that the tail curves – otherwise all the weighted vertices would just move as one solid block. Also note that neither the head nor tail is rigged to the actual “head” of the skeleton, but rather Neck0, which avoids the bobbing head of the chicken.
• If two subsequent bones rotate similar amounts at the same time, such as the Neck1 and Neck2 bones on the chicken, you can rotate them so that they will cancel each other out along one axis, but both not on the perpendicular axis. If a vertex is rigged equally to each of these bones, it can create the effect of a translation instead of a rotation. For the vvardvark (animated gif at top of page) I’ve set them up to partially cancel, letting the tongue dart forward and back.
