Difference between revisions of "Arcane University:Outfit Studio Export"
(Added section on partition function/modification.) |
(→Nif cleanup: fix collision link) |
||
| (2 intermediate revisions by one other user not shown) | |||
| Line 1: | Line 1: | ||
| − | {{Trail|3D Art|Mesh Export to NIF}} | + | {{Trail|3D Art|Mesh Export to NIF}}[[Category:Outfit Studio]] |
| − | Outfit Studio is a program which can natively work with NIFs. While intended to be used primarily to make small adjustments to existing outfits, it can also function as a capable exporter. It is included as part of BodySlide, which is available on the [https://www.nexusmods.com/skyrim/mods/49015?tab=posts Skyrim Nexus], on the [https://www.nexusmods.com/skyrimspecialedition/mods/201?tab=posts SSE Nexus] and on [https://github.com/ousnius/BodySlide-and-Outfit-Studio/releases Github]. It can be used to convert OBJ files to NIFs and the other way around. Since Obj files cannot contain rigging information, rigging will need to be done within Outfit Studio itself when working with rigged meshes such as clothes. It also contains simple mesh deformation tools, useful for creating simple edits. In spite of its name, it can also work with non-rigged meshes. | + | Outfit Studio is a program which can natively work with NIFs. While intended to be used primarily to make small adjustments to existing outfits, it can also function as a capable exporter. It is included as part of BodySlide, which is available on the [https://www.nexusmods.com/skyrim/mods/49015?tab=posts Skyrim Nexus], on the [https://www.nexusmods.com/skyrimspecialedition/mods/201?tab=posts SSE Nexus] and on [https://github.com/ousnius/BodySlide-and-Outfit-Studio/releases Github]. It can be used to convert OBJ files to NIFs and the other way around. Since Obj files cannot contain rigging information, rigging will need to be done within Outfit Studio itself when working with rigged meshes such as clothes, like explained in [[AU:Rigging in Outfit Studio|Rigging in Outfit Studio]]. It also contains simple mesh deformation tools, useful for creating simple edits. In spite of its name, it can also work with non-rigged meshes. |
== Export to OBJ== | == Export to OBJ== | ||
| Line 23: | Line 23: | ||
*Outfit Studio adds bones even to static meshes. To remove them you can select a bone in the branch view and use Ctrl+Del to remove it. | *Outfit Studio adds bones even to static meshes. To remove them you can select a bone in the branch view and use Ctrl+Del to remove it. | ||
*Adding any missing textures can be done within the BSShaderTextureSet. This is a child of (BS/Ni)TriShape > BsShaderProperty. | *Adding any missing textures can be done within the BSShaderTextureSet. This is a child of (BS/Ni)TriShape > BsShaderProperty. | ||
| − | *Adding | + | *Adding [[AU:Mesh Collisions|collision data]]. |
*If you created an outfit which does not occupy (only) the entire body, like a helmet, then you need to change the Partition. The Partition indicates to the game what slot it occupies, and therefore which other equipment cannot be worn at the same time. Outfit Studio normally sets the partition to the body slot (32). If you are unsure of what it should be, look at a mesh which occupies the same space. You can find and change the partition under the NiTriShape > BSDismemberSkinInstance. | *If you created an outfit which does not occupy (only) the entire body, like a helmet, then you need to change the Partition. The Partition indicates to the game what slot it occupies, and therefore which other equipment cannot be worn at the same time. Outfit Studio normally sets the partition to the body slot (32). If you are unsure of what it should be, look at a mesh which occupies the same space. You can find and change the partition under the NiTriShape > BSDismemberSkinInstance. | ||
[[File:Partition_Location.png|Partition Location]] | [[File:Partition_Location.png|Partition Location]] | ||
Latest revision as of 17:53, 1 August 2022
Outfit Studio is a program which can natively work with NIFs. While intended to be used primarily to make small adjustments to existing outfits, it can also function as a capable exporter. It is included as part of BodySlide, which is available on the Skyrim Nexus, on the SSE Nexus and on Github. It can be used to convert OBJ files to NIFs and the other way around. Since Obj files cannot contain rigging information, rigging will need to be done within Outfit Studio itself when working with rigged meshes such as clothes, like explained in Rigging in Outfit Studio. It also contains simple mesh deformation tools, useful for creating simple edits. In spite of its name, it can also work with non-rigged meshes.
Export to OBJ[edit]
Use your 3D program of choice to create your model. Then export this to OBJ using the program's built-in functions (Outfit Studio cannot interface directly with your 3D program). This may also generate a .mtl file, but this will not be used in the export, and can be discarded.
Import into Outfit Studio[edit]
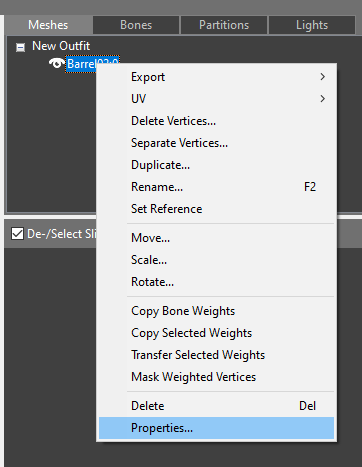
Outfit Studio can be accessed in two different ways. After starting BodySlide, it can be accessed using the "Outfit Studio" button in the lower right corner. You can also directly launch Outfit Studio using either \os or --outfitstudio as argument, though BodySlide will still be launched in the background. Once you have done this, you can import the mesh using File > Import > From OBJ... . This will import the mesh, but it will not remember any textures you may have applied in your 3D program. You will therefore see a "No Image" texture. This can be fixed by selecting "Properties" in the menu that shows up when you right-click your shape (in the block listing), and going into the "Textures" menu.
Here you may set the texture paths as they would appear in your Nif for a game-ready model. If you set up BodySlide correctly, then you will be able to use vanilla textures without needing to unpack your BSAs. The texturing step can also be done later in NifSkope.
Export to NIF[edit]
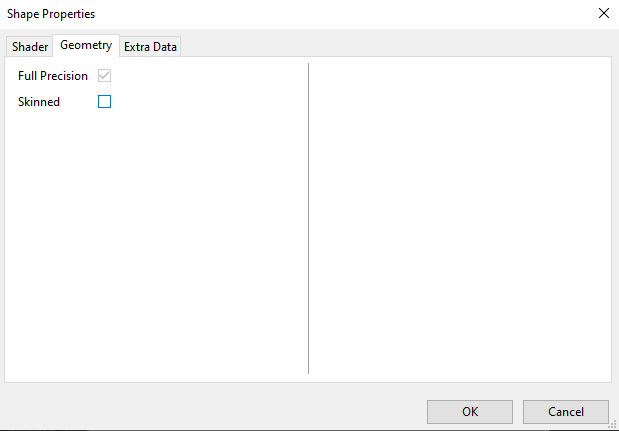
In the case of a static mesh, you need to go to the shape's Properties, and uncheck the "Skinned" checkbox in the Geometry tab.
If you want to export a skinned mesh, then you need to do your rigging in Outfit Studio, as explained in Rigging in Outfit Studio. You can then export your shape with File > Export > To NIF... . This will export all shapes, except any reference you may have set. If you receive the "Unweighted Vertices" error, then you have either not unchecked the "Skinned" box for a static mesh, or you have not completely rigged your skinned mesh.
Nif cleanup[edit]
Because Outfit Studio is mostly intended for outfits, there may be some cleanup needed to be done for the created NIF in NifSkope. Alternatively, you can copy the created BSTriShape/NiTriShape into another, already completed mesh.
- Outfit Studio adds bones even to static meshes. To remove them you can select a bone in the branch view and use Ctrl+Del to remove it.
- Adding any missing textures can be done within the BSShaderTextureSet. This is a child of (BS/Ni)TriShape > BsShaderProperty.
- Adding collision data.
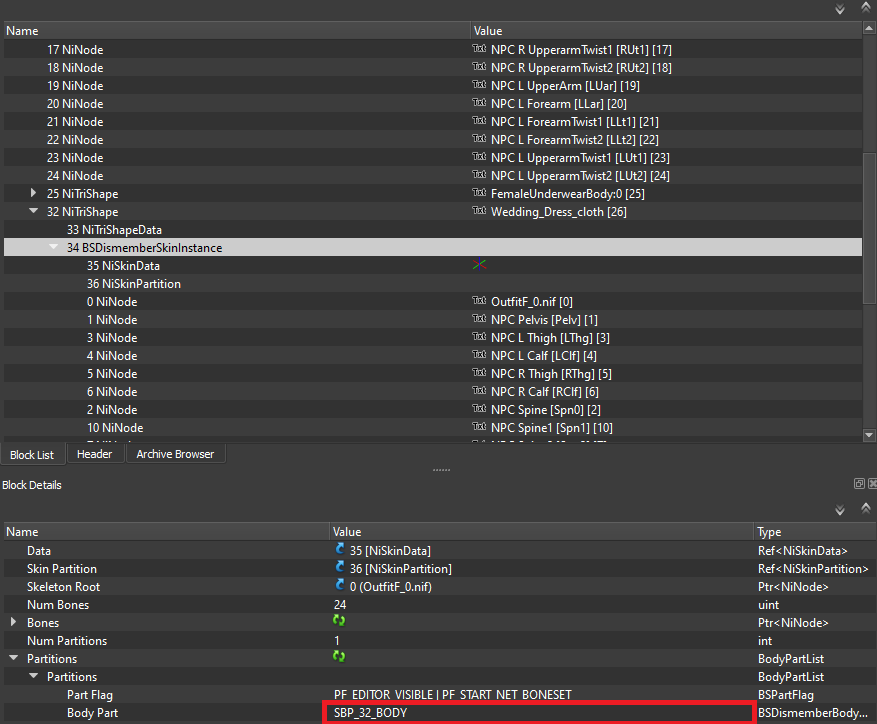
- If you created an outfit which does not occupy (only) the entire body, like a helmet, then you need to change the Partition. The Partition indicates to the game what slot it occupies, and therefore which other equipment cannot be worn at the same time. Outfit Studio normally sets the partition to the body slot (32). If you are unsure of what it should be, look at a mesh which occupies the same space. You can find and change the partition under the NiTriShape > BSDismemberSkinInstance.


