Difference between revisions of "Arcane University:Concept Art"
m (→Getting Feedback) |
(→Introduction) |
||
| Line 4: | Line 4: | ||
== Introduction == | == Introduction == | ||
| − | Concept art in Game Development is used to visually establish the world, objects, flora, fauna, creatures, and characters. | + | Concept art (also called 2D) in Game Development is used to visually establish the world, objects, flora, fauna, creatures, and characters. |
When you create concept art you essentially make blueprints for assets. These blueprints are brought to life by 3D artists and level designers. A majority of your time will be spent designing items and doing “visual problem solving”. A concept artist needs to invent fantastical things that also seem rooted in reality. | When you create concept art you essentially make blueprints for assets. These blueprints are brought to life by 3D artists and level designers. A majority of your time will be spent designing items and doing “visual problem solving”. A concept artist needs to invent fantastical things that also seem rooted in reality. | ||
Ideas and creativity is the bread and butter for concept artists. It's your job to take the written word and bring it to life on paper. | Ideas and creativity is the bread and butter for concept artists. It's your job to take the written word and bring it to life on paper. | ||
| − | |||
== Concept Art Workflow == | == Concept Art Workflow == | ||
Revision as of 17:25, 6 March 2021
This is the main page for the Beyond Skyrim Arcane University Concept Art information.
Contents
Introduction
Concept art (also called 2D) in Game Development is used to visually establish the world, objects, flora, fauna, creatures, and characters.
When you create concept art you essentially make blueprints for assets. These blueprints are brought to life by 3D artists and level designers. A majority of your time will be spent designing items and doing “visual problem solving”. A concept artist needs to invent fantastical things that also seem rooted in reality. Ideas and creativity is the bread and butter for concept artists. It's your job to take the written word and bring it to life on paper.
Concept Art Workflow
The concept art workflow is the 2D process from start to finish of an asset. The workflow may differ depending on your own preference, your art leads preference, and what you are concepting. In general, here is what you do:
- Read and Understand the Prompt
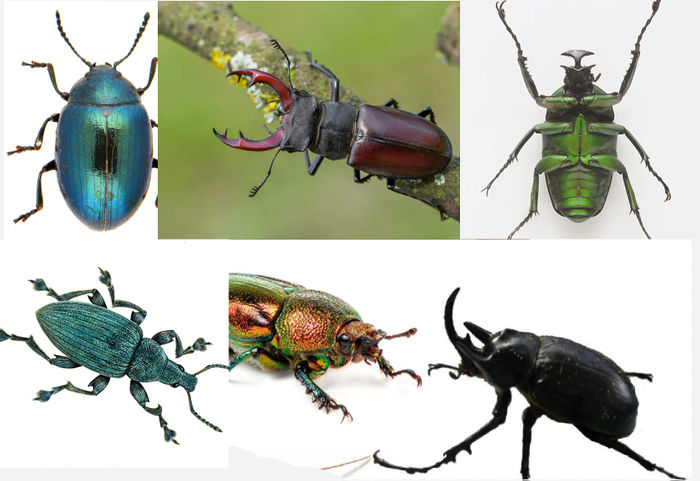
- Gather References
- Sketch your Ideas
- Review and Revise
- Turnarounds and Polish
Read and Understand the prompt
Make sure you've read and understood the prompt/claim before you start. Read the text thoroughly and ask your art lead any questions you might have.
Gather References
Contrary to popular belief, the concept artist does not pull a masterpiece out of their ass after brewing on the idea for 24 hours. You need references. You need inspiration. You need examples of how others have solved the same problem before you. The project you join will most likely have a style guide and the claim you choose may have references attached. But it doesn't stop there. After reading the prompt you should start thinking of ideas. Head on over to your preferred search engine and image search those ideas. Find inspiration from real life and other artists.
The Metropolitan Museum of Art has taken pictures of their entire collection and uploaded them online. This is a gold mine for finding real historically accurate references.
Thumbnails/Sketches/Silhouettes (Ideations)
You got your references, you got your ideas. You're ready to put the pen to paper. There are different ways to start a concept. Some do silhouettes (blockouts of major shapes), some do sketches. No matter your technique, you always:
- Be creative! This is the stage where you go wild. Try out all manners of crazy shapes and ideas and sizes and proportions.
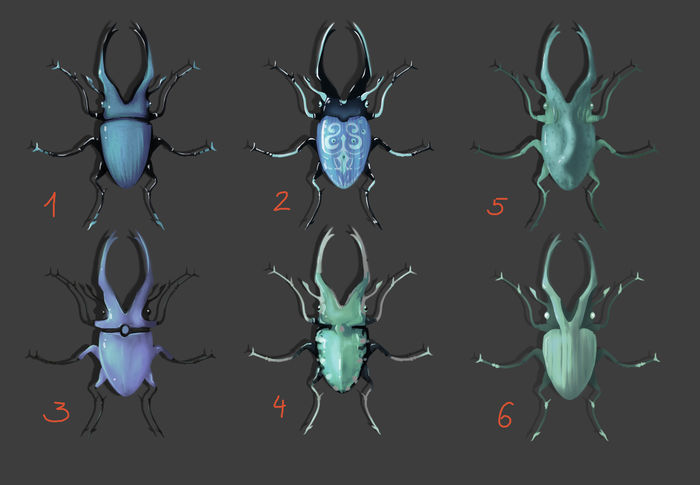
- Make several ideas. Draw multiple variations of your design - minimum 6. Do 20 if you want to impress your teacher.
- The bigger variation between your designs the better. Zoom out so your designs are small and make sure the silhouettes are distinguishable from each other.
- Be quick. 10 minutes max on each design. Establish macro shapes.
- Don’t draw details. Don't finish the concepts. This comes later.
- Sign your concept with the name of the claim and your name at the very beginning.
- Use a grey background to begin with; between 55% B and 80% B.
The first concepts you come up with can be rough but they must be readable and portray your idea.
Do not add color or render a lightsource at this stage.
Avoid drawing in perspective - draw your asset head on. This will make it easier for the 3D artist to model your asset. For armour claims you can find the model turnarounds pinned to the 2D discord channel.
A dance of reviews and revisions (Iterations)
Once you've come up with enough ideas it's time to submit them to the 2D discord channel.
A teacher will give you feedback (as soon as one is available) on your design and how you may improve your work. They may also suggest you read a tutorial or watch a video for your own improvement. Self reflection is important. Which designs do you like and why? Do you feel you're following the prompt accurately? Reflect on your own progress.
Once your work has been reviewed you may incorporate the feedback into your concept and continue refining your design.
And so begins the cycle where you are continuously edging closer to a finished concept with each revision. Design multiple variations of secondary details and ask for feedback again.
- For example, One iteration you design variations of ornaments, details, and decorations you need feedback on.
- Another iteration you come up with a variety of colours and textures you need feedback on.
- And so on and so on until you suddenly have a finished concept. It's important to check in with a teacher at every stage so you don't waste your time on a concept that won't work.
Hot Tip: Number your designs when asking for feedback.
Finishing Your Concept
Clarity is key. A 3D artist who doesn't even know what Skyrim is must be able to look at your sheet and know exactly what to do.
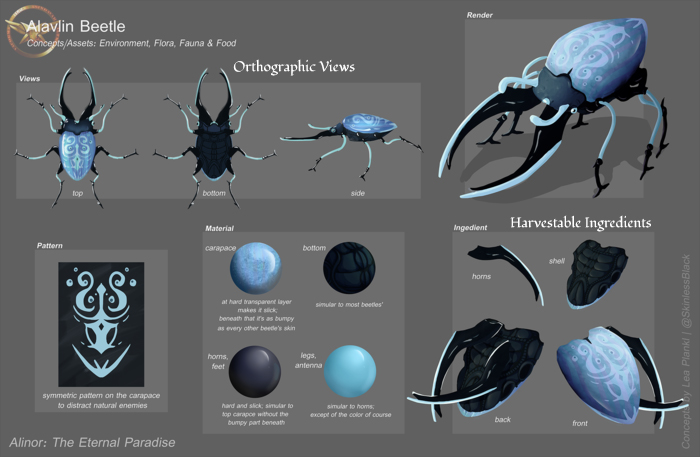
Accompany your drawn designs with material and texture reference images and written notes. How big is it? How does it work? Information that can be portrayed visually should be done so, but you may need to supplement your art with words.
Remember to sign your concept art with your name. You deserve credit for your work and it'll be easier for the 3D artist to find you if they have any questions.
Your finished sheet will most likely need to view the asset from several angles. These are called turnarounds. What angles you need to draw will depend on what you are concepting.
You may include a render (realistic version with light and shadows) in your sheet but it is not necessary nor required.
Final Concept Art Sheet Checklist:
- Your name
- Claim name
- Orthographic view
- Size measurement
- Notes regarding the design that can't be explained visually
- Material and texture image references
- Optional: Additional orthographic views
- Optional: Perspective view
- Optional: Rendered view
- Optional: Detail shots and design alphas
- Optional: Project logo
Not all assets can be designed and portrayed the same way. Read Concept art in the Arcane University for more information.
Getting Feedback
Being a concept artist means you're part of a team.
Receiving feedback and constructive criticism is part of that collaboration - your team members and team lead will offer you a new perspective with new ideas you perhaps didn't even think of. This can be intimidating or outright discouraging to some, but receiving feedback isn't scary. In fact: Feedback helps. Feedback will guide you towards your final piece and may reveal faults in your knowledge and technique that you didn't know you could improve. Having faults is nothing wrong in and of itself but they must be addressed if you want to improve as an artist. Feedback is not derogatory. If you are on a team, it’s because the team likes your work and wanted you there in the first place. It’s not personal attacks against you or your work!
In the Arcane University and your future Modding Project, you will be part of a community. Talking with your team members and helping each other will turn feedback into a network of constructive criticism. It’s not one-sided, it is part of working together, and everyone’s vision is welcome.
If you have concerns that an individual is bashing on your art with malicious intent, please reach out to a teacher, lead, or moderator. However, more often than not it is a mix of a language barrier, cultural differences, and the inability of conveying tone and intent - and not hostile remarks.
No previous art experience?
No problem.Everyone starts somewhere. If you have no previous experience with 2D art, there are a few different ways to get started.
We suggest you avoid starting with a concept claim and follow these resources instead:
- Drawabox - perfect for beginners who have never picked up a pen before, or folks who use traditional tools, this course will teach you control, perspective, and construction of shapes. Show us your challenges in the discord!
- CTRLpaint.com is the library of all libraries. He's got all the information you'll ever need, whether for concept art or illustration.
- FZD on Youtube is a game concept art industry veteran and art director. He offers the knowledge you'll not find anywhere else. Perfect if you're curious about concept art in a professional aspect and how it fits in the production pipeline.
Must-read books:
- Drawing with the Right side of the Brain ( Betty Edwards) - How to overcome symbol drawing and get into drawing as an adult
- Figure Drawing: Design and Invention (Michael Hampton) - Use Forms to build a human body (good add to the draw a box approach)
- Colour and Light (Gurney) - Understanding Colour and how colour/Light Shadows work
- The Noble Approach (Polson) - Great handbook for scene Setup/ Tricks on eye movement/ presentation and simplification
Looking for more? We have a whole collection of recommended libraries and tutorials you should check out on Arcane University: Concept Art Theory and Tutorials
Keep us updated on your work and check in regularly to see if you are ready for a claim.
Materials and Equipment
Recommended software
There’s plenty of software out there you can use for your concepts and new ones are being brought out constantly. You should consider doing your own research on this subject if you are unsure. However here are our recommendations:
Free: Krita or GIMP
Paid: Photoshop (Subscription) or Clip Paint Studio (One off Purchase)
Recommended Hardware
You should consider doing your own research as the market constantly changes. But when drawing digitally you need a tablet and pen. Get a cheap tablet for your first one - it only needs pressure sensitivity. Common brands are: XP-Pen, Huion, Wacom, Ugee.
A tablet with a screen will not make you a better artist. It all comes down to personal preferences. A graphics tablet without a screen can help with ergonomics (you sit straight, the monitor is further away), while a screen can easily force you to hunch over it (bad posture, eyes closer to the screen).
Other popular digital drawing tools are the iPad Pro and Surface Pro.
Traditional Tools
Concept art does not have to be done digitally - traditional tools can do the job as long as your concept reads well. However, achieving these results are harder to do with traditional tools, and revisions take a lot more work. You will need the proper tools regardless of medium. Pencils, fine liner, colors and a ruler is the most basic equipment for traditional concept art.
Concept Art in Beyond Skyrim and the Arcane University
Most Skyrim projects works on a claim basis - meaning they have a variety of assets to choose from that needs to be designed. You choose which asset you want to design - and the assignment is often called a claim. Most projects use Trello to keep track of claims, however others use Excel or other means.
Not all claims can be designed and presented the same way and they are often subject to different expectations. Click on these links for further information on how to do a claim type.
The Test Claim Board in the Arcane University is used to give students access to authentic Beyond Skyrim and Third-Party project claims.
Test claims are, primarily, an exercise. If a student completes the claim and it is of a very high quality, the claim in question can become part of the project. Teachers are allowed and encouraged to use these claims as final exams for students.
For more information regarding this system, please see the #test-claim-board on the Arcane University Discord server.
The Arcane University may grant special Arcane Roles to Students in order to display and honour their hard work, enthusiasm to learn and progression of skills.
Concept Art Tips and Tricks
- Use a grey background for your concepts. It provides a neutral background for the viewer to accurately perceive the highlights, shadows, and colours of your concept. Do not use a pure white or colored background. The grey should be between 55% B and 80% B. (Once your concept is finished you may switch the grey out for a parchment background for a higher cool factor)
- Your canvas size should be approx 3000x3000px in 300 dpi.
- Learn how real things work.
- Screw how real things work!
- Use references for everything. Yes, everything.
- Sometimes you may work on something that is outside your comfort zone. Prioritize the concept over your own interests and influences (f.ex. if you're designing a lion, don't concept an elephant).
- There is no shame in giving up a claim. You're doing this for fun and if your concept isn't giving you joy, consider giving it up for a different one. (Try to not do this too often though).
- Number your designs.
- Experiment with shapes: use circular shapes on 1 design variation, square shapes on another and triangles on another for example.
- Zoom out regularly.
- Harmonize your shapes - don't throw triangles and circles and squares at random into your design.
- "I'm sorry, I don't understand. Could you please explain?" is a valid response.
And last but not least: Take care of yourself, your mental health and your body.
See Also
- 2D Definitions Common terms and phrases in the concept art world.
- Art Theory and Concept Art Resources, Tutorials and Videos
- Architecture Claims
- Armour/Clothing Claims
- Clutter Claims
- Furniture Claims
- Flora Claims
- Fauna Claims
- Tilesets Claims
- Weapons Claims


