User:Gerp
Hi, I'm Gerp. I'm a beginner 3D student in the Arcane University programme.
Here's a guide to converting a Blender mesh to a Skyrim Special Edition NIF:
Blender to Skyrim SE NIF
Do not try to export directly to a NIF from Blender. Instead, we will export to an FBX file, convert it to a NIF, and then adjust it.
If you get stuck, find me in the Arcane University's Discord server and ask for help. :)
Requirements
This is for Windows only.
Download any of these that you do not already have, and unzip the .zip and .7z files (use 7-Zip for .7z):
- Blender 2.83
- Also install it
- If you have textures: Paint.Net 4.2+
- Install it, too
- CK-CMD March 2020 build
- NifSkope 2.0 Dev 7
- NifUtilsSuite 1.2.2
- No need to install it yet
- nif.xml
- For unmovable Skyrim objects: Skyrim_Static.nif
- For movable Skyrim objects: Skyrim_Clutter.nif
- SSE NIF Optimizer 3.0
If you want to verify that your conversion worked (recommended), you also need to install these:
- Skyrim Special Edition
- Skyrim CreationKit
Steps
These are based on this video. If you want, you can use that instead, check here when you run into issues, and then skip to Verification below at the end.
- Make or open your object in Blender, optionally with a colour texture and/or normal map
- If you have a colour texture:
- Open it in Paint.Net
- Resize it so the height and weight are multiples of 2 (example: 4096x4096 is OK, but 6144x6144 is not)
- Export it to a DDS file with BC1 compression in a folder called "textures" next to the .blend file
- If you have a normal map:
- Open it in Paint.Net
- Resize it so the height and weight are multiples of 2 (example: 4096x4096 is OK, but 6144x6144 is not)
- Export it to a DDS file with BC7/DX11+ compression in a folder called "textures" next to the .blend file
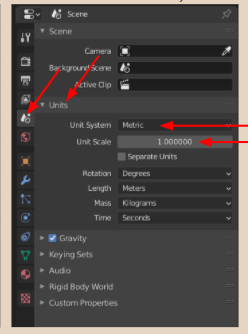
- Ensure that the Blender unit scale is 1.0 and the object is the desired size in your preferred unit system
- Duplicate the object in Blender with Shift+D and then right click to prevent moving it
- Scale the new object in Blender 100x
- Apply all transforms on the large object in Blender by pressing Ctrl+A with the object selected and clicking All Transforms
- With the large object selected in Blender, click File > Export > FBX (.fbx)
- In the pane that appears, on the right side, set these options:
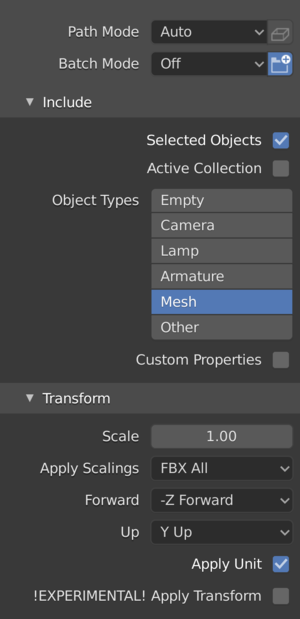
- At the bottom of the pane, click the Export FBX button
- Open the Windows command line by pressing Windows+R and entering: cmd
- In the command line window, go to the folder with ck-cmd.exe by entering: cd <folder path>
- Example: cd C:\Users\gerp\Downloads\CK-CMD
- On the command line, enter: ck-cmd importfbx <FBX file path> -e <FBX folder path>
- Example: ck-cmd importfbx "C:\Users\gerp\3D Models\myobject.fbx" -e "C:\Users\gerp\3D Models"
- This converts the FBX to NIF
- If you have a colour texture and/or normal map:
- Open the NIF in NifSkope
- In the top-left panel, open all hierarchy trees, and click the BSShaderTextureSet entry

- In the bottom panel, open the hierarchy tree
- If you have a colour texture:
- Double click the value column in the first row of the tree, and ensure that it is textures\<colour texture name>.dds
- Save the file, and click Yes or OK if any dialog box appears
- If you have a normal map:
- Double click the value column in the second row of the tree, and ensure that it is textures\<normal map name>.dds
- Save the file, and click Yes or OK if any dialog box appears
- If you have a colour texture:
- Note: you should now be able to see your textures on the mesh
- Open NIFUtilsSuite
- If you have not used the .exe file before, it will ask you for settings. In the first screen, add the files below. For the later screens, just use the defaults
- NIF.XML: nif.xml from Requirements above
- Textures: your Skyrim Data\textures folder (example: mine is G:\SteamLibrary\steamapps\common\Skyrim Special Edition\Data\textures)
- Templates: the folder with either of the Skyrim_X.nif files from Requirements above
- Default Input: wherever you generally want to put your NIFs
- Default Output: same as Default Input
- NifSkope: NifSkope.exe
- Click the Chunk Merge tab
- In the Files > Target-File and Collision-File fields, open your NIF
- In the Files > Template field, select Skyrim_Static.nif for an immovable object or Skyrim_Clutter.nif for a movable one
- In Collision Source, select Mesh data
- In Collision Material, select from the dropdown a type of visual and sound effects for your object colliding with things in game
- Click the Add Collision button
- Note: if it crashes, try making and using a simple bounding box for the Collision Source by adding a cube mesh in Blender, transforming it in Object Mode to barely contain your 100x-scale mesh, applying the transforms with Ctrl+A > All Transforms, and exporting it to FBX and converting it to NIF as above
- Copy the NIF to the same folder as SSE NIF Optimizer.exe
- Open SSE NIF Optimizer, and click the Optimize button
- In NifSkope, open the NIF in the Optimizer folder
- Note: the textures do not appear here. This is OK :)
- Note: if you click the red Show Collision icon button, you should see your collision wireframe in red
- Right click the mesh, and click Mesh > Update Bounds. If a dialog box appears, click Yes
- Save the file. If a dialog box appears, click Yes or OK
- Copy the NIF from the Optimizer folder to your Skyrim Data\Meshes folder (example: mine is G:\SteamLibrary\steamapps\common\Skyrim Special Edition\Data\Meshes)
- If your mesh has textures, copy those DDS files to your Skyrim Data\textures folder


Verification
If you want to see if it worked:
- Open CreationKit
- Click File > Data
- Double-click Skyrim
- If you already have a mod you want to add to, double-right-click it
- Click the OK button
- In the left-side list of the Object Window, select a category or subcategory that you think best describes your object
- In the right side list of the Object Window, find something roughly similar to your object. Right-click it and click Duplicate
- Double-click the duplicated object
- At the top of the new window, rename the object to a single word describing your new object
- Beside the Model field, click Edit
- Beside the Model File Name field, click Edit
- Select the NIF in your Skyrim Data\Meshes folder
- You should see a properly sized and textured version of your mesh
- Click the OK button of both windows, and when a dialog box appears, click No then Yes in the next dialog box
- In the Cell View, double click UnownedCell
- A 3D view of the cell should appear. You can zoom with the scroll wheel, rotate around the selected object with Shift, pan with Spacebar, and focus on an object by double-clicking its name in the Cell View or pressing Shift+F for the selected object
- Drag your new object from the Object Window to the 3D UnownedCell view
- You should see your new object. You can move it horizontally by clicking and dragging it, and vertically by holding Z while clicking and dragging
- Save your mod by clicking the Save icon button in the top left part of CreationKit
- If prompted, enter a name for your mod's file name
- Open Skyrim, and click PLAY
- In the Skyrim main menu, click MODS, and wait for them to load
- Press T and ensure that your mod is selected, then press Esc twice, and click OK if it asks you to restart the game
- You might also need to disable any mods that prevent you from spawning a new character where you want (example: Random Alternate Start)
- In the main menu, press the ~ key, which opens the console
- In the console, enter: coc unownedcell
- This starts the game inside the cell you edited in CreationKit
- You should now see your model from Blender :)