Arcane University:Flora Workflow

Flora has its own unique workflow related to it. Most of the steps described below are similar to the ones used in general 3D workflow. It is worth noting that this is not the only way, however it is as close as possible to the general 3D workflow. This tutorial covers creating custom models of different flora types using the example of Dandelion Flowers (harvestable). However, each of the stages can be used to create others, which are listed below.
Contents
Types of flora models
Harvestable mountain flower in Skyrim
Ingredient picked from mountain flower in Skyrim


- Static plants: these are ordinary static plants that do not require any interaction with the player, an example can be found everywhere in Skyrim - bushes! In addition, they can have a second version of a harvestable plant, as is the case with lavender.
- Grass: very similar to static plants, it contains much less tris. The main difference is already in the implementation and use of them in CK, because they can be painted on landmesh and placed by hand.
- Harvestable plants: often identical to static plants, the only difference is that the player can interact with them, which will result in collecting the ingredient that is in the model. It requires the creation of a model that, after implementation, will "replace" the one containing all the elements with the one that is already harvested. You also need a separate ingredient model, or a part of the model. For example, its flower as an item displayed in your inventory.
Creating the model
If you want to create your own flora model from scratch used as static or harvestable this is the place for you. Sometimes when you don’t need to create things that already exist in the real world you can shorten the whole process by using premade photos of actual flora and assemble them as is shown in “Going back to your 3D software” section.
Gathering references stage occurs regardless of the asset we are trying to create, so you would probably use it in Flora Workflow anyways. At this stage, attention should be paid to the characteristic features of the flora that may determine the final shape of the model.
Basic shapes and high poly

You need to determine basic shapes of a model you want to create. In this particular case, we need to divide our model into separate parts of the plant. We can distinguish the following parts of the model that will be created:
- Stem
- Leaf*
- Petal*
- other if the model requires it.
(*)Could be more than one, it “depends”
Sculpting
Sculpt details on each part of the model you’ve created, such as leaf and petal details, strokes, damages on them, etc.
Attention! This is an extremely important step that is required for texturing as it allows the flora to look natural.
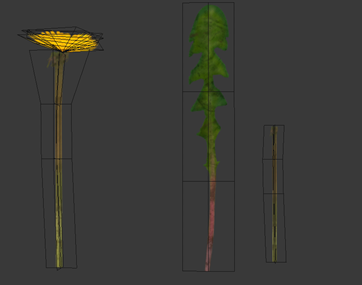
Create plane and retopologize other parts*
You need to create a plane for each element (except the stem – that part goes for the Retopology section in 3D General Workflow) and put them a bit behind the HP part exactly like in example below. (*)If needed, it depends on how the stem and other parts are made.
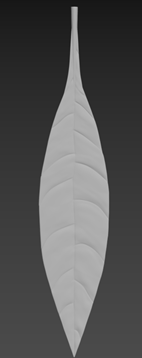
High Poly sculpted details on a leaf part

Plane placement behind high poly model on the leaf


Unwrap UV Maps
Same as always except that you need to unwrap the low poly model of the stem and the low poly planes of the rest of the model parts.
Baking and texturing your model
This part is a little bit different than usual so you need to follow these steps*:
- Bring your LP to your software (in this case Substance Painter)
- Bake HP on LP meshes as "always" with default settings
- Add Opacity channel in Texture Set Settings tab
- Once again bake only normal map with the following settings:
- Dilation width: 0
- Diffusion disabled
- Export baked normal map
- Open your normal map in Photoshop, GIMP, or other software and follow these steps:
- Open the Layer Style window and pick Color overlay, then select white (Normal, 100%)
- Add a new layer, then move it below Layer 1 and fill it with black. Congrats, you’ve just created your own Opacity Map!
- Import your opacity map to your shelf in Substance Painter, attach your opacity map to the slot it belongs to
- Rebake your normal map again with diffusion and dilation set on 1
- Texture your model following the steps from Texturing in General 3D Workflow section
(*)Mainly for Substance Painter workflow, but it could be replicated in other software.
Going back to your 3D software
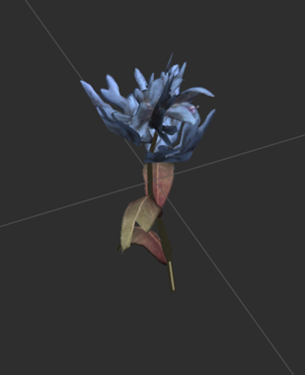
Low Poly parts needed to be made for Dandelion Flower. From left: assembled flower, leaf and separated stem
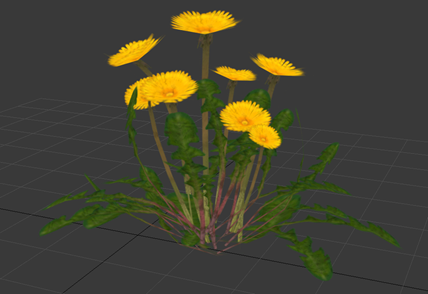
Assembled Dandelion flowers from parts shown above


Now, go back to your 3d program to assemble your model using low poly models and the textures you created. Apply textures on every part of the model and assemble parts that need to be together like stem and petals. Sometimes it needs adding some additional geometry and some manipulation of it to get the best result.
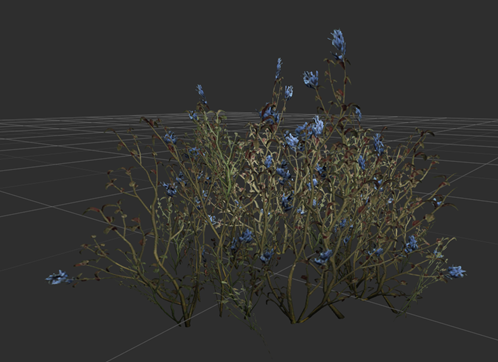
The next step is to set up the whole model using the models made in previous steps. You need to manipulate them to give them some life, it's good to have some variation in size, direction and shape of the flowers, leaves etc. Finished model should look something like model showed in second image at right.
Leaf animations
Most plants should take advantage of Skyrim's leaf animation shader. See the Tree Animations tutorial for more.